Showing posts with label block. Show all posts

Thursday, February 28, 2019

Splendid Sampler II - Mod Bowtie Block

pat sloan very splendid 2 count down 1

The very long wait is over and today is my day on the Splendid Sampler II block tour! It was ages ago that Jane and Pat asked me if I'd like to design a block for their second sampler book. I must admit, I was hesitant at first because I'm not much of a sampler-maker, but it is really hard to say no to Pat. Her enthusiasm for all things quilting and for bringing people together is super infectious and I knew that I'd have FOMO for sure if I didn't get on board! 


As I'm sure you know by now, the blocks are only 6" finished. I decided pretty quickly that I wanted to make something fairly simply design-wise. Something involving technique, but not so difficult or tricky that people would shy away from trying it. Finding ways to re-imagine traditional quilt blocks is fun and creative for me, so that's the approach I took.  I decided to incorporate my favourite way to applique bias 'binding' into the design.  The word binding is in quotes because you don't actually have to purchase special pre-made binding, or a bias making tool, or burn your fingers folding a skinny bias strip of fabric under a big iron.

Mod Bowtie, page 114 in Splendid Sampler 2

In fact, you don't even have to sew a curve! This block couldn't be easier to construct! One square, two quarter circles, two bias strips, fabric glue and coordinating thread are all you need. The possibilities for creating fun layouts using just this one block are exciting and something I hope to explore one day.


If you are sewing along with the Splendid Sampler 2 bloghop and you haven't yet acquired a 6" bias trimming square, I'd consider treating yourself to one! I love my bias trimming squares (I also have a 4" and 8" one in my ruler quiver).

I started out all keen and ready with a beautiful selection of Carolyn Friedlander voile prints combined with Oakshott shot cottons to make my blocks. Then I made 3 (badum-bum). These small blocks are great skill builders and I have every intention of choosing a selection (maybe 36?) of them from the book to make a wall hanging. I'll be bringing supplies to a retreat in March, so it's possible some blocks will happen there. So many of my talented friends have blocks in this book, so I definitely want to try all of their designs!

Thanks so much for stopping by. If you make a block, I'd love to see it on IG in the #splendidsampler2 group! Don't forget to add your block to the Splendid Sampler2 website for your chance to win this week's giveaway. Join the supportive Facebook group HERE.  


Happy Sewing!


Sunday, June 10, 2018

A Splendid Sampler V.2

The first half of the year has been a blur and I'm only just emerging from major volunteer commitments at two more quilt shows here at home. I need to tell you all about The Splendid Sampler 2 sew-along!! 

I was so pleased when Pat and Jane asked me to participate in their second sampler book (of 100 six inch blocks) after suffering a mild case of FOMO when the first one came out. Although I'm not really a sampler person, I just love being part of fun things when lots of other quilters are involved! Meeting new quilt-folk is a favourite pastime of mine - it is always a life-enriching experience. Sometimes it's hard to grow your circle without pushing yourself a bit and designing a tiny 6" block is a bit pushy for me, actually. After the last few years of (mostly) improv work where I just start cutting and sewing and playing on the design wall, it is a surprising challenge to focus small and design something contained.

B1467 TheSplendidSampler2 WEB

I have to keep my little block a secret for a veeeeeeeery long time, but until then I will be trying my best to sew along with the many other designers involved in this book. There have already been many posts about it (like selecting fabric and announcing the 1-wee countdown to the 20-block freebie sew along here). Check the links because there are fabric and book discounts there!


Follow along on the Splendid Sampler dedicated blog for all activities and announcements. It's time I did the same and got up to speed on everything that's happening! There are links in the header of the blog to galleries featuring stunning quilts made with the first book. You'll likely get lots of fabric inspiration there. I'm just in awe of people that can stick with such a big project and finish the quilt - that is definitely not my modus operandi.

I'm going to attempt my blocks in single colour stories using shot cottons from my Oakshott Colourbox purchased during a sale several years ago and lovingly dipped into for rare and special projects. I don't have tons of this fabric, so I plan to be a bit selective. I know making ALL of the blocks will be too much for me to stick with and I'm admitting that right up front.  Initially, I planned to skip all of the applique blocks because I never seem to finish applique things that I start (I tend to lose interest after all of the prep work).  However, this past weekend at my traditional guild show, I had the pleasure of meeting Rosa, the incredible designer of the Apliquick system. I purchased some of her amazing applique tools and notions, so hopefully I'll get to bust them out and try some new to me techniques for hand applique on some of these blocks.

What about you...do you enjoy the challenge of making a little block every week? Do you love sampler quilts?  Is it meeting new designers that gets you excited about a group activity like this? Let me know in the comments!


Saturday, September 9, 2017

Mill Town Block

It is September! So much is happening around here, but first thing first: it is time to share the block I designed for Sew Sisters Canadian Sampler Quilt!  I was so pleased to receive an invitation to participate in this BOM project. Not only do I love Canada, but I share a birth year  and month with my country (albeit 100 years later, but who's counting?) AND I've always wanted to make a two-colour red & white quilt. Canada's 150th birthday seems like the perfect occasion to finally get busy with it. In addition, all of the blocks in this quilt were designed by fellow Canadian blogger/designer/quilters, many of whom are good friends and sewing buddies of mine. It truly is the best celebration of quilting in Canada for me.

MILL TOWN
I don't really consider myself a block designer, but this design is something that I'd been playing around with when my friends at Sew Sisters sent out the invite to play. Read all about my Canadian inspiration for Mill Town Block on their blog here. 

A new round of BOM is starting up soon for this amazing quilt, so if you missed out the first time, you've still got a chance to receive two exclusive patterns per month for 10 months, BUT you have to be quick. Registrations close this month! To see an image of the entire quilt with all of the wonderfully unique blocks, check out the program details here.

I'm regretfully behind in making my blocks every month as the patterns arrive. Luckily I have a retreat coming up next weekend and I'm looking forward to catching up. I already have a setting idea and I can't wait to see if it works out...time to fire up the precision piecing engine. For sure I'm going to tune-up before I begin.

Have you made a special quilt commemorating Canada's sesquicentennial? Tell me about it!

Thursday, February 9, 2017

The Canadian Sampler Start

Last year I was invited to participate in a very exciting and patriotic project organized by the clever people at Sew Sisters, a long time partner here at Poppyprint. Having been born in the summer of Canada's Centennial year, it has always been easy to keep track of my milestone birthdays because there's typically a national event around every biggie.  So you can easily guess the whopper of a birthday I'm celebrating this summer!

The Canadian Sampler celebrating Canada's 150th birthday is 100% Canadian designed (by designers from coast to coast) and administered by the folks at Sew Sisters*. You can still sign up! While not generally keen on BOM's or sewalongs because I always lose interest before completing these projects, I have the extra incentive of always wanting to make a red and white quilt. At first I considered going all scrappy red, but most of my stash leans towards orangey reds. Instead, I chose Karen Lewis' Flowerbed print (on gorgeous "Chinese Red") from her first line of commercially screened Kona. The unique block designs don't scream Traditional Sampler to me. I like it.  I'm making it.

Here's the first block, designed by Daphne Greig. It is called Pacific Stars.  The beginning of this work coincides with a short lecture I'm preparing at the request of the VMQG board on the importance of accuracy. As I mentioned on IG the other day, sometimes it feels good to try hard (after a lot of improv work!).

The Canadian Sampler blocks from Sew-sisters.com

The Canadian Sampler blocks from Sew-sisters.com
One of the tips I'll be sharing is to piece with geese points on top, to ensure you don't cut off your points with the seam. You can see on the left white point, my seam fell just outside the point (yay) and on the red point, my seam fell exactly on top of the point (which will require a good press). Both worked to preserve the point.

The second block designed by Sandy is so cute. A very appropriate element of the Canadian winter uniform, the toque! We've been wearing way more toques than ball caps out here on the west coast this winter. People are so tired of the snow, but not me. I find it much easier to get through this time of year when the ground is white and the air is crisp. I love snow and always will.

The Canadian Sampler blocks from Sew-sisters.com

I'm not sure what month will feature my block design, but I'm looking forward to it because I've designed a very cool quilt with it that I'm eager to share. 

*I would like everyone to know that Sew Sisters very fairly compensated all of the designers who worked on this quilt, which is much appreciated in this industry that constantly asks designers to work for free.

Saturday, April 11, 2015

The Orange Grove Quilt


In my blog hop kick off post, I wrote about 3 of my projects in Make It, Take It. You can also find more background information on the inspiration behind the book in this post.


My final project in the book is Orange Grove, a 71" square quilt featuring a modern layout and colouration of the very traditional Pinetree block. This block has long been a favourite of mine and for years I've thought about creating a modern version with bright, colourful pine trees set on point (very different from the typical forest green and brown trees that you see in older versions).

Martingale - Make It, Take It (Print version + eBook bundle)
Photo Brent Kane for Martingale, Inc. All rights reserved.

 It was long-arm quilted by the amazing Krista Withers. Her masterful quilting really shines in the negative space of this quilt!  In particular, I love how she created quilted 'ghost blocks' between the pieced trees - first by outlining the square with a 1/4" echo frame and then filling each one with a unique design.  I was so happy that she included her signature moon motif in the upper right corner. This quilt could be coloured in so many fun ways; it would look amazing in multicoloured shot cottons.  I've got a full set of blocks in rainbow colours made by my Stash Trad bee-mates that I look forward to piecing into my second version.

Longarm quilting by Krista Withers

In the book, you'll find a tip box describing an exciting retreat activity you can do with these blocks and others.  You'll also get to feast your eyes on amazing details shots of Krista's quilting, which is truly breathtaking. Seriously, when I hold up this quilt at trunk shows people literally gasp!

Longarm quilting by Krista Withers

AH-MAZING


Wednesday, October 15, 2014

It is October, right?

Travelling over a change in month can be so disorienting. How is it mid-October already? Since returning from Italy, we have celebrated B's birthday and Thanksgiving. Next up is Hallowe'en!

The Vancouver Modern Quilt Guild often holds a block raffle at our meetings (one completed block = one raffle ticket to win a set of blocks). Every year I make tons of Hallowe'en blocks to enter, because I really want to make a Hallowe'en quilt! Alas, I've never one the Hallowe'en lotto. This will be my 4th attempt, so wish me luck.

I spent some time over the long weekend playing with scraps. Here's one of the blocks I made using some Oakshott Colourshott scraps from my Chess on the Steps quilt (speaking of which, go look at the incredibly playful All the Colours Quilt Leanne made using my pattern!).

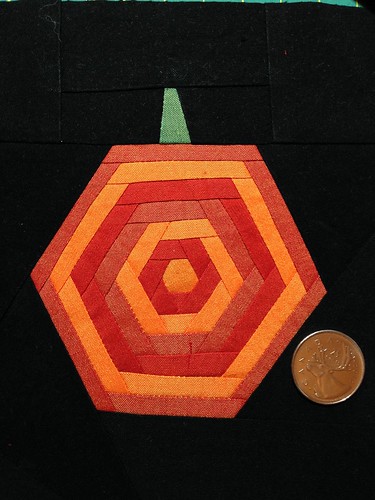
Hexy pumpkin 6 1/2" block made with Oakshott Colourshotts for the VancouverMQG Halloween block exchange.

I used a 1/2" hexy to start and pieced 3/4" strips log-cabin style in rounds. So fun!  Our blocks have to be in size multiples of 6" finished, so this one is actually 6 1/2" square, but I've zoomed in on the pumpkin for the photo.

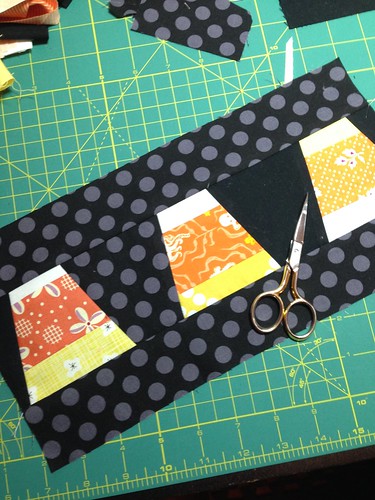
Scrappy candy corn pieced then cut with my GoBaby Accuquilt tumbler die.
apologies for pretty awful night time phone pics - it's dark and stormy here today!

For this 6 1/2" x 12 1/2" block, I first pieced some strips together and then cut out tumblers using my Accuquilt Go!Baby for some scrappy candy corn. I liked this so much, I made three more similar blocks. The meeting is next Monday night and I will let you know what happens.

I'm slowly making my way through holiday photos, editing, labelling and uploading. I'll be able to post some soon!

Friday, December 20, 2013

Winner, winner, Christmas dinner!

I felt so lucky (and for a moment, a little guilty) for winning the block lotto at my annual November retreat last month. I've been running this retreat for 8 years and never won, so I guess it was bound to happen. Can I just say how happy I am that it was this year? Happy, happy, happy!  Katy's Christmas scrappy trip inspired me to set the Scrappy Trip Around the World block as this year's lotto - it's a super quick make and everyone's got holiday fabric to use up!


Although I'd been sewing with my pals for 4 days non-stop, I returned home Monday night and put the blocks right up on my design wall. There were 30 blocks, so a 5 x 6 layout made the most sense. The odd number across the quilt meant I couldn't use the 'normal' diamond setting. As much as I love this block, I didn't really feel like making 6 more - I just wanted to get this thing together in time for Christmas! Using the strong diagonal reds, I opted for zigzags.


I busted out the wiggly stitch on my Pfaff for diagonal quilting lines through every second square. The wiggly stitch is excellent for diagnonal lines on a quilt with 2" squares because you don't have to mark the quilting lines!  Just aim for the corners of each square and you're all set. The wiggly line doesn't have to hit the corners dead on like you'd want to do with straight-line stitching.


I considered a flannel backing, but also had yardage of this super soft Kaffe Fasset shot cotton in green that's been lying around for years. Using up stash won over buying new flannel and I framed in this extra block with some Kona red so that there's a sweet little present on the back. The binding is a sweet candy cane stripe that was printed on the bias that I've been saving for just this kind of quilt (JOY by Kate Spain for Moda).


All washed and cuddly and keeping us warm on the couch!

Saturday, June 29, 2013

Logcabinitis

I've got it bad. I've always loved log cabins (and vow to live in one before I die), and log cabin quilt blocks, too. Why I have never made a log cabin quilt is beyond me. I've made variations, but never a traditional style one. It's on the list....the very LONG list!

So, when I set out to make my slabs for Cheryl and her Recover Southern Alberta relief effort, no matter how hard I tried to make slabs (or crumb blocks as they are sometimes known), I just kept coming up log cabins!

15.5" slab blocks by Poppyprint

One problem is that most of my scraps are larger in size, or already cut into strips. It seems counter-productive to cut them smaller, but that's what I had to do.

15.5" slab blocks by Poppyprint

I started to get the hang of it and was posting my blocks to Instagram when Cheryl commented to try and make smaller slabs, then join them together. This was very helpful, because I was always thinking about the block as a whole 15.5" hunk as I built it.

Finally, my pink scraps lead me to success:

DSC_6669

These blocks took about 30 minutes each and are completely addictive to make. I have to really tear myself away from making more because my TO DO list prior to leaving for the Fat Quarterly Retreat in London is still rather long. I know there are many who are busily making slab blocks to send on to Calgary, are you? Cheryl is hoping to distribute quilts in early September so she needs blocks in August.  Mine went in the mail yesterday.

I've heard many families might be out of their homes for 6 months or more which is heartbreaking news. I know these quilts will bring comfort to people living out of hotel rooms and trying to rebuild their lives. Thanks to Cheryl for facilitating this project so we can help from far away.

Monday, May 20, 2013

Tiny Pink Penguin Quilt in the Bloggers Quilt Festival

This is my second quilt entry for Amy's Bloggers Quilt Festival. The first is here.

I am beyond tickled to be able to share this quilt in the Blogger's Quilt Festival Group Category.

This special quilt was made by 30 women. Most of us have never met in person. All of us love Ayumi Takahashi, the generous creator of Pink Penguin blog and most recently Patchwork Please! a must-have Zakka project book.  When my suspicions were confirmed and Ayumi publicly announced her pregnancy last fall, I got straight to work on a Flickr group of people I knew would want to help make a special quilt for her and Joe's baby.  Many more names of helpers were suggested by members of her online quilting bees and swap friends. A very happy discussion thread allowed us to settle on an alphabet quilt design using Kumiko Fujita's Patchwork 318 book for many of the blocks. Ayumi loves Kumiko and her style of quilting! Since the book is out of print, impossible to find and only 6 people in the group own a copy, Ms. Fujita graciously gave us her permission to share her alphabet and motif designs with each other. Several of the motif blocks were designed by members of the group 'specially for this quilt.

Ayumi is Japanese and speaks English. Joe is American and speaks Japanese. We know this baby will learn both languages and hope this sweet quilt will provide many hours of happy learning and eye-spy fun.

The most amazing gift ever!
quilt photo by Ayumi

K is for Kite  K
Here are the two blocks I made - the kite is my first attempt at designing a foundation pattern.

Over the course of five months and on a few continents, 56 quilt blocks were constructed. 54 of them were successfully mailed to me....IN CANADA...this is quite a shocker considering our super slow postal system.  Participants also provided scraps for setting squares so that I could sash and assemble the blocks with an assortment of fabrics in Ayumi's style. Lori Holt provided her bias gingham for the backing (a print Ayumi loves). Berene provided the sashing and binding.

The Back

I considered several quilting options, but in the end just went with straight diagonal lines with white thread to accentuate the layout and let the sweet blocks shine.  Initially, one member of the group had planned a trip to Japan and the quilt was to be hand-delivered, but when that didn't work out we held our breath and went with good old mail (I did drive across the border and leave it, nervously, in the hands of the USPS). Within a week, the quilt was in Ayumi and Joe's hands!

The most lovely quilt put together by my friends!

You can read all about Ayumi and Joe's receipt of the quilt, see more photos and read Ayumi's unbelievably sweet thank you messages that identifies all of the quilters and the blocks they contributed, here. Please do!

DSC_6377
Sweet label embroidered by Jesse in England

All folded and ready to go!

For me, this quilt epitomizes the concept of a "group" project. It is not something I could have completed by myself before the baby started elementary school, but more than that, it's got the love and best wishes of a caring community stitched right in. The perfect gift for a Tiny Pink Penguin coming soon. The added bonus is that I got to meet a lot of new friends in the process and feel a tremendous amount of support from everyone.

Check out the rest of the festival entries, nominate your favs and vote!

AmysCreativeSide.com

Thursday, April 25, 2013

Jigsaw Love

In February, the VMQG block challenge theme was hearts, hot pink, orange and linen. Members were to make blocks and challenge themselves with a new technique in their block construction. There were lots of people who have never worked with linen before (hello, swishy fabric!). We got some amazing blocks back for our group quilt!

VMQG hearts challenge

I volunteered for first crack at jigsawing the blocks together. My idea was to put a bit of structure around some of the hearts with an improv log-cabin feeling...more like little borders really. I didn't want to go all crazy wonky since this will be passed on to other guild members and it's no fun getting an un-square, totally insane partly finished quilt top to work on!

VMQG hearts challenge

My block contribution is the bias appliqued string of hearts. I've always wanted to try applying a folded (wrong sides together) bias strip by sewing along the cut edges, then folding the strip over the seam (concealing the raw edges) and appliqueing the folded edge down.  No bias bars or bias tape making gizmo necessary. It took some planning to get the heart shape right, though. This is a great way to apply stems and vines by machine, too. I first saw this method used by my pal Double N Dianne on a sweet 1930's repro quilt she made.

Cross my Heart by Poppyprint

I can't seem to find any photo tutorials for this in a google search. If anyone knows of one, please share a link in the comments and if not, I could take a few pictures to show anyone who is interested!

Sewing is taking place here, but it mostly involves circus costumes these days (not very exciting since all I make is the basic bodysuits). The big show is in a couple of weeks and we've got lots of work to do! I've also finished a very special quilt but I can't share it quite yet. Hopefully in a couple of weeks.  

In the meantime, the sun is shining and Vancouver gardens have exploded into spring bloom. It's just gorgeous here now! I hope spring has sprung in your town, too.

Thursday, January 17, 2013

The Anti-Voodoo Block Piecing Tutorial

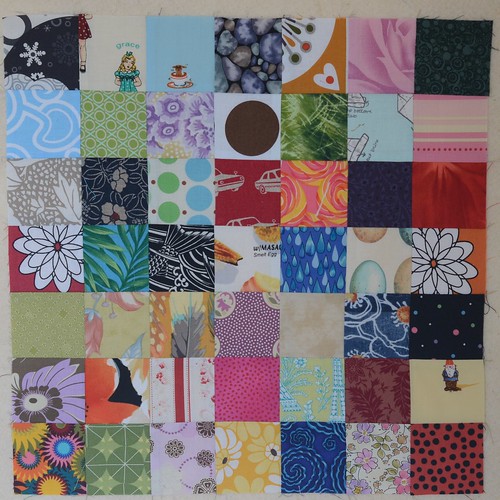
Have you ever experienced that mysterious voodoo that occurs between your design wall and your machine such that a perfect layout becomes totally mixed up and wacky once all your blocks have been carried to your machine and sewn together?  I don't know what happens, but time and time again, I swear I'm sewing the correct block to a row, or the right row to the bottom of the quilt but it'll end up bass ackwards or upside down or in some other crazy, unintended orientation.

Many years ago I took a Quadrille Twister class from former CQA (Canadian Quilters' Association) Teacher of the Year Dianne Stevenson. In that workshop, I learned what I believe is the BEST technique for sewing blocks or quilts of like-sized squares together.  Dianne learned the technique from someone else and was very happy to share it and now I'm passing it along to you.  There's a good chance someone else has done a tutorial on this already, but I've never seen one. Pluse, posted a very brief Instagram photo tute the other night and some of my friends asked for more details.

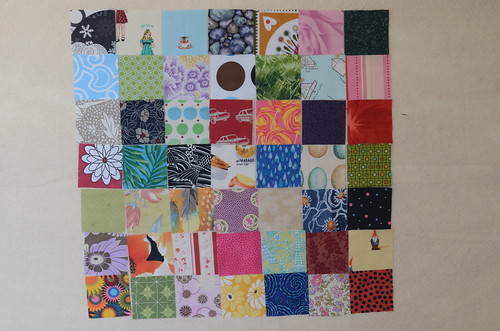
In my last post, I told you about the thousands of 2.5" squares that I cut from my unwanted, older, not-intended-for-any-other-projects fabric. I am very happily using all of these squares to build a Scrap Vomit quilt. At 49 patches per block, there is ample opportunity for the voodoo to creep in (not that it really matters with scraps).  Piecing this could be a tedious bore.

Enter: The Anti-Voodoo Block Piecing Tutorial.

I'm going to show you how to do this with little 2.5" squares, but it can also be done with an entire quilt of 10" blocks, or even a whole charm pack of 5" squares that you want to whip up into a baby quilt.

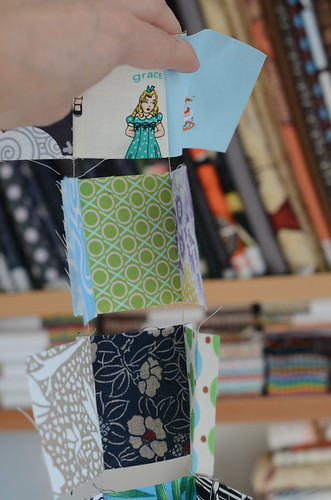
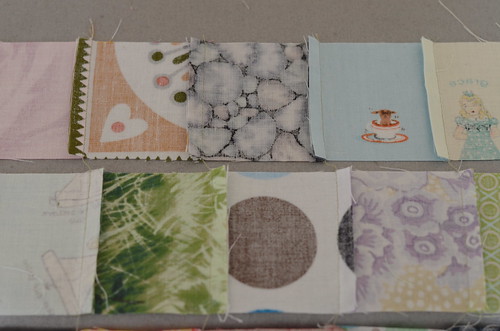
1. Arrange your squares on a design wall (or if small, beside your machine on your table).

Efficiency Piecing Tutorial

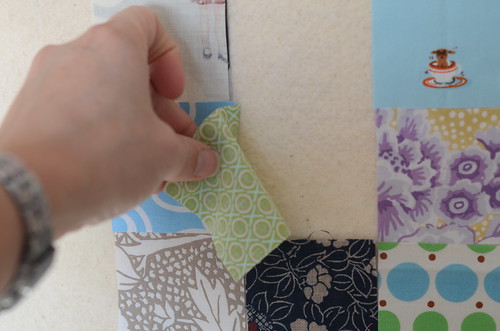
2. Turn column 2 squares over to the left so that they are RST with their column 1 neighbour.

Efficiency Piecing Tutorial

3. Now all column 1 squares are covered by their column 2 neighbours.

Efficiency Piecing Tutorial

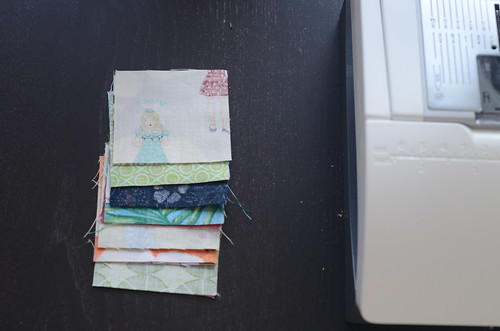
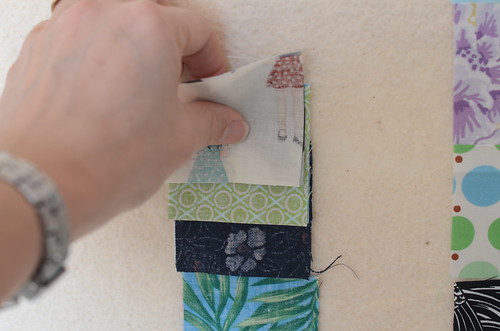
4. Pick up the first set and keeping it on top, gather the sets below it in order from top to bottom.

Efficiency Piecing Tutorial

5. Now lay the sets beside your machine, ready to sew in order from top to bottom.

Efficiency Piecing Tutorial

6. Sew the first set of squares together. At the end of the seam sew a few stitches 'in the air' before feeding the second set in (chain piecing). We are not cutting any threads until we reach the end of the sets!

Efficiency Piecing Tutorial

7. At the end of the sets, remove from the machine. You've got a chain of 2-patches!

Efficiency Piecing Tutorial 

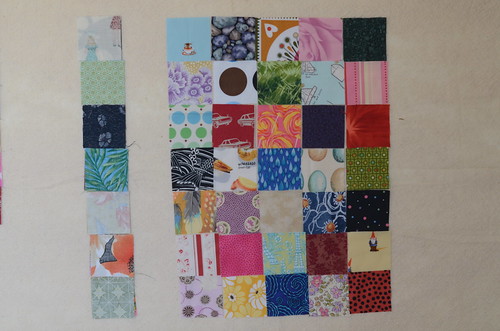
8. Now stack your 3rd column squares, keeping first square right side up on top, and the rest of the column in order from top to bottom.

Efficiency Piecing Tutorial

9. Take them to your machine and piece them in order to their 2nd column neighbours. I like to sit them on my machine bed, to the right of the needle so they are easy to grab.

Efficiency Piecing Tutorial

10. Now you've got a string of 3-patches that are starting to look like rows.

Efficiency Piecing Tutorial

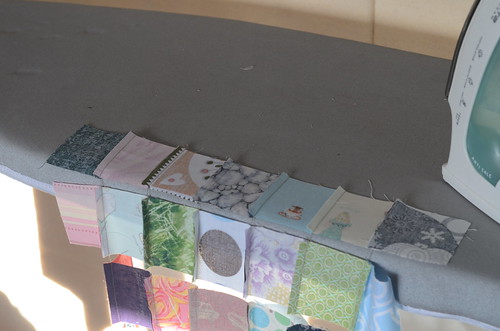
11. Continue until you've added all of the columns and you've got your entire block's worth of rows all joined together by their piecing strings. Take your rows to the ironing board and with the wrong side up, lay the top row on the board with the other rows hanging off the front of the board.

Efficiency Piecing Tutorial

12. Press all seams in one direction, then pull the second row up onto the board and press all seams in the opposite direction. Continue until all rows have been pressed in alternate directions. I like to hold on to the last patch of the row to give a little tension as I'm pressing, making sure that each patch is fully pressed out from the seams.

Efficiency Piecing Tutorial

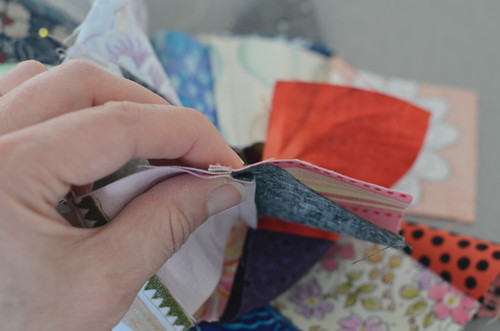
13. Now you're ready to sew the rows together. Nestle the opposing seams together (I like to pin before the seams, just to hold the seam allowances down as they approach the presser foot). I pull my pins out just before sewing over them. Don't worry about those 3 or 4 stitches that you sewed in the air; there is no need to clip the thread, unless of course you want to.

Efficiency Piecing Tutorial

14. Once all of your rows are sewn together, press the seams in the direction that makes sense for your project. In other words, so that the seams of neighbouring blocks will be opposite, allowing you to once again nestle seams and get nice, tight intersections between patches/blocks.

Efficiency Piecing Tutorial

There you have it! Now I am sure some of you will have questions about pressing seams open and I really don't want to get into a huge debate (that's a dead horse that's been flogged many times before on various blogs!). I am a side presser. Always. Except when making wallhangings, or very complicated foundation pieced blocks, or blocks with a crazy number of intersecting seams that would leave a massive lump if you tried to cram them all over to one side.

Let me put it this way: if you want to sleep under your quilt, throw it in the washer and dryer, drag it on picnics, built forts with it, take it to the beach, let your cat knead it into a suitable bed and snuggle underneath it on the couch, then why would you want to expose your piecing threads between each patch? I like my thread nicely protected under a seam allowance, thereby giving my quilt a fighting chance at longevity. Not to mention that every time you have two open seams meeting at right angles, there is a teeny, tiny hole in your quilt top!  I'm not saying pressing open is wrong. I just think pressing to the side is going to help my quilts last longer. 

Plus, those Old Ladies that Know Stuff told me to do it that way.

Saturday, November 24, 2012

Bee Finished

Well, it isn't long now until the end of the year and I'm pleased to say that I kept my bee commitments and made 24 blocks (21 for other people) in two bees this year. That's it for me, at least for now. I've got four quilts (or parts of quilts) worth of bee blocks in my sewing room and I won't sign up for any more bees until I've done something with them!

To re-cap, here are the blocks (below) that I enjoyed making for the Stash Trad Bee. The idea behind this one, started by Lynne, was to make traditional blocks from our stash of modern fabrics, using a specific background colour decided by the 'person of the month'.  There were several personnel changes throughout this bee, but I enjoyed meeting a few new people and making blocks for some great flickr & blog friends.

Stash Trad blocks by Poppyprint 2013

The Pine Tree block in the bottom right corner is the one I made as an example for my own month. I am most excited about putting this quilt together. The Pine Tree block has always been one of my absolute favourite traditional blocks and I had everyone make a single colour scrappy tree for me. It's going to be a rainbow forest when it's together....of course I want to make six more blocks for a layout of 18 blocks sashed on point.  I hope to work on that over a weekend retreat with friends in early March.
The second bee was very different. The group was put together by Lynne again and for a few of us, the concept was a real stretch!  The Free Bee meant free-piecing, improvisational quilt blocks. Some members (myself included) showed a photo for inspiration and included colour suggestions, others used inspiring quilts made by other artists/quilters as a starting point, one person chose a theme of urban landscapes and another Provencal doors & windows.  It was a lot of fun! We made a triangle block, a curvy strip block, square blocks & rectangle blocks.  

Free Bee Blocks by Poppyprint 2012

Looking at the mosaic, I guess most people chose solid or hand dyed fabrics for their month. Improv piecing is exciting (you never know what you're going to end up with!), but also not as easy as it looks. Random can be rascally. And mixing a bunch of colours together is tricky for ye of little colour theory!

So, that's it. I bee done.

And now friends, I will share with you that this is post #499 for me. Yup, it's taken me three years to get here, but my next post will make it an even 500!! That calls for a giveaway and here's a hint: I'll share something I've recently made. It's been published. It's adorable. It should arrive at the winner's home just in time to add some holiday decor. Followers will get a second entry, so come back Monday for your chance to WIN!
Monday, October 15, 2012

Blocks for October

The Vancouver MQG held a Friday night sew-in last Friday and I took the opportunity to sew with Agatha  for the evening. Agatha is my trusty Singer Featherweight that belonged to my late MIL and was generously given to me by my SIL. I just love piecing with this little machine.
Free piecing with Agatha

Tonight, the VMQG will hold it's annual Hallowe'en block draw.  Guild members can bring as many blocks as they like (blocks must have a finished dimension of  6" or multiples of 6"). You get one entry for every block you put into the draw and if your name is drawn you get to choose a number of blocks to take home. Last year I made 6 blocks and came home empty-handed. This year I've made three 12 1/2" blocks, but I won't be able to attend tonight so I'm sending my blocks with Berene and counting on her good luck to bring a set back to me!

free pieced pumpkin block by Poppyprint

free pieced pumpkin block by Poppyprint

I free-pieced both of these pumpkin blocks with scraps from my orange box. I love free-piecing because you never know what the end result will look like until you get there.  I'll also send along a duplicate of this Great Granny Block that I made for Cindy in the Stash Trad Bee this month.

Granny Says Boo! for Cindy

Have you got any spooky stitching going on for Hallowe'en? I've always wanted to have a Hallowe'en quilt, but never made one. Maybe this'll be my lucky year for a set of blocks to get me started!