Thursday, January 13, 2022

The Tote Tute

To help launch 2022 and what will (hopefully) be a return of my creative energy after a very long pandemic-induced hiatus, I'd like to share this free canvas tote tutorial with you! This also coincides with the City of Vancouver's long-awaited plastic shopping bag ban. If you can sew a straight line, you can make this simple pattern. The tote is unlined, but has French seams, a wrap around strap and no bottom seam for extra strength. Simple canvas totes are currently super popular with high school and university students; keep this in mind as a great gift for the student in your life, or their teachers!

If you would like to make totes from this pattern and sell them at a home crafter's (i.e. non-commercial) scale, please purchase the comprehensive Licensed The Tote Tute .pdf pattern from my Etsy shop for the awesome low price of $12 Cdn. 

If you purchase the crafter's license pattern, you will receive an invitation to join me in a 90-minute Tote Tute ZOOM sew-in from 10 a.m. to 11:30 a.m. on Sunday, February 27th! In addition, for a limited time, everyone is welcome to use the code POPPYPRINT for a 15% discount on lightweight 1˝ cotton webbing, Tula Pink webbing and zippers, charms and pulls at Zipper Valley! They will be bringing in 1˝ wide seatbelt webbing the first week of February if you'd like to wait for that. If purchasing strap materials from Zipper Valley, you'll need to buy 4 yards and put a note on your order that you need a continuous cut.


This tutorial is mostly photographic. It is not a difficult project and doesn't require that much in the way of fabric. In fact, you can make 2 totes from just one yard of canvas if your pocket is from the same fabric as the main body of the tote.

SUPPLY LIST

17" x 34" cotton canvas for main tote body
7" x 14" cotton canvas for pocket
120" continuous cut of nylon or cotton webbing 1" wide for strap
1" square cork label, scrap or 1" hemmed fabric scrap 

coordinating or contrasting 40 wt thread
90/14 topstitch needle
glue stick

NOTE: This tote is made from one long piece of canvas folded in ½ to avoid a bottom seam. If you have directional fabric, it will be upside down on one side of your tote. This is the same for the pocket, but you can place the upside down part on the inside of the pocket where it won't matter.


Prepare the Pocket

Fold the pocket piece right sides together, aligning the 7" raw edges. Sew the 7" top of the pocket with a ¼" seam allowance. Press open. Turn right side out and press the top seam and bottom fold.


Baste the sides closed and topstitch the top edge of the pocket by sewing up one side, across the top seam and down the other side with an ⅛ ˝ seam allowance.


Prepare the Tote

Hem the two 17˝ edges of the tote fabric. Turn under ½˝, press. Turn under another 1˝ and press again. Pin the folds in place. Topstitch both folds from the wrong side with an ⅛˝ seam allowance. I use a very skinny topstitch foot on my Juki for this task (you can see it in the photo below).


Now fold the tote in ½, bringing the hemmed edges together at the top. Press the bottom fold to leave a crease, so that you know where the centre of the bottom is when you create the gussets later.

Attach the Pocket

Pin the pocket to the centre front of the tote with the top of the pocket 4˝ down from the top hem of the tote (make sure you pin through just one layer of the tote!).  Attach the pocket to the tote by sewing down one side, across the bottom and up the other side with an ⅛˝ seam allowance, backstitching at the top edges of the pocket for extra strength.


Attach the Strap

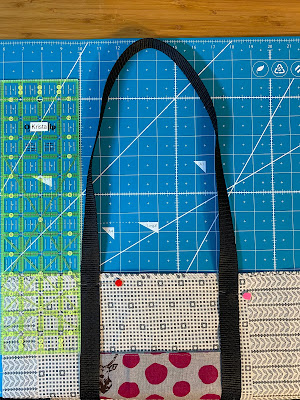
Pin the strap to the tote beginning about 1˝ below the right bottom corner of the pocket, overlapping the raw edges of the pocket by about ⅜˝. I use a 4˝ ruler to help keep the strap parallel to the edge of the tote. 


Leave a 12" handle at the top of the tote, taking care not to twist the strap as you bring it back onto the tote. I lay the tote on my cutting mat with the top edge on the 6˝ line and make sure the apex of the strap is at the 18˝ line.  Bring the strap back down the other side of the pocket and off the opposite hemmed edge, making the second handle. You are effectively making one giant loop of strap on the right side of the tote.


Trim the strap ends so that they butt together without overlapping. If using nylon, you may wish to run a lighter over the ends (in a well ventilated area) to burn the edges and prevent fraying.


Topstitch along both edges of the strap with a 1/16˝ seam allowance.When you reach the hemmed edges of the tote, sew a 1" square with an X in the middle for extra strength. You may have to double sew a line or two as you work your way around the square and X. Pivot with your needle down when changing direction at the corners. I don't mark anything. I just overstitch the hem seams as a guide for the square.


With a gluestick, affix a 1" scrap of cork or label over the strap ends and topstitch in place with a 1/16˝ seam allowance. I ordered my logo labels in Canada from Brickbubble.


French Seams

With the tote right side out, pin the sides and sew with a scant ¼˝ seam allowance. 


With a ruler and rotary cutter, trim any fraying threads from the seam allowance. Press the seam open.


Turn the tote inside out and press the side seams. Pin in place and sew the side seams, backstitching at the top, with ⅜˝ seam allowance. This will fully enclose and protect your previous seams.


At the bottom corners of the tote, mark a 1 ½˝ square bordered by the side seam stitches (NOT THE SIDE OF THE TOTE) and the bottom fold (check the ruler lines in the photo below).


Cut out the square on the marked lines. Take a moment to reinforce the side seam where you cut the stitches with a few back and forth stitches.


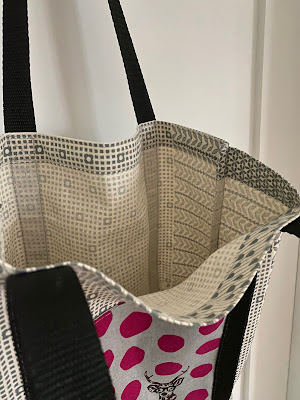
Turn the tote right side out. At both bottom corners, bring the side seam and bottom crease together and pin, forming the gussets. Sew with a ¼˝ seam allowance.


Turn the tote inside out. Press the gusset seams, pin in place and sew with a ⅜˝ seam allowance, enclosing the previous seam. If your presser foot is struggling to sew over the bulk at the side seam, you may need to use a humpjumper. Please see my instagram highlights @poppyprint for a humpjumper how-to. Backstitch at the beginning, at the side seam stitches and at the end for extra strength.


Turn your tote right side out. YAY, YOU'RE DONE!


If you share your work on socials, let folks know that you used my tutorial and give me a tag so that I can stop by with a virtual high five! If you have questions, please email me directly using the email address in the upper left sidebar. I can no longer reply to blog comments.

HAPPY PLASTIC-FREE SHOPPING, FRIENDS!


Sunday, April 4, 2021

Open Enrolment Workshop: Courthouse Colourplay

Edited April 10: This workshop is SOLD OUT, thank you! If you'd like to put your name on a list for future dates, please email me (address in my profile there in the upper left side bar).


Happy Spring, Friends! I've been hearing from more and more lovely quilters who would like the opportunity to take a Zoom workshop with me, but they are not guild members, or they haven't had luck with the dates offered thus far.

mini 18" x 20"

I thought I'd simply go ahead the simplest way possible: choose a date and ask folks to use a Paypal/Me link to forward the registration fee! Let's try it!

lap size 49" x 70"

COURTHOUSE COLOURPLAY

Explore the possibilities of colour expression and free-cutting while you create this wonky, nested Courthouse Step quilt (reminiscent of paper lanterns) in your own personal colour story. We’ll work intuitively from the centre out, creating a dynamic quilt with loads of personality. There will be no squaring up with this one -- instead I'll show you how to “build out”, finding the fit between adjacent blocks and using up all of our scraps in the process. As in all of my workshops, I will share loads of tips while encouraging all students to find confidence in new techniques that will inform their pursuit of designing original quilts. Put your traditional quilting skills to work and explore improvisational design and piecing in a fun, supportive environment.

Quilt size: wall hanging to lap size depending on the amount of fabric you start with. A collection of 18-25 F8's for wall hanging/baby quilt or 18-25 FQ's for large lap to single size (solids or reads-as-solids) plus 1 FQ contrast colour for block centres is recommended.

You are cordially invited to my Courthouse Colourplay Zoom Workshop with live instruction and limited enrolment.

DATE: Sunday, May 16th, 2021
TIME: 9:00 a.m. to 1:00 p.m. Pacific Time
 (that's noon - 4:00 p.m. Eastern or 5:00 p.m. to 9:00 p.m. GMT).
FEE: $59 Cdn
LOCATION:  Poppyprint Zoom account

TO REGISTER: Please send $59 Cdn using this link  and make sure the email address you use for general communication is noted if it is different from your Paypal email. 
{if you live in Canada and would prefer to pay $55 by e-transfer please use my email address noted in the upper left sidebar to do so}

lap quilt/wall hanging 42" x 42"

queen-size 90" x 90"

Friday, December 4, 2020

Medina Dots Table Runner & Matching Placemats

 I'm excited to share my latest project for Oakshott Fabrics! Everything you see here was made from one F8 stack of the Lipari and one F8 stack of the Ruby Reds collections (a total of 16 super-sized Oakshott F8's which measure 10" x 27"). I set myself the challenge of creating a pattern that would not only let the fabrics shine, but let you feel good about your purchase by using up all of the precious cloth in the two F8 stacks. The result is a super luxurious set of table linens with playful shapes and vibrant colours reminiscent of Moroccan market stands.

The table runner features 60 degree triangles of the blue and green Liparis, appliquéd Ruby Reds circles (by hand, or machine) and a unique diamond-shape that is sure to fancy-up your table! The 6 coordinating placemats make use of the remaining F8's from the Lipari stack with leftover triangles pieced as a border accent. Everything is beautifully bound in a scrappy Ruby Reds binding using up almost every inch!  And because I have a feeling someone will ask...the binding went these angles in the exact same way it works on right angled quilt corners. It just takes a little finesse when turning to the wrong side to create the mitre.


I used a regular cotton blend batting in the table runner, but for the placemats I wanted a bit more structure that would stand up to more regular washing (by hand). I chose heavyweight fusible fleece by Pellon and am very pleased with the crisp finish. 

Everything is pieced with Aurifil 50wt and quilted with a luscious green Aurifil 40 wt thread. I give all of the recommended thread weight and colour info in the pattern. I didn't want to compress those pretty circles with quilting, so I chose to simply quilt 1/4" from all of the piecing lines with my walking foot and repeated the same angles and double lines on the placemats. A Hera marker works a treat for chemical and chalk-free marking on Oakshott shot cottons.

If you're looking for some luxe and would like to make your own set, the .pdf pattern is available in my Etsy shop here and you can purchase the full fabric pack directly from Oakshott here. I've also got a limited number of full kits for sale myself that include all fabric for front and binding of the runner and 6 placemats, the full colour printed pattern + die-cut cardstock circle templates for a great price of $125 Can shipping to North American addresses for $20 Cdn (or available for local pick from my front porch). Please contact me via my email address (upper left corner under my headshot) to claim one! ONLY FOUR AVAILABLE AS OF DECEMBER 4.

Friday, November 13, 2020

Chic Upcycled Suede Pillow

 I recently made this double-sided pillow for a friend's birthday out of her old suede trousers! Read all about the process and how Aurifil thread really took this project to the next level over on the Auribuzz blog here.


Thursday, October 22, 2020

Upcoming Workshops with Open Registration

 The following workshops (which are limited to 20 or 25 students) each have a few available spaces for open registration. Each workshop is priced according to the sponsoring shop or guild's policies. Please email* the appropriate contact listed with each date for more information. I hope you can join me for a Zoom workshop soon!

Emails are written below using (at) for @ and (dot) for . to avoid automated spam. When typing these email addresses into your mail program, please use the @ and . symbols.

For full class descriptions, please see my previous posts.

Speed Date With Improv


Wednesday, November 4 & Thursday, November 5th (the workshop is divided into two half day sessions. Students attend both days) from 9 a.m. to 12:30 p.m. Pacific Time. Seymour Quilter's Guild. Contact Barb: bmcgillivray(at)cw(dot)bc(dot)ca

Saturday, November 7 from 10 a.m. to 4:30 p.m. Eastern Time. Twilight Quilter's Guild. Contact Diane: cluke(at)kwic(dot)com

Saturday, January 16, 2021 from 10 a.m. to 4:30 p.m. Mountain Time. Lethbridge MQG. Contact Kathy: keoliver(at)shaw(dot)ca


Monday, September 28, 2020

ZOOM Workshops


Moving forward from Fall 2023, my preference will be to book in-person workshops only.  Please do get in touch if Zoom is the only option and we can certainly discuss! I do offer a wider selection of workshops in person. The list below only includes my Zoom-adapted sessions.

For rates, availability and to book a workshop, please contact me directly via email (address in top left sidebar).


THREADPLAY POUCH

The Threadplay Pouch workshop is offered as a follow up addition to the Aurifilosophy Lecture described on the Zoom Lectures post, however I'm happy to teach this as a stand-alone workshop.

This half-day (3 .5 hour) workshop typically follows on the Aurifilosophy presentation so students may put into practice the technical information shared in the lecture. Students will make a Quilt-as-you-go zipper pouch along with Krista as they learn about managing machine tension, proper needle selection, stitch length, free motion or walking foot stitching strategies, hand appliqué, appropriate thread for decorative stitches and a lot more! The pouch is designed to show off stitch patterns in multiple weights of Aurifil thread. Participants may purchase custom Poppyprint Aurifil sample thread packs in advance that include 5 small spools of thread in weights 12, 28, 40, 50,  & 80 wt. A minimum of one month lead time is required to order and ship sample packs to the guild representative for local distribution to participants.

Pouch sizeapproximately 6˝ x 9˝

Class Time: 3.5 hours

Class Size: 20 students


SPEED DATE WITH IMPROV
#speeddatewithimprov


Think of this class as speed dating with improvisational piecing techniques that include curves and free-cutting.  It will be fast-paced and a lot of fun:  several techniques are introduced and demonstrated one after the other with very little time to second guess, stress or obsess over perfection. Every student will end up with a unique, original improv sampler quilt!  The focus here is to explore line, shape and happenstance in abstract design, so keep things simply graphic by using solid-coloured fabrics in black, white and one pop of colour.  In the afternoon, Krista will share design wall tips to jigsaw the improv elements together, seeking balance and creative design opportunities.  Some pre-cutting is required.

This Zoom class combines pre-recorded technique videos with live instruction/support from Krista throughout the class.

Quilt Size: without borders, approximately 20" x 20". Fabric required: 1/2 yard black, 1/2 yard white, FQ colour (all solids or reads-as-solids).

Class time: 6.5 hours with 30 minute offline break. 

2-day option: 6.5 hours on day one with 30 minute offline break, 3-hour day two for more support on puzzling together the improv elements into the sampler collage.

Class size: 20 students

COURTHOUSE COLOURPLAY
#courthousecolourplay


Explore the possibilities of colour expression and free-cutting while you create this wonky, nested Courthouse Step quilt (reminiscent of paper lanterns) in your own personal colour story. We’ll work intuitively from the centre out, creating a dynamic quilt with loads of personality. There will be no squaring up with this one -- instead Krista will show you how to “build out”, finding the fit between adjacent blocks and using up all of our scraps in the process. As in all of her workshops, Krista will share loads of tips while encouraging all students to find confidence in new techniques that will inform their pursuit of designing original quilts. Put your traditional quilting skills to work and explore improvisational design and piecing in a fun, supportive environment.


Quilt size: wall hanging to lap size depending on the amount of fabric you start with. A collection of 18-25 F8's for wall hanging or 18-25 FQ's for large lap to single size (solids or reads-as-solids) plus 1 FQ contrast colour for block centres is recommended.

Class time: 4 hours 

Class size: 20 students


What students are saying about these classes:

"For those of you who know me well, improv has not been one of my go to techniques. The fabric consumption was way too much for me. But Speed Date with Improv eliminates that concern with fabric waste" 
-Susan, @modernblendedquilts

"Speed Date is my number one technique class"
-Gillian, @sewgolly

"Thank you so much Krista for taking the fear out of improv cutting and piecing!"
-Linda, @myquilts

"hands down the best patchwork course I've ever been on. Krista is so organized and patient. I can't believe how much I learned in one day"
-Rachel, LondonMQG (UK)

"..this class was SO good!! it was awesome to learn these techniques and add some new things to my arsenal, such as the grading technique. I think the combination of videos and live feed is excellent. Krista is a gifted teacher.
-Cindy, @liveacolorfullife