Showing posts with label poppy. Show all posts

Friday, May 8, 2015

Professional Poppyprint

One must have a professional-ish business card when one visits their first ever trade show, right?  I've had lots of fun trading and handing out my little Moo cards over the years, but it was time for the real deal.  Not really having a logo of my own has kept me from ordering business cards in the past.

While writing my book I had to prepare almost 200 drawings. I enjoy hand-drawing technical things very much, but thought I should take advantage of the necessity and learn some kind of computer drawing program.  When I attended the Fat Quarterly retreat in London a couple of years ago, Lynne taught an introduction to Touchdraw morning workshop. Touchdraw is a very user-friendly, inexpensive, 2-D drawing program for iPad that you buy from the appstore.  With the very small amount of information my exhausted and jet-lagged self retained from Lynne's class, I was able to trial and error my way through all of the book drawings. I also invested in an iPad stylus, which is much more accurate than fingers and a huge help. Yay!


So, back to the logo. I knew I wanted a stylized poppy print of some kind, so I started with a radial design of elongated ovals.  I figured I'd get something basic together, then ask my design guru Berene for help.  It turns out I was able to draw something all by myself that I liked very much, so I went with it!  The ombre is kind of quilty and overall, it is pretty similar to the print you'd get if you used a stamp pad and poppy seed pod to make a print.

poppyprint fabric

poppyprint process3

My new cards arrived today and I'm very happy with them! They were ordered on vistaprint.com. The price, quality and ease of designing them right on their website made it a no-brainer for me. I love that you can put a photo on the back of your card and crop it however you like. 

DSC_9881

DSC_9877

I'm going to carry them in this PERFECT needle-felted pouch gifted to me last year by a fellow Circus Mom after the hours and hours we spent sewing together for the show.

Ok! I think I'm ready for market. Well, just as soon as I figure out what to say at my schoolhouse. Yikes.

Thursday, October 6, 2011

And they're off.....

My swap package for Suzanne is complete and on it's way across the continent (visit her blog to see what she made for me! It is simply gorgeous). I completed the hoop this afternoon. I've told you all about it here, so I'll just show you the ta-da pix today.

Embroidery sampler by Poppyprint

Hoop backing by Poppyprint

I thought that I would try a blanket stitch sort of finish around the outside of the hoop, but it looked really awful, so I ripped it out and went with my standard ricrac embellishment. If you click through the photo of the back, I explained how I finish my hoops in the photo description.

swap package for suzettra by Poppyprint

The hoop is snug in it's pretty hoop pouch and I'm sure will be enjoying a lovely flight back east very soon. Let's hope it avoids the Twilight Zone.

I also made this Stash Trad block for Angela. She's posted a tute for it on her blog. It's a big mama - measuring in at just under 20". I keep referring to it in my brain as the Cheese and Cracker Jacks Scraps block...but Angela just calls it Cracker Scraps. I'll make a second one for our other group, the VIBees as soon as her fabric arrives. This block made me realize my yellow/mustard yellow stash is sadly slim. Must buy more fabric.

Angela's VIBee block
Angela requested Kona bone for the background - nice!

Now, to design my last hoop swap stitchery. I have some fun ideas for my partner in the Misfits Hoop Swap....I just hope my drawing/copying skills are up to the task!


Monday, October 3, 2011

Poppyprint Embroidery Sampler

After my recent embroidery course, I wanted to get busy and practice some of the new stitches I'd learned before they were forgotten. Suzanne requested a hoop featuring some of my poppy-printed fabric for our private swap. It's not complete yet, but here is where things stand at the moment.

Poppyprint embroidery sampler

I picked up this oval hoop at a charity shop last spring and have been wanting to use it for a swap. The fabric is a natural linen printed with red ink and I used Presencia perle 8 cotton for the embroidery. My idea was to embellish the prints, using their symmetry to guide my stitching, without entirely concealing the printed forms. Check it out: I learned how to do Shisha!

Poppyprint embroidery sampler

It's more fun saying Shisha! than it is stitching those little mirrors on, trust me. I need more practice to get my stitched frame more symmetrical (obviously). Please don't ask for a tutorial, because this is a technique you've got to see done right in front of you. Possibly 10 times over before you will 'get it'. Ahem. I may need a trip to India.

Next is an old stitch with a new look. How adorable are these sets of three nested lazy daisies?

Poppyprint embroidery sampler

Something else I learned is the wrapped spider web. Perfect for the season!

Poppyprint embroidery sampler

I have a bit more work to do and hope to show this in it's final form in a day or two. I have a thought about finishing the edges of the hoop that may or may not work....

I'll be mailing the hoop inside this embroidery project pouch that I made before our summer holidays.

Hoop project pouch for Suzanne

Made with 'twofers' leftover from this project's flying geese blocks.

Hoop project pouch for Suzanne
Here's the flipside, with some stitched dragonflies.

My to-do list is dwindling now that I am almost done with swap commitments. I'm not taking on any new ones so I can free up some creative time for Christmas gifts and a bed quilt for us that I want to have pieced before the holidays. Here's to a productive week ahead!

Tuesday, August 2, 2011

Who's Expecting? GO!Baby winner!

The suspense is over and I'll make this short and sweet. Thanks everyone for making my birthday extra special with all of those lovely well-wishes! Unfortunately, there is only one Accuquilt GO!Baby for me to give away, and that little bundle of fabric cutting joy is going to:


Hueisei!! Congratulations, I have emailed you! Here's the exciting thing: Hueisei is expecting her first baby (like, a real one!) and it's a boy. I'm sure the GO! Baby will come in handy to save her time with her quilting projects.

And now, here are the winners of the 3 consolation prizes: each person can choose their favourite colour of my poppyprinted fabric and I'll mail them a hunk (of fabric, people...not the Mark Wahlberg variety).
hmmm, wonder what colour she's gonna pick.


Drop me a line at the email address up there in my profile and let me know your fav, girls. And if your eyes are tired, I'll tell you that pinksuedeshoe, Lisa and Lori are the winners.

Poppyprinted 2011
click on the pic for details of ink/fabric colours

I've got so much to share with all of you - last Thursday was stupendous in the mail department! I think I've got a post for every day of the week, so stand by!

Friday, July 22, 2011

This is it Baby. GO! Giveaway

Today is my birthday (like you didn't already know) and I can't think of a better way to celebrate than giving one of you a present. When Accuquilt offered me the opportunity to try out one of their adorable GO!Baby cutters I was very happy to accept because it meant I could then share one with one of you. These are expensive tools and not necessarily something everyone can just run out and buy. It feels nice to be able to gift something like that!


You can read more about my escapades with the cutter here and here see a tutorial for making your own QR Code quilt on my flickr sets here. I've only used my GO!Baby to cut 2" squares so far. I have been getting a lot of ideas of what else I could use my new tumbler and chisel dies for, though. Luckily I have two willing assistants who think rolling the dies through the cutter is a super fun job (it is!) so when I'm ready to tackle one of those projects I know who to call.


I've had some inquiries about whether an Accuquilt cutting machine would be helpful for someone with arthritis in their hands. Well, I have arthritis in my hands that is mostly in remission, but easily flared by repetitive strain. I can say this: you have to be able to grip, both the top handle to stabilize the cutter, and the rolling handle to turn it. A flat hand over the top would work for holding the machine steady, but a full grip is necessary to turn the crank. The dies did flow VERY easily through the machine with 3 fabric layers so you don't necessarily need a tight grip...any more than 3 layers require more general arm strength and a tighter grip. Also, unless you are using scraps, fabric preparation with rotary equipment is still required, so this is not a replacement for rotary work by any means. I don't believe any auto-cutting system is.


The good news is that the GO! Baby is just plain fun to use, and very safe (the blades are super sharp, but if a grown-up places the fabric and cutting mat on top of the die safely, then a smaller helper can roll it through the machine for you). Or a big man helper, whichever you happen to have on hand.


For your chance to win a GO!Baby and three dies of your choice, please leave ONE comment. Your email address MUST be linked, or written in your comment for a valid entry. If you blog on a platform other than Blogger, your email is not linked, please leave it in your comment!!

This giveaway will be open until Thursday, July 28th at 6:00 pm PST


ETA: comments are now closed, thanks for entering. Winners will be announced when I return home the week of Aug.1st.


Now, before I received my GO!Baby, I had entered a lot of giveaways trying to win one myself. I know what a bummer it is not to win, so with that in mind, I'm going to offer a very small consolation prize to three more Poppyprint readers.


Poppyprinted 2011


You can choose your favourite colour of my poppy-printed fabric and I'll send you a piece!


Ok, if you are here for free stuff, go ahead and leave a comment. If you are curious about the good-luck birthday story I mentioned the other day, here you go.


I had always thought I was lucky that my birthday was on the 22nd, because that meant I would be old enough to do something really cool on my "good luck" birthday. You know, turning 22 on the 22nd. Well, I did do something really cool that day. In fact, it was something I NEVER would have dreamed of. Turns out, that summer of '89 I got a job in South Africa through recruiters at my university. Gold Fields, a South African mining company, had a program to bring over foreign geology and mining students for their summer term and give them 'a job' to experience the mining industry there. The hope was that you'd return after obtaining your qualifications. As a geology student, I was able to work at the mineralogy lab, and live in an apartment in Johannesburg (most of the mining students remained out on the mines in staff housing). Over one two week period, I had the opportunity to work at a field camp just north of Swaziland - there I rode my mountain bike amongst ostrich, wild boar & zebra since we were just inside of a soon-to-be-game park. Pretty cool. Fortunately I never encountered a Black Mamba, which apparently had been found in the shower shack the week before I got there!


Here's the birthday part: turns out King Mswati III of Swaziland turned 21 that summer and he decided to celebrated on the 22nd, even though is birthday is in April. Now, he's turned out to be a not-so-great guy for his country because of all the money he blows through, and I'm not sure how his 14 wives feel about him, but for his 21st birthday, he threw an incredible party! I drove down with a South African geologist and another American student and we camped out at this amazing field (Woodstock style, but with less mud). There was an incredible concert including Eric Claptan, Joan Armitrading, Johnny Clegg & Savuka all playing on this massive outdoor stage, while the King circled overhead in a helicopter. At the end of the night there was a stunning fireworks display. BEST. BIRTHDAY.EVER. The photos are in a box of slides somewhere in my crawl space....maybe one day I'll dig them out and share.


So, my friends, there you have it. Another year. I still am having a very hard time believing that concert was 22 years ago and that I am twice as old today as I was then. I'll leave you with this beautiful bouquet, dropped off by the incomparable friend Double NN Dianne last night.


Birthday flowers from Dianne


Good luck in the giveaway and thanks for stopping by for my birthday party!

Tuesday, July 19, 2011

Poppy Pouch

It is summer swap season and I'm so happy that I've completed my first commitment 3 weeks early! Go, me! The Pretty Little Pouch Swap is a lot of fun and you cannot believe the incredible amount of inspiration in one flickr group. If you are at all interested in creating sewn pouches, check it out - everything from pencil cases to snap frame change purses, hoop pouches and little key fob cases to boxy cosmetic cases. Here are a few great project photos that I included in the inspiration mosaic for my partner.

Poppyprint's Pretty Little Pouch Picks - Round 2
click on the photo for links to each pic

I got a great secret partner for the swap and once I'd received her mosaic and sign up info, I was immediately inspired and got busy making this for her:

Poppy pouch by Poppyprint

I can't give too much away or it might become obvious who this is for, but I'll tell you that it's fully lined with a pretty Central Park laminate, the outside base is Moda Crossweave and the scraps are MoMo's It's a Hoot line. It's my first real laminate project. In order to keep the lining as useful as possible (i.e. continuously seamed laminate), I left the turning opening on the side seam of the outer bag, in lieu of the normal lining hole. I had to carefully stitch that up from the right side using a ladder stitch.

Poppy pouch interior

It's got a side handle and is a great size of about 8" x 9 1/2". It'll be perfect for cosmetics, or anything else requiring a bit of spill-resistance! The outer bag is quilted with insul-brite.....you know, in case something has to stay cool or warm.

Poppy pouch for PLPW#2

I spent last Sunday printing fabric with my poppy seed pods (stay tuned for poppyprint fabric on offer!) and took the opportunity to decorate the back of the pouch with some groovy prints.

Poppy Pouch back

I've made several zip pouches and I have to say that every single time, it's a total mystery as to how well the ends of the zip are going to turn out. I've read countless tutes on how to reduce zipper bulk, but I've got a long way to go perfecting this element of zippy pouch construction!

I think my partner will like it - I'm feelin' good about this swap!

If you're looking to stock your stash with some luscious hand-dyed fabric, scroll down for your chance in my birthday month giveaway #3!

Monday, July 4, 2011

Soggy Poppies

News Flash: summer has finally arrived on Canada's we(s)t coast!! Hallelujah! So, this will hopefully be the last time you read any complaints about weather here (until the fall hits, that is).

I've been so looking forward to printing more poppy fabric this summer. Then two very important factors well beyond my control intervened. Those would be rain and letter carriers.

The rain and unseasonably cold temperatures convinced the blooms to stay snug in their shells.

Poppyprint's poppies 2011

In one rare afternoon of sunshine a few weeks ago, some brave flowers that could not be contained opened with a flourish, only to have their delicate petals pelted down by rain the following morning. Several of the giant buds actually just rotted atop their tall stems, having never even shared their gorgeous orange or red petals.

Poppyprint's poppies 2011

Poppyprint's poppies 2011

Poppyprint's poppies 2011

Interestingly enough, when I gently pull the rotted bloom off the stem, the seed pod is perfectly formed inside, and still has it's gorgeous stamp all prepared and ready for printing!

However, there's this little issue of our postal strike. You see, all of the solid fabric I ordered to use for printing is somewhere between Texas and my house. Possibly stuck in the main sorting centre downtown for all I know. We had three days of delivery before the holiday last Friday, so I'm hoping packages are moving and my fabric will arrive this week. I ordered plenty this time, so I'm hoping to be able to share some pieces with you - I might even open an Etsy shop, or maybe just post photos and sell them via Paypal. I can't decide. Maybe as I'm printing the right solution will come to me!

If you haven't yet entered my first week of birthday month giveaway, head over here. Entries open until this Thursday, July 7th. Please, please make sure your email is linked, or in your comment so I can contact you.

To all my U.S. friends, happy 4th of July! May you eat cake and watch beautiful fireworks.

Monday, July 12, 2010

Poppyprint(ing)

I promise never to take my daughter for granted. She is, and I believe always will be, the energizer bunny of our family; she's got endless enthusiasm and willingness to try new things. Ever since our giant poppies bloomed, she has been asking me "when are we going to print the poppies and make our own fabric?" Believe me, it's been on my mind for weeks, but other stuff just keeps getting in the way.

Well, yesterday at 5:00 p.m., I could postpone no longer. The seed pods are drying out rapidly in this heat and once the tops flip up, they are useless for printing because the velvety raised patterns are all hard and won't accept the ink. We set up outside on the deck got busy.

We worked with four ink colours: gold, white, red and brown. I pulled 4 solids from my stash: Kona snow, black and red and an Essex linen/cotton blend in lime green.

The Stampers:

stamp 3 stamp 5 stamp 1 satmp 7
poppypod stamp bouquet

The Process:

We used stamp pad ink that is colourfast for fabric (after you iron it) to print our fabric free-hand. I put a double thickness of towel under the fabric for two reasons; to absorb excess ink and to provide a soft surface to better complete the stamps because some of the pods have slightly rounded (convex) tops.

poppyprint process2

poppyprint process3

The Results:

poppyprint fabric

poppyprint fabric3

poppyprint fabric2

I've said it before and I'll say it again...the symmetry in nature is astounding. These are some of the most beautiful, unique shapes and they please my eyes tremendously!

If you are new to Poppyprint, now you know how this blog got it's name! This is our first effort on fabric, but it won't be our last. I have to send a thanks out to my dear friend L3 who made a special effort to save the small-sized stampers from her garden and bring them all the way over from Victoria!

Wednesday, June 9, 2010

Thursday, May 27, 2010

Meet the triplets

Why, hello there!

Threesome

These three handsome fellas just opened last weekend, the first in the garden. Against the backdrop of green foliage and the dainty white Viburnum blossoms, they are really stealing the show.

first poppy

Those tender, papery-silk petals that virtually shimmer in the sunlight are so gorgeous. And the size! These flowers are huge! Standing proud on their 2 to 3 foot stalks that sway stiffly in the breeze, the poppies almost dare the sky to open and fill their centres with waterdrops. Alas, they are no match for the Vancouver rains....luckily for me the sun is shining and I can enjoy my poppies for another day. When these are gone, the orange ones will open and the admiration will begin all over again.

Once those petals fall and the seed pods are fully formed, I will get busy doing some more of this! I'm going to try it on fabric this year....

I hope you are enjoying something beautiful today, too.

Monday, September 21, 2009

What's in a Name?

When my children were in Montessori pre-school, one of our favourite teachers was Donna D. One day we invited Donna over for tea in the garden. When she saw all of our giant poppy seed pods towering over all of the other leaves (and let's face it, weeds), she asked if we'd ever tried using them as stampers. Pre-schoolers don't need much more encouragement than that, when it comes to inkpads, paper and something to stamp out over and over and over!


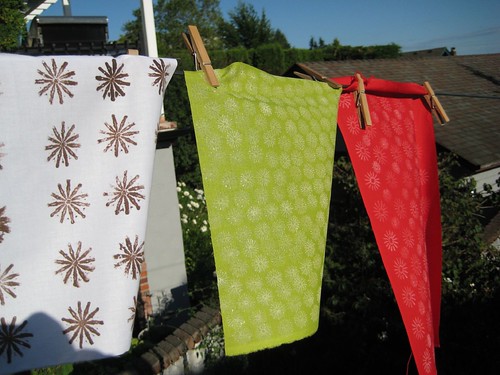
When I saw the amazing symmetry and lines in the stamped images, I knew right away I had found my 'logo', my 'company name' and something to look forward to. One day, I might even sell something I'd made, and this would be me: Poppyprint.

I mean, just look at these gorgeous images! Nature is astounding in her perfection, especially when it comes to the garden. I'm a 'plant it and hope it lives' gardener. These poppies have thrived under my negligence and really taken over. I can only hope my 'at home' creating will be equally prolific with just a little bit more care and nurturing...


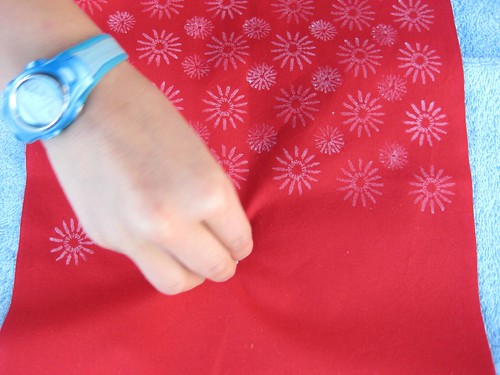
The velvety bits are perfectly suited to stamping - they soak up the ink and transfer it back to paper beautifully. The trick is to not let the pods dry out too much, because then the velvet dries up and gets too hard. Every image is slightly different from the next, and all of them are lovely. I'm going to try stamping on fabric with next year's crop!

Thank you Donna D.!