Showing posts with label pouch. Show all posts

Friday, November 27, 2015

Pouch Production and Sewing Beyond Cotton

While at our annual Loon Lake retreat in mid-November, several of us got busy trying out some of the awesome projects in Krista Fleckenstein's new book Beyond Cotton. Krista is super clever and an amazing artist to boot, so she's got some incredible ideas on how to expand our work beyond cotton just like the title says.

Beyond Cotton

I started out making pouches using Krista's easy pattern. I didn't have leather on hand with me at retreat, so I substituted Craft-Tex (a C&T paper product that is totally washable and strong like leather!). I'd pre-washed and crinkled my Craft-Tex before retreat, hoping that I'd be able to use it for some project or other.  These pouches will be gifted at Christmastime. I was nervous using chunky metal zips, but I didn't break a single needle and I'm so pleased with how nicely the zipper ends appear once the pouch is turned right-side out. Plus, I got to use some of my treasured Japanese linen collection!
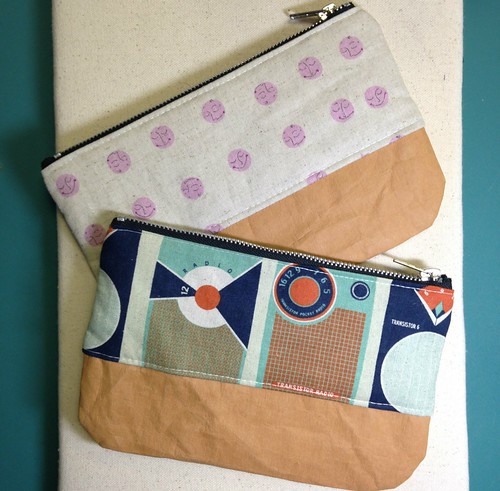
Sewing from Krista Fleckenstein's new book Beyond Cotton.

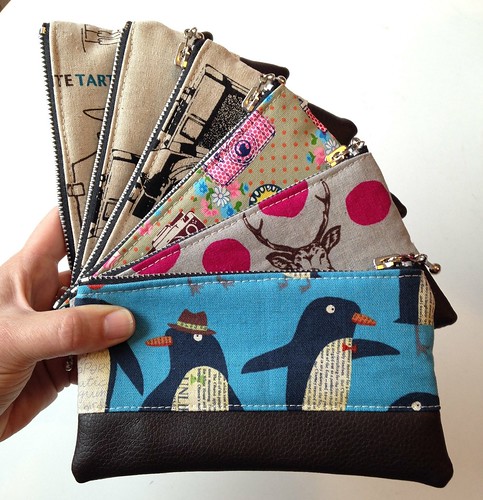
Zip pouches by Poppyprint
I made these smaller versions after returning home and getting my hands on some lovely upholstery-grade vegan leather (otherwise known as vinyl).

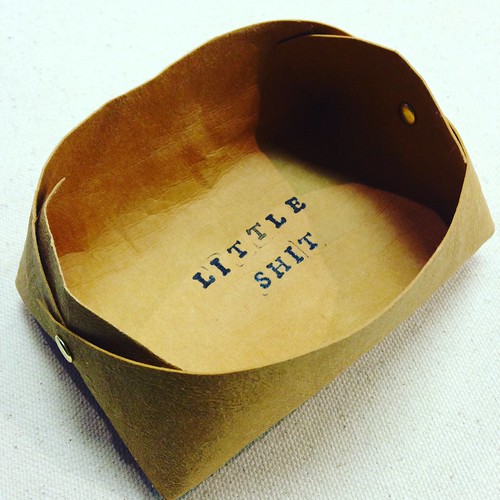
I also followed Krista's pattern to make leather boxes (again using Craft-Tex) and got to try riveting thanks to friends that had brought along the hardware and tools. There was a lot of banging on this retreat as we were riveting all the things with hammers!  This is a very tiny box, so to avoid confusion I stamped exactly what might fit in it onto the bottom of the box *wink*.

Sewing from Krista Fleckenstein's new book Beyond Cotton.

Finally, Krista had sent along a few leather cuff kits for us to try our hand at punching a pattern of holes and then using them to embroider a design with floss. I was feeling a bit lazy, so I stole Katie's carefully prepared design template and copied her bracelet completely.  Here's a photo with all of our lovely leather cuffs!
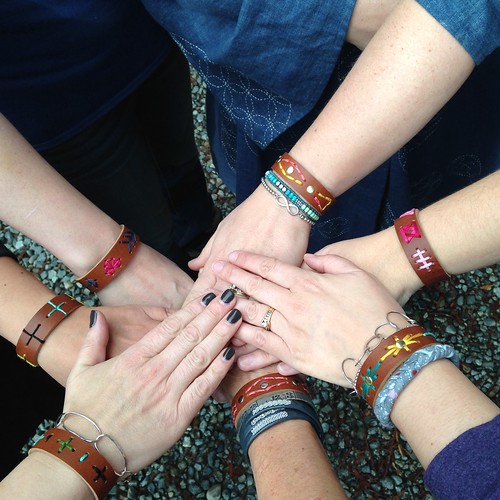
Untitled

I've since visited a leather supply store here in Vancouver. I must say, it is not a cheap endeavour. Keep an eye out for free leather couches on Craigslist!! There may also be some industrial felt winging it's way to me right now for some more fun projects out of the book. Next, I want to try some stamping on canvas. Check out Krista's sweet tutorial and make your own wrapping paper this year.

Thank you for so much fun, Krista!! 

Saturday, December 7, 2013

A Birthday Box

After watching the Canucks win in overtime last night (on TV), I started a much-delayed birthday gift for a friend. I mean, how much time can a box pouch take anyway? It was only 10:30 on a Friday night....

I've never made one before, so I scoured the internets for available tutorials and decided to use this one by Libby. Even the lining is completely turned, so there are no exposed seams on the inside of the pouch. Just to ramp up the challenge, I decided to cut into my stash of never-used coated cottons and chose an Amy Butler print for the lining (I got mine at a shop that has since closed, but I found some for you here).  Even though I make a lot of bags, visualizing how stuff is going to turn from inside out to right side out is not my strength, so I went slowly.

Lined Box Pouch by Poppyprint

The tutorial was easy to follow with excellent photographs. The only issue I had was trying to sew over top of the zipper ends "in the same place" on both the lining and outer fabric (a luscious AMH linen interfaced with Pellon ShapeFlex, by the way).  I found this impossible due to the bulk of the pull tabs, but it's no biggie, it just means you can see stitches at the end of the zipper on the inside of the pouch.  This, of course, will make absolutely no sense to you unless you've tried to make one of these before!

Lined Box Pouch by Poppyprint

The other issue that kept me up until 1:30 a.m. was finding the right needle for the job. My stitches were lovely on the top, but when trying to sew through any seam allowances that included the coated cotton, the bottom of the work was a bit of a tangled mess. The vinyl side of the fabric was not touching the plate or foot, but just sewing through that stuff proved disastrous to my tension. I think the thread must have been sticking to the vinyl within the layers.  Finally, a topstitch 80 needle coupled with increased top tension did the trick.  See Amy Butler's tips for sewing with her vinyl coated cottons here.

Lined Box Pouch by Poppyprint 

In the rare seams where I had to sew over the right (sticky) side of the coated lining, I used a teflon foot which easily glides over the vinyl.  Apparently a piece of tape on the bottom of  your presser foot can do the trick just as well - if only I'd known before springing $25 for the Pfaff foot! I've heard of putting tissue paper on top of the vinyl can help, but then you have to pick paper out of the stitches. No thanks.  I wish I could have given the pouch a final pressing (all boxes/bags/pouches look best with a good pressing) but I didn't want to risk melting the vinyl!

Lined Box Pouch by Poppyprint

Rumour has it my friend's husband forgot her birthday today. Ouch. I'm so glad I stayed up late to make this for her!

Sunday, November 24, 2013

Small Sewing

It's that time of year! Time for various quickie, small sewing projects to get through the season of dinner parties and stocking stuffer preparation.

Last night we were invited to dinner by a colleague of B along with her sister and brother in law who are, coincidentally, old friends of ours from early in our careers [hi Kris!]. I made both of them a seasonal potholder during a guild sew-in yesterday.

photo

I was inspired to make the improv trees out of scraps from tree skirt projects and Essex yard dyed linen in black.  Jolene's tree quilt is one of my favourite from Modern Quilts from the Blogging Universe and after seeing Krista's version at my recent retreat, it was fresh in my mind. Time to make some already! I quilted the tops to one layer of Insulbrite and another of cotton batting, then sewed that RST with a red and white fork & knife print for the backing, turned them out and top-stitched around the seam. There's a little hanging loop in the corner, too.

Next up was this set of two zipper pouches for a friend's young daughter to carry womanly essentials in her backpack.

linen pouches by Poppyprint

As I joked on Instagram, 'there's nothing that says welcome to womanhood like a weird purple Echino deer!'

linen pouches by Poppyprint

There are so many great gift tutorial round ups online at the moment. I have to restrain myself from making all the things and sticking to my program here! Check out the great gift ideas here and here.  If you've got a great tutorial you'd like to share, please leave a link in the comments, I'd love to see what you're making.

Tuesday, July 9, 2013

Just in time for London

The last VMQG meeting proved very lucky for me. I won half of the block lottery and came home with enough Modern Disappearing 9-Patch blocks to make a 52" square quilt. We often have monthly challenges that result in everyone making one or more blocks in order to practice something new. I always participate, but have never won the lotto since Felicity is busy winning them all (wink).

DSC_6859

For the modern version, you make the 9-patches with more solids than prints, based on Kristy Daum's tutorial here. We chose black as our solid, to provide background or negative space. I must say, it was hard to sew all that black and I wasn't really in love with the quilt top after piecing it all together.  I wondered if I could lighten things up a bit with some fun thread and chose to do a loopy meander using a variegated Aurifil 40 wt cotton in bright colours of yellow, green, fuschia and blue.

DSC_6860

I like it much more now! I'm much happier about donating this quilt to a child now that all that black has been jazzed up.  For the back, I built a log cabin around a colourful panel I've had stashed for several years. The panel was printed off kilter and it always bothered me as I wasn't sure how I'd deal with that in a baby quilt. I don't notice it as much now that the field of green is all around it.

DSC_6862

The binding is pieced from several colourful leftovers. I like this dotty corner that happened quite by accident!

DSC_6861

This quilt will accompany me to London next week and I'll happily hand it over to Lynne for her Siblings Together quilt drive.  Siblings Together is a wonderful British charity that brings siblings separated by the foster care system back together at a summer camp. It appears that there will be many other comfort quilts coming into the Fat Quarterly Retreat; the goal is to send every child home with a quilt to cuddle and remember their special time with brothers and sisters. I hope they give comfort to a lot of children living in less than ideal and complicated circumstances.

I have quite a bit of sewing to do before I depart in a week. Hopefully I'll get to show it all to you before I go!  Yesterday I spent a lovely few hours with even lovelier company at Berene's house. Mai was visiting from the OahuMQG so we were all invited to meet her and stitch together. She came bearing surprise gifts from my sweet friend Amber, look:

wonderful surprise gift from Amber 1shabbychick!!
Gah! Cutest camera pouch and gorgeous FQs! This is totally coming on vacation with me. Thank you so much for your thoughtfulness Amber, and Mai for the personal delivery.

Finally, for those of you who just can't get enough of me, the VMQG did a lovely "member spotlight" of me and my work that you can see here. Thanks friends!

Friday, February 1, 2013

Zip, Zip, Zip

That's the sound of my triple zip pouch. I took a break from scrap sewing and prep work for the 241 Bag workshop I'm teaching this weekend to make this cute pouch. Deb designed this and wrote up a tutorial late last year and is hosting a Triple Zip Along on her blog at the moment.

Triple Zip Pouch by Poppyprint

Once all of your fabric pieces are prepped, this pouch goes together fairly quickly. I love the cute factor here (possibly due to my fabric choice - I finally caved and jumped on the typewriter bandwagon and cut into my new pearl bracelets FQ set, too) however I'm not sure all the fuss and bother is really worth it. My ambivalence is likely due to the relationship I have with my zipper foot. We're not on good terms. I just don't have much control with it. It's definitely the most disappointing foot that came with my Pfaff QE 4.0. For most zipper projects I use the standard sewing foot and move my needle position over as far as it will go towards the zipper.

Triple Zip Pouch by Poppyprint

The pouch itself is about 7" x 5 1/2" and even though there are three separate storage linings (one for each zip) it doesn't have any more capacity than a 1-zip pouch of the same size.  It just might be convenient to keep certain small tools/accessories/makeup in a different compartment from others, I guess.

Triple Zip Pouch by Poppyprint

There are lots of tips and alternate finishing methods discussed in the flickr group for the Triple Zip Along. Plus, loads of good ideas for fabric combinations. There are even several cute quilted versions to see.

Triple Zip Pouch by Poppyprint
As always, beware the directional fabric!  You could seam your main pouch fabric to avoid this, but it sort of cracks me up, so I didn't bother.

Deb's organized some great prizes for people who post a finished pouch photo to the flickr group by February 15th.  Why don't you give it a try?

Monday, January 7, 2013

Math Geek

Fabric Geek, Foodie Geek, Instagram Geek. Pick your title. I'll answer to them all.  It does give me great pleasure to see that my son has grown up into a very intelligent 16 year old who not only does very well in math, he actually really loves it, too. Unlike his mom who did well in math but forgets absolutely everything she learned, I have a feeling he'll be retaining his knowledge for years to come.

I try to always gift something handmade for family birthdays. It's getting tough for a teenage boy, but this year I had some help in the form of irresistible fabric designed by none other than the talented Berene of Happy Sew Lucky. I ordered a FQ of her Math Class Notes fabric in grey on linen during the 2 for 1 Spoonflower sale last fall. It was neatly folded awaiting this uber geeky graphing calculator pouch for T's birthday last week:

Scientific Calculator pouch by Poppyprint
The geologist in me could not resist the coordinating rock fabric!

I'm just waiting for the orders to start rolling in, because you know every guy in his class is going to want one, right? hehe. I noticed he put it into his backpack this morning. I hope he's not embarrassed by his Fabric Geek mom.

Have you got a Math Geek in your life? Order some fabric and make them something cool with it!

Friday, June 22, 2012

This Little Pouch Went to Portland

Last night the VMQG celebrated our two year anniversary!  There were yummy treats, fruity punch, lots of laughs and some seriously fabulous pouches.  (Almost) Everyone who is participating in the pouch swap with the PMQG brought their pouches to the meeting to show and also to pack them up and send them down in one shipment to our secret partners care of the PMQG.

Here's the little flex frame pouch I made for my partner who gave me a great idea as to what she needed a pouch for, as well as specifying she likes bright, cheerful colours. Just so happens I won a mini charm pack of all the new Kona solid colours from Pink Chalk Fabrics recently - perfect!

Snap frame pouch by Poppyprint
side 1

I paired up the bright colours, drew a line diagonally and sewed 1/4" to each side, creating two triangle squares (seams pressed to one side).  Then, I paired two of those right sides together (butting the seams) and drew a diagonal line perpendicular to the seams.  Sewing 1/4" each side of that gives you two tiny little hourglass blocks. Cute!

Snap frame pouch by Poppyprint
side 2

I framed everything up with some black linen, inserted a flex frame and there you have it. If you would like to read a full tutorial on making a flex frame pouch, check out Leila's here or Ayumi's here. Both are excellent.  

Wanna see the inside?

Snap frame pouch by Poppyprint

Seems my partner and I have something in common.....I wonder if hers barks as much as mine?

Thursday, January 12, 2012

A Down Under Swap

Consider it a Winter-Summer thing. Here, we are supposedly mid-winter (hello, can we please get some snow already?!), while in Australia it is high and hot summer.  Nova sits, patiently awaiting my end of our swap bargain, likely enjoying a long tall glass of lemonade or iced tea.  At least that's what I'd be enjoying if it was 100 degrees!

I had a peek at Nova's favs and read up on some of her likes (blues, greens, maps, linen). I was super excited to use some of this perfect Japanese linen printed with a sort of made-up map of some European city that may be Prague, or Paris or Frankfurt. Who knows what goes through the mind of these Japanese designers, but whatever it is usually produces the most interesting of fabrics! ETA: Thanks to Kerry, I can now tell you it is Berlin! This fabric was designed by Marie Jacobi for Yuwa. And Marie is German, not Japanese. My bad.

Hoop Project Pouch by Poppyprint

First up is a hoop project pouch so Nova can take her stitching to the beach!  It's lined with some of Lizzy House's Castle Peeps and a piece of Moda marble provides a handy divider to keep hoop and floss in their own little compartments.

Hoop Project Pouch by Poppyprint

Next we have the requisite swap-with-Poppyprint thread catcher.  I believe that Nova has a fondness for repurposed fabrics, so this one is lined with shirting and the outside coordinates with her hoop pouch.

Linen Thread catcher by Poppyprint

And last but not least, a sweet little linen house tape measure made with Laurraine's pattern.

House tape measure by Poppyprint
someone recently asked me why all my houses are either #4 or #7. It's because those are the easiest numbers to embroider in small size - no curves! Sometimes I can be incredibly lazy.

We've been thoroughly enjoying the gorgeous pillow Nova sent weeks ago. It's time for me to package these goodies up and send them on their way to the sunshine!

Thursday, December 1, 2011

On the Lam{inate}!

Several months ago while on a little fabric browsing/post office/Trader Joe's run across the border, I picked up a few chunks of laminated cotton fabric. I haven't used it very much, but thought I'd try making a couple of pouches with laminate on the outside and cotton on the inside.

Trying out some different settings on my new camera, I took this picture in diffused daylight (overcast, but bright light, no direct sun) in aperture priority setting.

Laminated cotton pouches by Poppyprint

Hmm. The depth of field was so narrow, only the pens are in focus. I'm pretty sure you're not here to see pictures of office supplies.....so, I returned to full AUTO mode for this next one, and stood back a little as well.

Laminated cotton pouches by Poppyprint

There, now you can see the pouch in focus as well as the pens. That's better. I can see it's going to take me a while to get the hang of close up photography with the DSLR. It was a no-brainer with my little point and shoot on the cute little tulip (macro) setting.

Laminated cotton pouches by Poppyprint

The cupcake ribbon is so cute and looks perfect with all that pink! I recently purchased a teflon foot for my Pfaff and it was a dream to topstitch the laminate with it. I had tried topstitching with a piece of tissue paper between the laminate and a regular metal foot, but the tension went all wacky so the stitches looked terrible. If you're planning to do a lot of laminate sewing, I would highly recommend the teflon!

Laminated cotton pouches by Poppyprint

Now, I need advice on how to get rid of the wrinkles that result when turning the pouch right side out. I pressed the finished pouch through two layers of cotton pressing cloth (no steam), but the wrinkles didn't iron out. Any tips?

These pouches, the fleece sweater, some gloves and a notebook are heading to a young girl we sponsor in Ecuador. I made two pouches and decided to send both in case she has a friend without a sponsor that she'd like to share with. I really should have had them in the mail a few weeks ago!

Wednesday, October 5, 2011

A Solid Swap

Yesterday, after a loooong wait, my For The Love of Solids swap package arrived. The international shipping deadline was September 8th but my fellow Canadian swappers know that as soon as a foreign parcel sets foot on Canadian soil, it enters the Canada Post Twilight Zone and delivery ranges from 1 day to 1 month. In this case, I have to say: totally worth the wait.

My solids mini from Megan!!!

Megan, who blogs here, was one of the swap organizers. She made this stunning mini quilt and also sent along a coordinating pouch and a Kona solids charm pack (awesome, because I am so not done with this pattern yet and will undoubtedly create something else with the charms soon).

FTLOS swap extras

This will be my last major swap for a good long while. I like to go out on a high note and Megan really delivered with two beautifully constructed gifts! I literally have no more wall space for mini quilts, and I freely admit to feeling extremely liberated -- in a creative sense -- knowing that I do not have any sewing commitments or deadlines for other people in my future. I must say though, this solids swap was a great challenge and I was very inspired by the wide range of projects and the original use of solid fabrics that appeared in the flickr pool.

I just have two hoops to finish up and then I will get busy sewing stuff I want, for me (well, and everyone that I am making Christmas gifts for).

Monday, October 3, 2011

Poppyprint Embroidery Sampler

After my recent embroidery course, I wanted to get busy and practice some of the new stitches I'd learned before they were forgotten. Suzanne requested a hoop featuring some of my poppy-printed fabric for our private swap. It's not complete yet, but here is where things stand at the moment.

Poppyprint embroidery sampler

I picked up this oval hoop at a charity shop last spring and have been wanting to use it for a swap. The fabric is a natural linen printed with red ink and I used Presencia perle 8 cotton for the embroidery. My idea was to embellish the prints, using their symmetry to guide my stitching, without entirely concealing the printed forms. Check it out: I learned how to do Shisha!

Poppyprint embroidery sampler

It's more fun saying Shisha! than it is stitching those little mirrors on, trust me. I need more practice to get my stitched frame more symmetrical (obviously). Please don't ask for a tutorial, because this is a technique you've got to see done right in front of you. Possibly 10 times over before you will 'get it'. Ahem. I may need a trip to India.

Next is an old stitch with a new look. How adorable are these sets of three nested lazy daisies?

Poppyprint embroidery sampler

Something else I learned is the wrapped spider web. Perfect for the season!

Poppyprint embroidery sampler

I have a bit more work to do and hope to show this in it's final form in a day or two. I have a thought about finishing the edges of the hoop that may or may not work....

I'll be mailing the hoop inside this embroidery project pouch that I made before our summer holidays.

Hoop project pouch for Suzanne

Made with 'twofers' leftover from this project's flying geese blocks.

Hoop project pouch for Suzanne
Here's the flipside, with some stitched dragonflies.

My to-do list is dwindling now that I am almost done with swap commitments. I'm not taking on any new ones so I can free up some creative time for Christmas gifts and a bed quilt for us that I want to have pieced before the holidays. Here's to a productive week ahead!

Thursday, August 4, 2011

Pretty (and Perfect) Little Pouch

This is fast becoming my favourite swap group. The members are fun, the talent is evident and the work is inspirational. I am busy clicking the 'favourite' button on almost every pouch photo! I love the rules that specify your pouch cannot be larger than 12" and any extras you send must fit into the pouch. It helps one avoid falling into Overachieving Swap Participant Mode.

In my sign up survey, I indicated that a pouch to hold our family's Kobo e-reader would be a great idea if my partner was looking for ideas (I personally like direction from my partners, so I try to give some ideas when I sign up for swaps - it takes a lot of pressure off from wondering what the heck to make!). When I first saw this photo in the flickr pool, I immediately got that "oh! Could this be for me?" feeling. Imagine my thrill when it did arrive in my mailbox last week!

My Stupendously Pretty Little Pouch Swap Package from VikkiLovesTea

It was beautifully made by the talented Vikki and sent along with those amazing extra treats all the way from the UK. Thank you so much Vikki! We used the pouch right away on our recent family road trip and everyone thinks it is totally cool (and cute, and functional, and perfect).

The pouch I made for one of the swap organizers (and fellow VI Bees member) was very well received (there were a lot of exclamation marks in her thank you flickr mail - so cute). Kelly had asked for a pouch that could tote juice boxes & snacks for her two little boys. I took this as a great opportunity to try lining a zip pouch with laminated fabric recently purchased in Bellingham. I also quilted the outer pouch with insul-brite thermal batting which gave the whole thing quite a lot of body so it can stand on it's own.

Pouch for Kelbysews by Poppyprint
Pouch + loot
(including my quilting secret weapon, Roxanne's Glue Baste-it, some chocolate, a Kona solids charm pack, hilarious napkins and tissue holder)

Pretty Little Pouch swap #2
Back of the pouch, with some poppyprints and stamped text (I'd been dying to use my alphabet stamps purchased at JoAnn last March).

So, another great swap comes to an end. I think I'm gearing down on public swaps in general, but I will definitely participate in this group when round 3 comes up. It's too much fun!

Tuesday, July 19, 2011

Poppy Pouch

It is summer swap season and I'm so happy that I've completed my first commitment 3 weeks early! Go, me! The Pretty Little Pouch Swap is a lot of fun and you cannot believe the incredible amount of inspiration in one flickr group. If you are at all interested in creating sewn pouches, check it out - everything from pencil cases to snap frame change purses, hoop pouches and little key fob cases to boxy cosmetic cases. Here are a few great project photos that I included in the inspiration mosaic for my partner.

Poppyprint's Pretty Little Pouch Picks - Round 2
click on the photo for links to each pic

I got a great secret partner for the swap and once I'd received her mosaic and sign up info, I was immediately inspired and got busy making this for her:

Poppy pouch by Poppyprint

I can't give too much away or it might become obvious who this is for, but I'll tell you that it's fully lined with a pretty Central Park laminate, the outside base is Moda Crossweave and the scraps are MoMo's It's a Hoot line. It's my first real laminate project. In order to keep the lining as useful as possible (i.e. continuously seamed laminate), I left the turning opening on the side seam of the outer bag, in lieu of the normal lining hole. I had to carefully stitch that up from the right side using a ladder stitch.

Poppy pouch interior

It's got a side handle and is a great size of about 8" x 9 1/2". It'll be perfect for cosmetics, or anything else requiring a bit of spill-resistance! The outer bag is quilted with insul-brite.....you know, in case something has to stay cool or warm.

Poppy pouch for PLPW#2

I spent last Sunday printing fabric with my poppy seed pods (stay tuned for poppyprint fabric on offer!) and took the opportunity to decorate the back of the pouch with some groovy prints.

Poppy Pouch back

I've made several zip pouches and I have to say that every single time, it's a total mystery as to how well the ends of the zip are going to turn out. I've read countless tutes on how to reduce zipper bulk, but I've got a long way to go perfecting this element of zippy pouch construction!

I think my partner will like it - I'm feelin' good about this swap!

If you're looking to stock your stash with some luscious hand-dyed fabric, scroll down for your chance in my birthday month giveaway #3!

Wednesday, May 4, 2011

Pretty Pouch(es) in da house!

Fun mail today! You just saw the pouch I made for my secret partner. No sooner did I finish that, then this arrived, all the way from Champaign, Illinois.

Pretty little package from Suzettra

My partner Suzanne obviously did her homework because both of the pouches she sent are absolutely perfect and incorporate so many details I just love!

Pretty Little Pouches by Suzettra

I mentioned in my sign up stats that a pouch to hold the Kobo e-reader that I share with my son might be a good idea (if my partner needed a plan). Suzanne posted a picture of this pouch in the Flickr pool and said things had gone a little off with her measurements and she wasn't sure if it would fit "a certain device". I immediately LOVED it and wondered right away if she was referring to our Kobo. After a field trip to the store for testing, Suzanne realized it was too small, but I'm so grateful she decided to send it anyway because it is just so great!

Robot pouch by Suzettra

It will be the perfect thing to store my three rotary cutters in! The best part is that I don't have to share it with T. Don't worry, I'll make his Kobo a cover one day....it doesn't stray far from his bedside table, so I'm not really in a rush.

I feel rather spoiled that Suzanne made and sent this wristlet too! It comfortable fits my iPhone and a few credit cards/driver's licence. Perfect for walks to the village for coffee!!

Stitched wristlet by Suzettra

I heart sashiko stitching but typically I mimic it with very thick thread on my sewing machine. I am really appreciative of the time and effort put into these hand stitches, which by the way, are so beautifully done!

Thank you for these wonderful swap gifts Suzanne, and to Kelly and Michelle for organizing all of us! The Pretty {little} Pouch swap was super fun. Check out the flickr pool for lots of amazing pouch ideas.