Showing posts with label Christmas. Show all posts

Tuesday, December 17, 2019

Spicy Mexican Chocolate Cookies

After posting photos of my all-time favourite Christmas cookies on Instagram yesterday, many people expressed an interest in the recipe (there are MANY if you Google the title of this post). However, here's the one I've been using for 25 years:


MEXICAN CHRISTMAS COOKIES
preheat oven to 350F. Makes 6 dozen 

6 oz unsweetened chocolate
Melt the chocolate gently over a double-boiler. Set aside to cool a bit.

2 C + 2 Tbsp flour
1 Tbsp cinnamon
2 tsp baking powder
1 tsp salt
1/4 tsp cayenne pepper (don't be tempted to use more!)
1/4 tsp ground cloves
Blend above dry ingredients in a medium bowl

1 3/4 C sugar
1/2 C. unsalted butter at room temperature
3 large eggs at room temperature
1 tsp vanilla
Cream the sugar and butter together in mixing bowl. Gradually beat in the eggs one at a time with vanilla. Slowly stir in the melted, partially cooled chocolate.

Mix in the dry ingredients just until blended. Cover tightly and refrigerate at least 2 hours or overnight.
Form 1" balls of dough, roll in icing sugar and place 2" apart on parchment-lined sheets. Gently press a raw almond into the top of each cookie, just so that it stays (don't flatten the ball). Bake for 10-12 minutes. Cookies will appear raw-ish in the middle.  Gently push down the almonds a bit more. Allow to cool.

Happy Holidays, everyone!


Thursday, November 17, 2016

Stuff Your Stocking This Year!


The elves at Sew Sisters are lining up treats of all kinds for quilters naughty OR nice! This fun event includes the shipping in your registration fee of only $10. Every day from December 1 - 7th, you'll receive an email outlining the special deal exclusively for Stuff  Your Stocking subscribers. If you like what you see, make the purchase that day.  All of your purchases will be held and shipped together after December 9th.  Last year, I stocked up on a variety of Aurifil thread colours on small spools at a killer price!

  What are you waiting for ?


NOTE: if none of the daily deals sent to your inbox appeal to you and you make no purchaes, then your $10 will be fully refunded at the end of the event! 

Monday, December 14, 2015

12 Days of Spark!

My lovely friend and blog partner Daryl of Fabric Spark is running a really fun holiday promotion to say thanks to all of her customers. For 12 days, there will be a new special announced in the morning that runs until midnight EST. Be sure to check back every day to see what might spark your imagination!  I'm sorry that I didn't have a chance to tell you in time about the weekend specials, but consider yourself fully informed to stuff your own stocking now!


Today, you've got several chances to win one of two Cotton and Steel canvas totes. Entry details are all on the Fabric Spark 12 Days of Christmas page here (comments here are NOT entries, kay?).  U.S. readers, remember that your strong dollar means an additional 25-30% off everything you buy from a Canadian shop! You may have to make yourself a bigger stocking.

Tuesday, December 1, 2015

A Christmas Quilt!

Aren't you pleased that I waited until December 1 to post a Christmas quilt? I do not appreciate the interwebs freaking me out about the remaining shopping/baking/decorating/crafting days starting in September. So I waited.  Just for you.

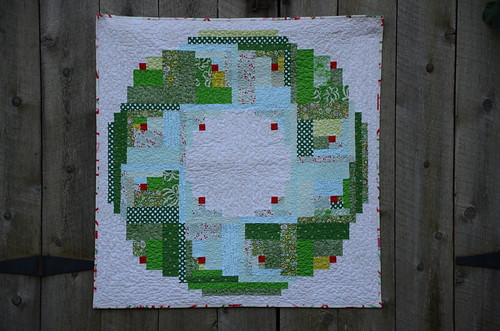
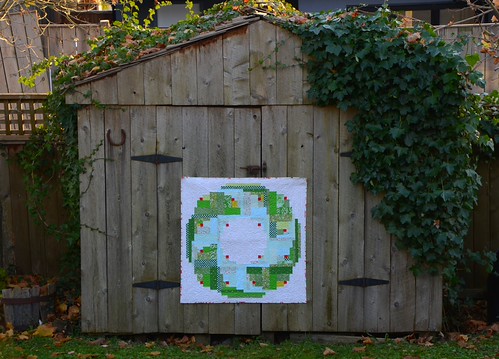
Pieced at Loon Lake 2014, basted shortly thereafter and finally quilted at Loon Lake 2015! I think this is one of the most clever log cabin quilts ever. The quilt was on the cover of Quilt Now magazine last year; the pattern is by Jessie Fincham of MessyJesse on Instagram.  Jesse was one of the lovely UK quilters I met when I travelled to London for the Fat Quarterly retreat a couple of years ago.

Evergreen Quilt by Poppyprint

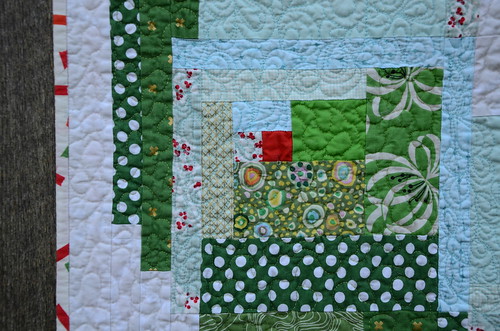
I enjoyed using some treasured scraps for the blue and green logs and pearl bracelets for the cream background. This quilt was a great colour exercise for me. It turns out that I often chose fabric thinking it is green, when actually it is yellow. I had to carefully extract a few yellow strips from the middle some blocks and replace them with a more vibrant green in order for the contrasting blue/green sections to show up.  Jessie made her original quilt with solids and tone on tones, I think.


Evergreen Quilt by Poppyprint

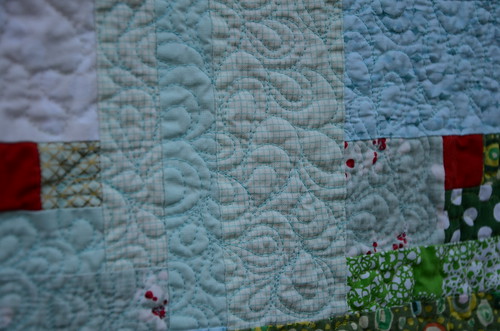
I had a great time free-motion quilting this on my new Juki 2010. I had absolutely no issues which was so great for a change!  In the cream and green areas I did a fairly close stipple and in the blue areas I did the interlocking clam shell-paisley thingy.  It seems to be in every single FMQ'ing book with a different name in each one.  I think I'm gradually getting my FMQ mojo back with this machine that doesn't cause me as many problems as my old one.

Evergreen Quilt by Poppyprint

I took a poll at retreat and the washi print from Cotton & Steel's Tinsel line won out for the binding. It is a fun print to bind a cream border with because the washi tape colours show up as random little dashes in the binding.

Ok, so here's the thing. I thought I would try wool batting for the first time on this fairly small wallhanging (I think it is around 36" square). It definitely made FMQ a breeze. I'd been told that wool batts were totally washable by a few people who have used them before. I washed this little quilt in my front loading washing machine (no agitation) on the gentle cycle, squeezed the water out, rolled it in a towel and then blocked it on my carpeted floor to dry. After it was all dry, I picked it up, marvelled at how perfectly flat the blocking made it, then noticed that it's completely FUZZY. Like, it needs a shave, fuzzy. The wool batting is bearding all over the place, not just at seams (that are, as you might expect, pressed to the side) and stitches, but it's actually coming out of the fabric. I'm so happy I didn't put it in the dryer! Has this happened to you? 

Evergreen Quilt by Poppyprint

Isn't it the cutest wreath?! I'm excited to gift this for Christmas, fuzz and all.

Wednesday, September 23, 2015

Tinsel Time

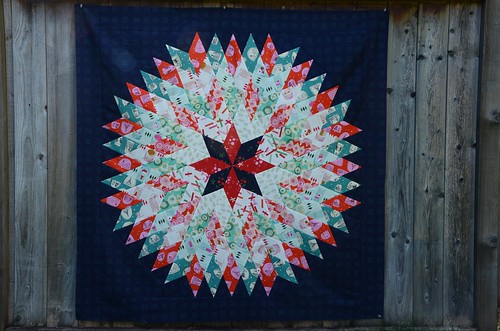
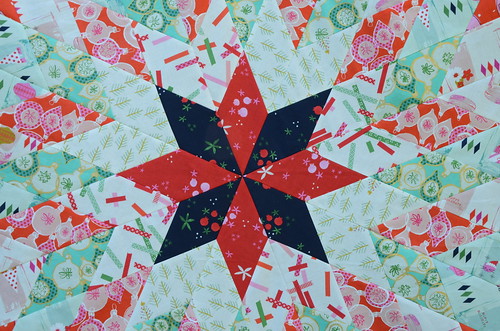
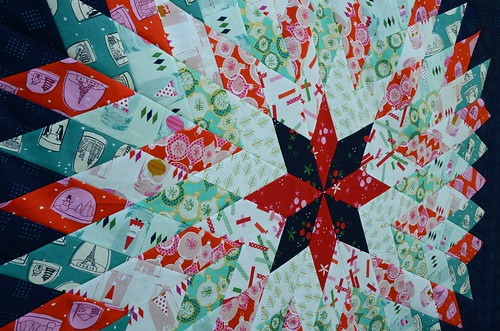
I held off until after school started, but this Christmas project could wait no longer. As soon as I saw Cotton & Steel's fun Tinsel* line at Spring Market, I knew it would be perfect for making Lynne's Lonestar Circle quilt from my book. I'll be teaching this quilt for two local guilds in the coming months and I needed a full-sized sample. Students will have the choice of making a mini like the three I've made, or this 55" square version.  I'll also provide info on fabric requirements for creating a radiating design with only 5 fabrics plus background, or using two alternating colour ways like I did in this Tinsel version and this mini version.  Fact: the full size is more forgiving and actually an easier make than those mini versions!

>Tinsel Lonestar Circle

I've got a folkart-inspired appliqued tree skirt that I've loved for years but after seeing the Tinsel fabric in all it's amazing cuteness, I thought I'd try and make this project and transform it into a new tree skirt.  Then this incredible stroke of luck happened....

Tinsel Lonestar Circle

The centre points turned out perfectly. This is part careful planning, measuring, pinning and sewing, but also part quilting voodoo. How can I cut that gorgeous centre star right outta there? Not happening. 

Tinsel Lonestar Circle

Hello, new holiday table cloth.

Sunday, December 28, 2014

Christmas Creativity - the Husband Edition

Christmas is the usually the only time of year that my husband B is able to carve out some creative time from his super demanding day job.  Every year we wonder if he'll be able to pull off another original design and get 150 cards screened in time and every year by some holiday miracle he succeeds. It is very important to him to continue a family tradition started in 1947 by his father (to read a more involved post about his process, check this out). This year he perfected the photo-emulsion technique that had eluded him in the past (thanks to a knowledgeable hipster at the art supply store). This is very happy news for me, because no harsh chemicals are needed to clean the screens, so I can breathe easy at silk screen time now!

Christmas card 2014: Our fireplace nook, complete with a lounging Flynn


B started his own tradition last year by writing everyone in the family a personal poem about their year (completed with beer or wine accompaniment on Christmas Eve). Read last year's poem about me here. Luckily his sister is even more prolific in the poetry department, so she writes one for him in return. I'll share this year's rhymes with you by way of giving you some pretty straightforward hints of the exciting year I have ahead of me. There is a lot of travel scheduled for 2015 and I couldn't be more excited....

 Back in the early 2000s
Bryan travelled on too many trips
It led in a roundabout way
To krista sewing up strips.

From the early days piecing log cabins
And other traditional blocks
Quilting gave Krista an outlet
More engaging than looking at rocks.

Fast forward to 2014,
Krista's hobby's a full blown career
With a glossy new book coming out
And trip to Loon Lake every year.

We know that her students love her
And retreaters would kill for a spot
To work on one of her patterns
With fabric that's cotton, and shot.

But of late there's another dimension
To the growing mystique of P-Print
She is going to travel the world
Due to an improvisational stint.

The offers are coming in fast
From the north and the east and on water
When she swings through our town the next time
We'll be lucky even to spot her.

What is it about this technique?
One might think it is just a glue trick
The Swedes from Uppsala know better
As does the Guild Inuvik.

Through it all you have family behind you
Though your fame may go up and down
I will always setup your tables
As long as retreats are in town.


I hope that you enjoyed your Christmas holiday surrounded by loving family or kind friends in front of a warm fire. All the best to you from our cozy blue cottage.

Blue Cottage Christmas 2014

Tuesday, December 2, 2014

Handmade for the Holidays

Just popping in to let you know that my lovely partners at Mad About Patchwork are having a fun sale until December 7th. They've created some fabulous kits for gift makes! You'll find kits for flannel + lawn Infinity scarves, table runners, quilts, aprons, pillows adorable drawstring bags and more.  The great thing about kits is that you just buy the fabric you need for the project, so they're an economical way to go. All kits are 15% off with the coupon code HANDMADE until this Sunday, Dec. 7.


In addition, all notions (rulers, thread, interfacing), pre-cut charms and rolls, flannel and fleece are on sale.  If you spend $60, you'll receive a handmade Mad About Patchwork pin cushion!


That's not all the good news. In keep with the spirit of the season, the shop donated a portion of their total sales last weekend to Ottawa's Snowsuit Fund . That's my kind of holiday spirit!

Thursday, November 20, 2014

Stuff Your Stocking

There's a really fun promotion coming up at Sew Sisters! If any of you like to give Santa (or, say, your husband, partner, parents or kids) a helping hand, you are going to want to check this out.

Stuff your Stocking

Pre-registration is required to unlock the deals, but if at the end of the event you've not made any purchases of the daily deals your $10 will be refunded. The best part (well, there are five best parts as far as I can tell):

  1. FREE SHIPPING IN CANADA for all of your accumulated Stuff Your Stocking purchases!
  2. There's a fun surprise every day (I am one of those people who LOVE surprises).
  3. You are guaranteed to have pretty and useful items that you LOVE in your stocking! 
  4. The daily deals are emailed direct to you - no need to search the web every day.
  5. Santa gets a break.
To register, visit the nice people at Sew Sisters here.

To further support your Christmas list, Sew Sisters has started an "All I Want for Christmas" wish list Pinterest board here where you just might find some Doe (yes, they have yardage AND packs - I think they might be the first shop in Canada to have it!).

I'm dreaming of a white Christmas.

Friday, December 20, 2013

Winner, winner, Christmas dinner!

I felt so lucky (and for a moment, a little guilty) for winning the block lotto at my annual November retreat last month. I've been running this retreat for 8 years and never won, so I guess it was bound to happen. Can I just say how happy I am that it was this year? Happy, happy, happy!  Katy's Christmas scrappy trip inspired me to set the Scrappy Trip Around the World block as this year's lotto - it's a super quick make and everyone's got holiday fabric to use up!


Although I'd been sewing with my pals for 4 days non-stop, I returned home Monday night and put the blocks right up on my design wall. There were 30 blocks, so a 5 x 6 layout made the most sense. The odd number across the quilt meant I couldn't use the 'normal' diamond setting. As much as I love this block, I didn't really feel like making 6 more - I just wanted to get this thing together in time for Christmas! Using the strong diagonal reds, I opted for zigzags.


I busted out the wiggly stitch on my Pfaff for diagonal quilting lines through every second square. The wiggly stitch is excellent for diagnonal lines on a quilt with 2" squares because you don't have to mark the quilting lines!  Just aim for the corners of each square and you're all set. The wiggly line doesn't have to hit the corners dead on like you'd want to do with straight-line stitching.


I considered a flannel backing, but also had yardage of this super soft Kaffe Fasset shot cotton in green that's been lying around for years. Using up stash won over buying new flannel and I framed in this extra block with some Kona red so that there's a sweet little present on the back. The binding is a sweet candy cane stripe that was printed on the bias that I've been saving for just this kind of quilt (JOY by Kate Spain for Moda).


All washed and cuddly and keeping us warm on the couch!

Tuesday, December 17, 2013

Oh, Improv Tree

A few weeks ago I taught an informal workshop for members of my traditional guild. I was keen to share a new improv piecing technique that I've been having fun with. I like to sew along with students so that I have something to demonstrate. For this afternoon session, I gathered up a bunch of green and blue solids and set to work.

Improv Tree Pillow by Poppyprint

I had this little idea that I would make a modern Christmas pillow by arranging strip sets into a tree shape. I decided that a winter tree needed some snow, so the narrow white strips were added to separate the greens from the blues.  When I pieced it all together, it really looked like a green volcano. The appliqued wool snow 'flakes' were required to cement the winter look for me.

Victorian Greenhouse by Poppyprint

Originally I'd pieced a small yellow tip on the tree to represent a star. After asking for advice on Instagram on turning my 'verdant mountain' (as one commenter put it) into a convincing tree, several friends suggested a proper star.  I think it was good advice!

Improv Tree Pillow by Poppyprint

I had fun with the free motion quilting. I tried to do windy swirls in the blue background and a fir tree-type pattern in the tree itself. The pillow front was fused to Pellon fleece and I quilted it without a backing fabric since it's the inside of a pillow, after all.  The backing is a JoAnn Fabrics print from last year, and of course the binding is a fabulous red Loulouthi print by Anna Maria Horner that picks up the pinks from the back and blues from the front!

The pillow seems very happy on our couch along with the new Scrappy Trip Christmas quilt that I've yet to share in it's finished form. The lighting is very limited this time of year and I've yet to score a decent photo.....soon, I hope!

Monday, December 16, 2013

A Christmas Greenhouse

Making special gifts for family and dear friends is what Christmas is all about for me, and I know many of you, too.  The minute I saw Amy's Victorian Greenhouse pattern for foundation paper piecing, I knew that I would make it for my lovely friend. She recently inherited her mother's sweet greenhouse and after dismantling, transporting and setting it up in her own backyard, she spent last summer filling it with various seedlings, tomatoes, strawberries and a sweet garden chair.  I know it is very special to her, and that it will enrich her garden fully, not only with warm memories, but also vibrant, healthy plants.

Victorian Greenhouse by Poppyprint

We share a love of Liberty prints, so I had a look through the stack of tana lawn that I brought back from London last July to find just the right print to fill the greenhouse. I used my own poppy-printed fabric for the ground and Joel Dewberry's new woodgrain in grey for the border.  The foundation print is one of rocks that I've had for years and had never found a use for. It is perfect here.

Victorian Greenhouse by Poppyprint

The pattern, although featuring some super skinny strips, was very easy to sew on the foundation. I used a product called "Fundation" printable sheets  to print the pattern directly from my printer.

Victorian Greenhouse by Poppyprint

I sewed ties into the top and bottom seams (between the pillow front and back) to keep the back overlap from gaping. 

My friend visited with her family yesterday and we exchanged our heartfelt gifts. I was absolutely thrilled to receive the most beautiful hand-woven tea towel from the first cloth she has created on her table-top loom. You can see the blogpost about her newest obsession, and my treasured gift, here.  While Christmas is definitely a time of giving, I will freely admit to being a most appreciative receiver as well!

Victorian Greenhouse by Poppyprint

I hope you are enjoying spending some time sewing for special people in your life, too!


Sunday, November 24, 2013

Small Sewing

It's that time of year! Time for various quickie, small sewing projects to get through the season of dinner parties and stocking stuffer preparation.

Last night we were invited to dinner by a colleague of B along with her sister and brother in law who are, coincidentally, old friends of ours from early in our careers [hi Kris!]. I made both of them a seasonal potholder during a guild sew-in yesterday.

photo

I was inspired to make the improv trees out of scraps from tree skirt projects and Essex yard dyed linen in black.  Jolene's tree quilt is one of my favourite from Modern Quilts from the Blogging Universe and after seeing Krista's version at my recent retreat, it was fresh in my mind. Time to make some already! I quilted the tops to one layer of Insulbrite and another of cotton batting, then sewed that RST with a red and white fork & knife print for the backing, turned them out and top-stitched around the seam. There's a little hanging loop in the corner, too.

Next up was this set of two zipper pouches for a friend's young daughter to carry womanly essentials in her backpack.

linen pouches by Poppyprint

As I joked on Instagram, 'there's nothing that says welcome to womanhood like a weird purple Echino deer!'

linen pouches by Poppyprint

There are so many great gift tutorial round ups online at the moment. I have to restrain myself from making all the things and sticking to my program here! Check out the great gift ideas here and here.  If you've got a great tutorial you'd like to share, please leave a link in the comments, I'd love to see what you're making.

Wednesday, December 12, 2012

Merry Christmas from the Krista Elves


Happy Holidays to you and yours from K1 and her Flygirls
(K2 & K3)

This is the funnest free app EVER. Check out Office Max Elf Yourself at the app store. You can even choose your own music genre. Obviously, we are rockin' the hiphop isolations.

Monday, November 26, 2012

Poppyprint 500 - A Celebratory Giveaway!

I've had a lot to say since the day I started talking. My parents, teachers, friends and very patient husband would all nod their heads in agreement. I just can't help myself. I am incredibly bothered by awkward silences and as a result, tend to blather on with abandon at all times. I'm admitting to you all now that there are times in social settings where I actually have to concentrate really hard on NOT talking all the time. What can I say, I've been blessed with the gift (or annoying habit, more like) of the gab.

Sharing is also high up on my 'what I like to do' list. Blogging, therefore, is the perfect vehicle for me. I started my engines three years ago, and here I find myself at the Poppyprint 500. I'm waving the checkered flag for you all on a sweet giveaway to say thank you so very much for hanging out here.  I appreciate your comments and support so much!

Yo Yo, It's Winterkist!

I love this "Yo-Yo, It's Winterkist!" pillow cover I made with Monica's delicious fabric and some super soft chambray for Fat Quarterly's Holiday 2012 edition. It's so bright and cheerful and it would please me very much to share it with one of you.

DSC_2854

Awww. How adorable is that Gnomie on the back? I still have some Gnomes and Gnomas left to make something fun for myself, so where will this little guy end up?

WAIT! If you don't win the pillow, you still have a chance to win an Echino passport wallet chosen from this stack of 34 that I've made for the VMQG table at Got Craft? coming up soon in Vancouver.

DSC_2859
still have to install the snaps....

Leave a comment for your chance to win. I'll send the pillow cover anywhere and it should arrive in time to add a little punch to your holiday decor - you'll just have to provide the pillow form!  

If you are a follower of Poppyprint, please leave a second comment to double your chances - after all you're the ones who put up with my blathering on. And on. And on!

I'll choose two winners on Saturday Dec.1st at noon PST. Good luck friends! 

Thank you so very much,
Krista

ETA: Comments are now closed. Thank you for visiting Poppyprint!

Thursday, September 13, 2012

Pillow Pretties!

Back in February I taught a 'dresden plate by machine' class for my traditional guild showing how to make a lovely pillow cover using my Dresden Pillow Pattern.  My friend Colleen, (also a fellow member of the VMQG) recently posted these gorgeous pictures of the two pillows she made!

Dresden Plate pillows

She used a beautiful charm pack of Kaffe Fassett prints purchased from Matt, yet another member of the VMQG at his shop The Quilted Bear.  This close up shows a fun variegated thread buttonhole stitch Colleen used to highlight the dresden centre.

Pillow close up

I love her beautiful hand quilting around the dresden plate. Thanks for sharing Colleen!

If you're looking to get a start on some holiday gift sewing, check out my pattern right here. It's a great one for using a Christmas-themed charm packs or collections (like this, or this ) to make some decorative holiday decor.

Monday, December 12, 2011

Bare Neck-ed No More!

Ok ladies, this post is a peek at the gifts you'll receive if you are a woman over 13 years old and related to me by birth or marriage. If you would like to keep your present a total surprise, I suggest you make a hasty exit. There are some colour options, so that bit you won't know until you open, and they are already wrapped and labelled, so no special requests! That means you SIL who loves 2 blocks from me (as opposed to the two who live a zillion miles away).
.
.
.
.
ok, last chance to bail!
.
.
.
.
.
.
.
.
Alright then. Thanks to Krista, who gave me the idea with her one-woman sweat shop production line at retreat, I came home with the plan to make lovely scarves for all the girls. Using my very own scarf purchased from Krista as a template (and with her encouragement), I got busy with some buttery soft AMH voile, Alexander Henry cotton lawn and a cozy Jo Ann's flannel in gorgeous colours. I used up every scrap of fabric I bought for my gifts, but if you would like to treat yourself or someone you know with a bare neck to a luscious scarf, Krista still has some available in her shop!

flannel & voile scarves

The scarves are a generous 70" long and 8" wide. I've been wearing mine daily (and sometimes just even around the house!).

flannel & voile scarves

I'm not going to give you a full length view in case of looky-loos, but I was so excited about (a) how these turned out and (b) that they are actually completed on time for shipping far away that I could not wait until after Christmas to show you (and by YOU, I mean women unrelated to me by birth or marriage). Because those you's are not reading this post, are you?

Friday, December 9, 2011

My kind of air freshener!

Baking. That's the only thing I want to smell in my house. Not some chemical Tahitian sunset coming from a plugged in plastic seashell. Today my home has the lingering scent of Mexican Christmas Crackles. This is my go-to holiday cookie. When it comes to the holidays, nothing says Christmas to me like the smell of these chocolatey-cinnamony-clovey-cayenney cookies.

photo

Mexican Christmas Crackles

6 oz unsweetened chocolate (I used Trader Joe's discs), melted over double boiler

1/2 C. room temperature unsalted butter creamed with 1 + 3/4C sugar
add in 3 eggs one at a time
add 1 tsp vanilla
gradually stir in chocolate

Sift together:
2 C + 2 TBsp flour
1 Tbsp cinnamon
2 tsp baking powder
1 tsp salt
1/8 tsp cayenne pepper
1/4 tsp cloves

slowly combine dry with wet and stir until blended. Chill in fridge for 2 hours or overnight.

Preheat oven to 350F and line cookie sheets with parchment paper.

Form tablespoonfuls of dough into a ball and roll in sifted icing sugar. Place onto sheet 2 inches apart. Press a whole almond or 1/2 cherry into the top of each ball.

Bake for 12 minutes. Let cool on sheet 5 minutes before transferring to wire rack.

I made three batches yesterday. That's 18 dozen. I only needed 11 dozen for my cookie exchange last night. Mmmmmm, more for me! Well, not too many. When the kids were young, they called these "the spicy cookies" and avoided them like brussel sprouts. Sadly, when they got home from school they both devoured several. Apparently their palates have matured!

What smell says Christmas to you?


Thursday, December 8, 2011

Pillow Party under the Tree

If you are my sister, or my SIL who is also a mother to five children AND you don't want to see what your children will be getting from me for Christmas, then make a hasty exit now please. No paging down first.
.
.
.
.
.
.
.
For the rest of you: they are done! Seven quilted reading pillows for all of my nieces and nephews (yup, one of my brothers has 5 kids and my sister has 2). For specific fabric lines used, click on the photo and it will take you to flickr where I wrote that info in individual photo descriptions.


Reading Pillows by Poppyprint
All 18" pillows except for the pink/purple dresdens in the bottom left corner, which are 20". You can see the pictures individually once you get to my flickr photostream - they're all there.

I didn't use any specific tutorials to make these pillows, but I got the idea to use my GO!Baby tumbler die for the boy pillows after seeing Katy's. Check her Tumbler Pillow tutorial at Fat Quarterly. If you want to try a dresden plate there are several free tutes I found via the google searching wonderdog here and here. Or if you want a hybrid tumbler/dresden pillow, check out this tute! For my dresdens, I used a 22.5 degree ruler made by Nifty Notions, but you can use any dresden ruler. To know how many blades you need to complete the circle, just divide 360 degrees by the number of degrees in your ruler's arc.

I like dresdens with long blades and a small centre circle (trying to use up my scraps after all), but chubby dresdens can be very cute, too. Nova just published an adorable pattern that is a chubby dresden pillow with a pocket in the centre circle. Brilliant!

On pillows for the younger kids I did a simple envelope closure for the back (plus I ran out of long zips. Note to self, an 18" pillow requires a 16" zipper, not an 18" one). I covered the couple zips I did use to protect furniture and long hair. There are different ways to cover a zipper, one is here and another here.

Next up, gifts for grown-ups.

Tuesday, December 6, 2011

All I want for Christmas is candy

So says my daughter's Secret Santa partner at school. Remembering the last time we had a birthday request for CANDY, she asked if I would make another fabric basket to hold the sugar. I happen to know her secret partner, a very nice boy who is really enjoying the guitar lessons that started up in music class last month.

Presto. One fabric basket featuring the divine guitar (or is it Ukelele?) print from Heather Ross' FFAIII line, Ty Penningtons woodblock in grey and Mrs. March's Collection Modern Style for Lecien as the lining.

Goodie {fabric} basket by Poppyprint

They are in French Immersion class, after all. Had to throw in some Paris! There is even sheet music printed in the background of the print.

And here it is filled with cavities.

Goodie {fabric} basket by Poppyprint

These fabric baskets make up in a jiffy (in fact, I almost had it complete in the time it took for D and her friend to walk to the candy store and back!). They are perfect for gift giving...fill them with French milled soaps for a girlfriend, home-baked cookies for a neighbour or teacher, or you know, candy for the discerning 12 year old sweet tooth on your list. Easy peasy tutorial here thanks to Ayumi. You'll see that I substituted two 3.5" x 9.5" pieces of guitar fabric instead of the pieced panels, and sped things up by using fusible fleece for the batting.

The gift-making continues here in Poppyprint-land.....

Tuesday, November 22, 2011

Fuzzy Snow

No such thing. It's cold, it's wet, it's white. I love it.

Once in a while, I like to celebrate the snowflake's sublime symmetry. Yesterday, when I realized my guild's ornament swap was happening tonight, it was panic stations around here for a few minutes before I clued into my new GO!Baby die: the hexagons! A 6-armed snowflake would fit perfectly onto a hexagon background. You know, sometimes that university degree comes in so handy.

wool felt snowflake by Poppyprint

I googled "snowflake template" and perused many a flake before deciding on this one (chosen for supposed ease of negotiating small spaces with a machine blanket stitch). Please do not examine all those points too closely, my blanket stitch did run amok in spots. I fused the flakes (using Transweb) onto the hand dyed wool 4" hexagons that were beautifully cut on my GO!Baby. I put one layer of wool at a time through the cutter and the hexagons were cut accurately and cleanly.

wool felt snowflake by Poppyprint

Both sides are identical and the ornament hangs from a 1/8" satin ribbon loop. I hand stitched the two hexies together with perle cotton and lightly stuffed with fiberfill. Then I secured matching buttons to each other through the middle to gently squeeze the snowflakes, giving them some added roundness. Swap-ready in one hour! Love that.