Showing posts with label embroidery. Show all posts

Thursday, October 22, 2015

They're Golden!

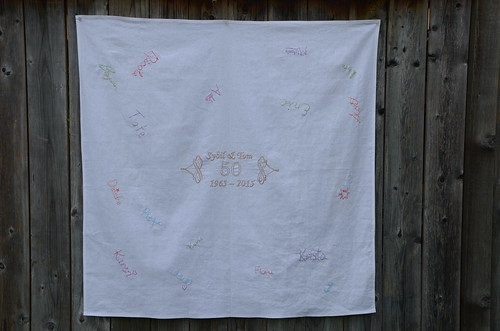
You may recall that in July my family attended a special reunion in Nova Scotia. My three siblings and I, our spouses and children all joined my parents to celebrate their 50th wedding anniversary.  The four families chipped in and gifted my folks a weekend in Niagara-on-the-Lake complete with tickets to a musical.  I wanted to do something a little longer lasting, though.

>50th anniversary table cloth

I made them a fun quilt for their 40th anniversary featuring hand drawn and crayon-coloured blocks by most family members. That quilt hangs proudly in our family cottage.  This time I opted for an embroidery project.  I hemmed a yard of white Essex linen and took it along to Nova Scotia with me for everyone to sign using a Frixion pen.

50th anniversary table cloth
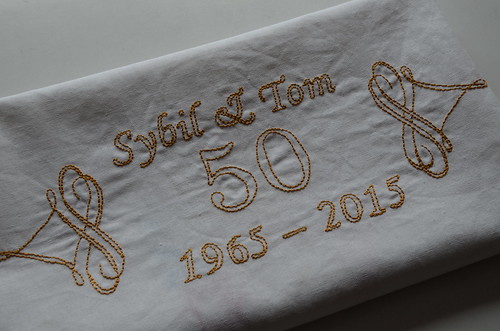
My parents are the original Sybil and Tom...I'm sure Downton Abbey fans will ask ; )

The middle dedication was prepared in Word, printed and then simply traced onto the linen. The flourishy thingies I found in free clip art online.  I first tried to stitch it with metallic embroidery floss, but that was a disaster. It looked awful, I couldn't knot it without huge lumps and the metallic threads frayed off the rayon core thread like crazy.  Luckily a friend provided this gold coloured rayon floss that worked beautifully.

50th anniversary table cloth

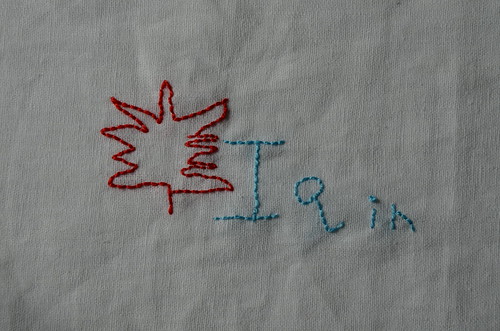
My favourite 'signature' on the table cloth is by the youngest member of our family, my four year old nephew. After writing his name, he looked up at me and said "I'm thinking about a maple leaf". I asked him if he'd like to draw one and look what he drew, from his memory! He never took the pen off the linen and looked up at me after he drew each line. Adorable.

It is a difficult thing to photograph well, but you get the idea of this gift. There is a round table in my parent's front hall that I thought this would suit perfectly, and that's where my mom has put it. They are currently cruising in luxury around Italy, Croatia and France. That sounds like the perfect way to celebrate 50 amazing years!

Sunday, June 21, 2015

Stitching at Sea

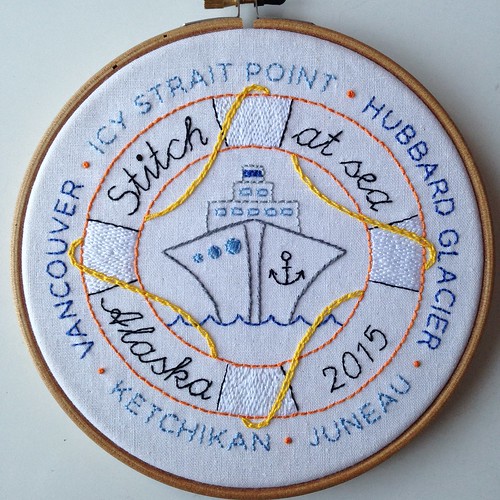
Ahoy! We're home from our epic week aboard the Celebrity Infinity!  Myself and 18 quilty friends spent a wonderful week exploring the Alaskan ports of Icy Straight Point (Hoonah), Juneau and Ketchikan, plus a trip into the Hubbard Glacier which was spectacular. We were so very well taken care of by the wonderful staff aboard the ship (shout out to the electricians who kept our irons hot and our machines running!). In addition to plenty of sewing time, we ate so well, drank lots of delicious wine and coffee, danced, were entertained in the theatre and a few of us even played the slots and went ziplining (more in the next post!).

Stitch at Sea Alaska 2015

This embroidery hoop was my surprise for all of the Stitch at Sea Alaska participants. I drew up the design and had my pal Berene tidy it up in Illustrator so that I could print it directly onto white Essex linen through my inkjet (I cut the linen to 8 1/2" x 11" pieces and ironed them onto freezer paper. If you set your printer to 'cardstock' it will grab the thickness of the linen + freezer paper and feed it through!). 

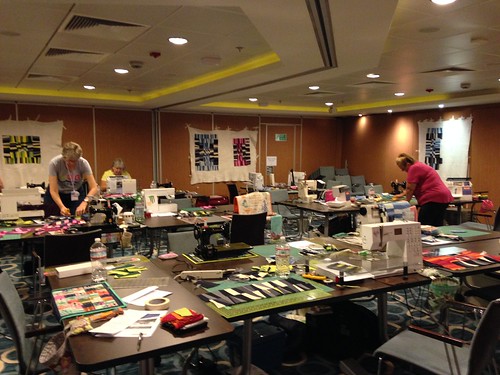
Our Stitch at Sea classroom
conference room Beta - our studio for the week (design walls/batting supplied by Pellon!)

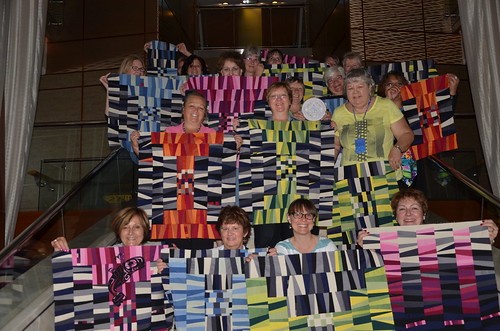
I taught two workshops on the cruise for a total of 9 hours of instruction, but we had many more hours of free sewing (one night at sea several intrepid quilters stitched until midnight!). First we played with the luscious Oakshott colourshotts which I had kitted into four Alaskan-themed colourways for my Improv Under the Influence technique class. Students had their choice of Midnight Sun, Northern Lights, Glacier or Fireweed. You can see the results here (sadly, too windy for an outdoor photo, so we took over the Grand Staircase inside the ship).

Improv Under the Influence workshop
Most people stuck with the "Chess on the Steps" layout, but as you can see, a few took my encouragement to try alternate layouts for their improv borders.

The second workshop was much more precise: the mini Lonestar Circle. We were all feeling the effects of a week at sea, being well fed and toured around.  People chose their Cotton & Steel FQ sets I'd curated, cut their strips and started piecing, but we didn't get far enough for photos, really. On our final day, the sun was shining through the Inside Passage and most of us chose to pack up our supplies and head up to the top deck to enjoy some stitching in the sunshine while keeping an eye out for whales.  Many of us were rewarded with Orca sightings! I saw a baby jump fully out of the ocean (I thought it was a porpoise), but then the mama's massive dorsal fin appeared, followed by her tail. I was super excited to have my first "Orca in the wild" sighting!  

More photos and stories coming....but first a word from our sponsors:

Over the previous few months I contacted several folks in the industry and was able to put together some fabulous goody bags for everyone, in addition to collecting enough incredible door prizes that each quilter went home with a bonus as well. Special thanks to all of these generous sponsors!


    Love Patchwork & Quilting
  Pellon Projects
rox_LOGO_100        Oakshott fabrics        

       
 Mad About Patchwork
Image result for sew sisters button     


Friday, February 14, 2014

Sharing the Love (runner)

Hello my lovelies and Happy Valentine's Day.

Just a quick visit to let you know I am still here, working very hard and trying to stay focused. It is really hard to walk past my sewing room a zillion times a day without sitting down to sew!  I did manage to finish off my Love runner in time for today, though.


This was an unexpected project that resulted from a new piecing technique I'm working on for upcoming workshops. I tried it out using a really old charm pack of Valentines fabric I found in my stash. The pieced units looked pretty good, and I have never made any home-dec items for Valentine's Day, so I decided to go for it.


The alternate rows are Kona PFD (prepared for dying) white that I had on hand. I used fusible Pellon fleece for a thin batting and stitched in the ditch of every seam.  The hearts were marked, then using a pearl cotton, I quilted them in with a running stitch.


And finally, a little Love chain stitched along one end.   It's all bound up with Lizzy House's fabulous pearl bracelets, which makes a fabulous binding!

I hope you get, and give, a nice lovin' squeeze from someone special today. And if that doesn't work out, treat yo' self to some delicious chocolates. Happy heart day.

Monday, October 7, 2013

Portholes

A lovely class with Lucie Summers at the Fat Quarterly retreat in July yielded these three "Porthole" blocks which I love. Spending a couple of hours learning from Lu was a real treat. She is so much fun, completely unpretentious and hilarious and most importantly for a teacher, really instills a "you can do this" feeling in her students.

Porthole Table Runner by Poppyprint

I wanted to complete a small project with the blocks and keep them together as a technique sample. I love the finished edge and texture that this technique provides. It's not difficult, you just have to be extra careful while trimming away seam allowances from the back!

Porthole Table Runner by Poppyprint

Lu also taught a wonderful improv piecing class (which I wasn't in), then the next day demonstrated the kantha-style running stitch in a hand-quilting session.  I love kantha stitching and felt it was a great way to show off these blocks and provide lots of texture to the table runner. It's a great feeling to create running stitches freehand, just rocking your needle up and down across fabric without trying to follow lines or worrying about keeping your stitches consistent.  Katha stitching also marries well with the block-printed linens I used from Maiwa Handprints. Some of them may even be from Bengal, where Kantha embroidery originated!

Porthole Table Runner by Poppyprint
A triple porthole!

At retreat, Alex Veronelli of Aurifil shared some wooden spools of his linen thread for people to try. The natural colour and texture (it's a bit nubbly and the thickness varies) is just perfect here. I loved it.  I think initially Alex was hoping people could put this thread through their machines. I haven't tried, but having stitched with it by hand, I am pretty sure my machine's tension discs, and machine needles, wouldn't appreciate the varying thickness and natural imperfections in the thread.  For hand-sewing an organic running stitch however, it's ideal.  I'm sorry but I don't know if this thread is available commercially.

Porthole Table Runner by Poppyprint

The runner is only 10" by 33" so it's a bit teeny for our big dining room table. I may end up hanging it on a narrow wall area. I will definitely display it somewhere because I'm super pleased with this project.

Monday, November 28, 2011

Embroidery - You Can Do It Giveaway!

Time and time again I receive comments and lovely compliments on the embroidery projects that I show here on Poppyprint. Many avid quilters and sewists tell me they would love to learn how to embroider.

Embroidery sampler by Poppyprint

I learned how to embroider in Girl Guides many, many years ago. It is a pastime that I find very relaxing and endlessly creative. Plus, I love floss. And all things considered (in our chosen hobby/work/art/craft) it is super cheap.

Team logo stitched by Poppyprint

Embroidery can be simple, or complicated, but either way it is not difficult. Earlier this fall I took a wonderful 2-day course to hone my skills and learn some new stitches. The excellent (and extremely patient) teacher, Bonnie Adie, recommended a reference book called The A-Z of Embroidery Stitches by Country Bumpkin Publications. Unfortunately the book was very hard for me to find locally, so I contacted the publishers and guess what? They sent a copy all the way from Australia for me to share! Now you can learn, too!

A-Z Embroidery Stitches giveaway

This guide comes with a brave claim on the front cover that it is "One of the great reference books of all time". I don't know about that, but I do know everyone capable of holding a needle can learn every stitch contained in this book. Beginning with the Algerian Eye Stitch, and ending with the ZigZag Stitch, every page is stocked with full-colour photos to guide you through each stitching step required.

A-Z Embroidery Stitches giveaway
Look, you can do Shisha!

Helpful tips are inserted along the way in text boxes, including tips for lefties, needles, using hoops, knotting your thread and finishing you work. I love it when publishers are clever enough to bind crafting books with a spiral so they will stay open and flat on your work table - makes following step by step instructions so much easier.

A-Z Embroidery Stitches giveaway

After learning a basic stitch, you'll be ready to combine techniques for beautiful effects like this loopy blanket stitch rose, above. This book doesn't have a lot of fluff - it's full on useful information from page 1 and I know I will refer to it often. There are no project ideas, it's strictly technique for over 150 stitches.

A-Z Embroidery Stitches giveaway
I love the two-colour chain stitch!

I had never heard of Country Bumpkin before (not surprising they are in Oz, land of beautiful stitchery!) and have learned that they publish beautiful magazines and many other reference titles. So, how'd you like to add A-Z of Embroidery Stitches to your crafting library? Just leave one comment for your first entry and then sign up for Country Bumpkin's e-newsletter and comment that you've done so for a second one. Please, please make sure there is an email link in your comment so I can contact you.

Happy Stitching!
(random winner will be chosen Saturday, December 3rd)

Comments are now closed, thanks for visiting!

Tuesday, November 22, 2011

Fuzzy Snow

No such thing. It's cold, it's wet, it's white. I love it.

Once in a while, I like to celebrate the snowflake's sublime symmetry. Yesterday, when I realized my guild's ornament swap was happening tonight, it was panic stations around here for a few minutes before I clued into my new GO!Baby die: the hexagons! A 6-armed snowflake would fit perfectly onto a hexagon background. You know, sometimes that university degree comes in so handy.

wool felt snowflake by Poppyprint

I googled "snowflake template" and perused many a flake before deciding on this one (chosen for supposed ease of negotiating small spaces with a machine blanket stitch). Please do not examine all those points too closely, my blanket stitch did run amok in spots. I fused the flakes (using Transweb) onto the hand dyed wool 4" hexagons that were beautifully cut on my GO!Baby. I put one layer of wool at a time through the cutter and the hexagons were cut accurately and cleanly.

wool felt snowflake by Poppyprint

Both sides are identical and the ornament hangs from a 1/8" satin ribbon loop. I hand stitched the two hexies together with perle cotton and lightly stuffed with fiberfill. Then I secured matching buttons to each other through the middle to gently squeeze the snowflakes, giving them some added roundness. Swap-ready in one hour! Love that.


Tuesday, November 1, 2011

Chihuahua Princess

Ladies and (one or two) gentlemen, may I introduce Chihuahua Princess, my latest embroidered hoop project...

Chihuahua Princess - by Poppyprint

This is on it's way to my secret partner in the Misfit Quilter's modern hoop swap, a small swap group that I totally gate-crashed after reading about it on Twitter. I was in the mood to make another hoop. They don't take tons of time and you can have a lot of fun with them.

Chihuahua Princess - by Poppyprint
Her 'diamonds' are clear beads attached with a French knot.

I'm never sure that others will share my sense of humor, but I thought it would be funny to have a totally blinged out princess Chihuahua in her 80's Adidas bag letting everyone know that her other ride is a Prada. I hope no one sues me. I think every boy in my high school carried their books in those vinyl Adidas bags in the early 80's...that is until the handles inevitably ripped out of the rivets!

I'm linking up to Rachel's Celebrate Color Needlepoint pool with this hoop!

Celebrate Color

One more swap to complete: I'm making a pair of potholders for a member of the Fraser Valley Modern Quilt Guild in a swap with my Vancouver Modern Quilt Guild. We are only about an hour's drive apart location-wise and sometimes a few members of one guild will attend the other's monthly meeting. We thought a guild to guild swap would be fun. Have you ever done a swap like that?

Thursday, October 20, 2011

Fav Fabrics - Sampler Tutorial & Giveaway!

Fabric and scrapbook design company Basic Grey created a groovy concept for a sampler display canvas. You've likely seen them on other blogs recently - Fat Quarterly had a bunch made up as designer challenges and Amy has done several stunning examples, too. It's cool to see how different people run with the idea of displaying their fav fabrics, notions, trims and even scrapbook paper!

My original plan took a bit of a U-turn. Initially I thought about painting the vines gold and using Christmas fabrics in the circles...sort of a Christmas bauble idea. I considered silk ribbon for embroidering hangers on a few of them, or criss-crossing it over the middle of a few circles as if they were wrapped gifts. The Sharpie Gold Paint pen was a disaster on the canvas. I tested it on the back and it sunk into the canvas with no sheen at all. It was just a dull brown stain. Euw.

Basic Grey Sampler by Poppyprint

So, plan B was Sharpie Silver which looked better (still not what I envisioned, but oh well). Unfortunately, I don't have enough holiday-looking fabric to coordinate with silver so I re-programmed and went with a fav fabrics display for my daughter. She wants us to repaint her bedroom in lime green, purple and turquoise. Hmmm. If I can keep this a secret, it will be a Christmas gift for her. If you'd like to try out a Basic Grey sampler and want some ideas, here's how I did mine:

Basic Grey Sampler by Poppyprint

After the colouring was all done, I scoured my scrap bin for suitable fabrics. Then I cut 3.5" squares of Steam-a-Seam II and stuck it on the back of each scrap, leaving the backing paper ON. Using my GO! Baby and the circle die (thanks Di!), I cut out 2" and 3" circles from the Steam-a-Seam-backed scraps. I also tossed in a few hand dyed wool pieces for a hit of saturated colour. I hadn't considered cutting wool with the GO!, but Paulette recently did a whole bunch and it worked perfectly!

Basic Grey Sampler by Poppyprint

Then I laid everything out with a few buttons and took a photo for reference. All the backing papers were peeled off and, as is typical of me, I chucked the photo and rearranged most of the pieces in a different way. To hold them in place temporarily, I used a Clover mini-iron, just heating the very centre of each circle. This little iron would have crushed the felted wool, so Roxanne's Glue did the job on those ones (honestly, I hadn't intended for this post to become such a product placement....I really have all this stuff and I really use it!).

Basic Grey Sampler by Poppyprint

Now with everything secured, I turned the canvas frame over so I could press firmly from the back to adhere each circle permanently.

Basic Grey Sampler by Poppyprint

I found the whole display rather flat at this point, so it was time for some buttons and embroidery to add texture.

Basic Grey Sampler details
I know the pottery puppy button seems like a complete non sequitur, but if you know D, you know there is nothing she loves more than dogs. I've had these South African-made buttons for ages and this seemed like a place to use one!

Still not completely satisfied, I decided that some ricrac would help frame the whole she-bang so I staple-gunned it around the edges to the back of the frame. A few dabs of hot glue secured it to the canvas. And here you have it:

Basic Grey Sampler by Poppyprint

Now that you see how easy and fun it is to create a display of your fav fabrics, do you want to try one? Have you got a horde of cherished scraps, or bits of baby clothes, or grandma's button collection to display? Basic Grey will send one lucky reader a canvas sampler of their choosing (there are three different styles). If you'd like to leave ONE comment below I will use the random number generator to pick a winner on Saturday morning, Oct.22. The samplers are available to purchase online here.

PLEASE: Your email must be linked to your comment, or written in your comment to win. Use "name(at)network(dot)com" format if you like.

Edited: Comments are now closed, thanks for visiting!

Monday, October 17, 2011

Some Hoopla!

This day is a happy one. I've already been for a lovely 1-hour sunshiny walk with the dog and arrived home to a full mailbox.

My swap with Suzanne is now complete. She has received from me and her package arrived today. We did a side swap out of the Pretty Little Pouch swap flickr group and decided to swap a hoop & hoop pouch with each other. Suzanne had already made me two adorable, useful and much loved pouches in round 1 of the PLP swap, so I feel extra lucky.

My sweet hoop from Suzanne!
Isn't this hoop fun?!! Both Suzanne and I ordered the map fabric panel last spring from Hancock's after seeing it put to amazing use as background in Gayle's Farmer's Wife blocks.

And here's my beautiful hoop pouch. I love this so much. I've never English Paper Pieced before (despite having purchased hexy papers a few years ago...I don't even know where those things are anymore!). I adore every fabric she put into the star and the handstitching totally makes it for me. The pouch is lined with the pink/red dot DS print from the Jo Ann line. Perfection!

My new Hoop Project Pouch by Suzanne
This pouch is going to get a lot of well-deserved attention at my next stitch group get together. It's loaded with my latest embroidery project already!

Thank you so much for sharing your beautiful work with me Suzanne.

p.s. picnik guys were "stepping over black cats" while the program loaded today....

Thursday, October 6, 2011

And they're off.....

My swap package for Suzanne is complete and on it's way across the continent (visit her blog to see what she made for me! It is simply gorgeous). I completed the hoop this afternoon. I've told you all about it here, so I'll just show you the ta-da pix today.

Embroidery sampler by Poppyprint

Hoop backing by Poppyprint

I thought that I would try a blanket stitch sort of finish around the outside of the hoop, but it looked really awful, so I ripped it out and went with my standard ricrac embellishment. If you click through the photo of the back, I explained how I finish my hoops in the photo description.

swap package for suzettra by Poppyprint

The hoop is snug in it's pretty hoop pouch and I'm sure will be enjoying a lovely flight back east very soon. Let's hope it avoids the Twilight Zone.

I also made this Stash Trad block for Angela. She's posted a tute for it on her blog. It's a big mama - measuring in at just under 20". I keep referring to it in my brain as the Cheese and Cracker Jacks Scraps block...but Angela just calls it Cracker Scraps. I'll make a second one for our other group, the VIBees as soon as her fabric arrives. This block made me realize my yellow/mustard yellow stash is sadly slim. Must buy more fabric.

Angela's VIBee block
Angela requested Kona bone for the background - nice!

Now, to design my last hoop swap stitchery. I have some fun ideas for my partner in the Misfits Hoop Swap....I just hope my drawing/copying skills are up to the task!