Friday, October 30, 2009

All Hallow's Eve

IMG_6421


Here's how the kids went off to school this morning...


IMG_6412


Hope you and your goblins have a bewitching weekend!! I just have some Bert hair repair to do...the dog ate it after school. Really! He did! He chewed Bert's red nose to shreds as well. AAAAArrrrrrggggghhhhhh!!!

The Gathered Threads were over today. We all did a fun paper project and made ourselves orts boxes, (you can see the one Dorothy made me last year in the photo here). Photos coming over the weekend...when exactly depends on how severe my sugar hangover is.

What's your fav candy bag item that you steal from the kids? I love Rockets, those little round sugar candies in pastel colours all tightly rolled in cellophane.

Wednesday, October 28, 2009

Endings and Beginnings

There's been frost the last couple of mornings. A sparkly white dusting on the tips of the grass blades and all along the roof tops. The local mountains even had a skiff of snow at the very tippity tops the other day! Fall is coming to a close around here, which means the moss is growing thick on our apple tree and it's time to pick that very last delicious, crunchy apple...


apple tree moss


last apple


When we first moved into this house 9 years ago, the apple tree was so healthy and happy. We must have had 100+ apples that first summer. I think we may have stressed the poor thing by pruning some of the lower, kiddie-eyeball-level branches in those first couple of years. Some people say there are so few bees that pollination isn't really happening like it used to. Whatever the cause, there were only about 20 apples this year. Sad.


Our perennial bed is looking mightly droopy and tired. Everything's gone yellowy, fallen over and is in dire need of a clean-up. The hydrangea is the last hold-out on the colour front.


end of the hydrangea


So, on to new things! I received my swap partner today for the Quilting Bloggers Fall Quilt Swap. This is my first time participating in a swap. I've been busy spying on my partner already, sifting through her old posts, looking for clues as to what she likes, her quilting style and home decor. We have to make a small wall hanging, no larger than 12" X 24" by January. I've got some ideas and I'm looking forward to getting started soon.


First, my Mystery Quilt is calling me. At guild last night, we received the first set of piecing instructions. All I have to do now is press this mess and get going!!!


mystery fabric pile


...but really first-first, there are the Hallowe'en costumes to finish up!


I am SO looking forward to a 4 day retreat coming up. I'm hosting 23 women at this perfect place where we will sew, eat, hot tub, walk in the woods, look at the ocean and laugh. A lot. Departure in only 8 sleeps!!! I love retreats.
Don't forget to visit sew, mama, sew and vote for your favourite Stash Buster Tutorials. Voting is open until tomorrow!!!

Tuesday, October 27, 2009

Weekend Work and a Shout Out for Democracy

After a biblical start to the day (rain-wise, that is) Monday turned out just ducky. The clouds parted, the sun shone down and everything started steaming. Thick rolls of steamy mist curled off the cedar shakes of our garden shed, off the top rail of the fence, off our neighbour's garage roof, off the bark of the trees. It was a little Hallowe'en-ie out there for about half an hour! All misty, spooky-like. Except it was sunny, so I wasn't afraid.

In fact, Flynn and I went for a mid-morning stroll. I never realized how camo he is at this time of year. Spot the mini-dachshund (just follow the blue leash):


camo flynn


camo flynn2


After lots of sniffing, investigating, looking up at falling leaves and generally holding up our walk, he discovered this sweet little faerie-land of mushrooms, with water drops still clinging to their caps.

mushrooms


That certainly was an unexpected little break in our day.

Yesterday I promised photos of my QBTB finishes (and I gotta tell you, I don't have much success making big things while working a retreat, I stick to smaller projects that I am familiar with...that don't require a lot of complicated instructions, so I can socialize, entertain and have fun!) I finished two of Rae's Buttercup Bags that I will donate to a fundraiser silent auction.

buttercup bag2

buttercup bag interior2

buttercup bag

buttercup bag interior

Rae offers this bag pattern FREE on her blog Made by Rae, or you can buy a licensed version if you want to sell them!

Okay, here's the Shout Out for Democracy segment of today's post. If you've been following along here lately, or anywhere in crafty blogland for that matter, then you know about the sew, mama, sew Scrap Buster Tutorial Contest. They received 114 tutorial entries!!!! The prize: 3 chances at $50 of fabric from their gorgeous shop. Amazingly generous. The girls decided it was too many entries to judge, so they've thrown it back at us and asked us to VOTE for our favs. The good news is, everyone gets 8 votes, so USE 'EM! Scoot on over there now and exercise your democratic right! Don't delay! And, you know, if you're having trouble deciding which box to tick, the Crop Circle Table Runner can be found in group 2.


The following statement is not a bribe, just a friendly little fyi: If I win $50 of fabric, there's gonna be a giveaway....right here, right quick. With $50, I could buy 5 yards of LOVE! Then, as stated in yesterday's post, I could Share The Love! And, in case you haven't noticed, I really like to share.

Sunday, October 25, 2009

Winning Weekend

I am completely exhausted. In a good way. Well, except for the head ache. So many exciting things are going on, I don't know where to start....I think I'll make a list.


1. On Friday during my whirlwind cooking, packing, fabric preparing, grocery shopping, entertaining kids while getting ready for QBTB, I took a wee latte break & checked my Flickr page. Lo and behold a message! An ad agency wanted to contact me regarding one of my pictures because they wanted to buy it! Like, with real money! Nothing like the offer of $ for something you weren't even trying to sell (and not far from Christmas, either!). Naturally, I called right away. After some nice conversations about pixels and potential prices (but without first obtaining consent from my model) I agreed. It is not a done deal; they still have to present it to their client, but if all goes well, B may be gracing the cover of a tourism magazine for the interior of British Columbia next summer.


beb from Kettle Valley Railway

I'll keep you posted as I should find out in about 2 weeks. Even if it doesn't happen, the thrill of being asked will last a lot longer than those 2 weeks!!

2. For 13 hours on Saturday, I got to hang out with 23 of my quilting buds sewing, eating and having a generally fabulous time. I can't believe it, but after all of the packing up and driving to the hall and setting up, I realized I had left my camera at home, charging. Rats!

3. B came to pick me & all my gear up, help pack away the tables and clean the hall. Then, we came home and transformed ourselves for a Hallowe'en party (sorry, he's too shy to share - it was his first event in drag and it may take a few more before he's up for posting photos). I can let you know that he totally rocked it as HRH, the Queen of England. Super fun time with friends, complete with impromptu group line dance to Disco Fever! Burn, Baby Burn!

4. Then today, after returning from a killer soccer game (killer-bad due to 8 a.m. start, after 2 a.m. bedtime, and killer-good due to D scoring several amazing goals!) I finally sat down to peruse blogland. Well, much to my surprise and sheer delight this is what I saw at the top of my dashboard:


Hey, that's me! Really? I won a giveaway? I LOVE sweetjessie's fabric garland and think that she is indeed sweet to be sending it to me. Thanks Jessie!!

5. Ok, nearing the end of the report. For me this is a biggie, just cuz I've been a major follower and fan of everything they do at sew, mama, sew. I think the sms gals run an incredibly efficient shop, blog and forum, provide tons of resources for 'the modern sewist' and generally do a wonderful job helping creative people connect and share. And I'm not just saying that to win $50 in fabric from their shop. Honestly. But check it out, my Crop Circle Table Runner tutorial made it onto their post yesterday amongst other fab entries to their Scrap Buster Tutorial Contest.

Crop Circle Table Runner

Wow. What a weekend. Like I said, totally exhausted, in a good way. Looking forward to a nice hot bowl of chicken soup, the Amazing Race and my pillow.

After a good night's sleep, I'll take some pix of my finishes from retreat yesterday and I do believe I should get busy devising some sort of giveaway - Must. Share. The. Love.

Thursday, October 22, 2009

Dismembered Digits

How's that for a post title? Before you start imagining hideous rotary cutting accidents, spurting blood and ruined fabric (let's face it, that's the biggest worry, isn't it?), let me remind you that Hallowe'en is only NINE sleeps away!! Costume supplies are gathering slowly around here. I'm sure there will be some late nights next week because this week I am busy preparing for Quilt By the Bay (otherwise known as QBTB) coming up on Saturday.

In order to support my habit/addiction/not-so-secret-obsession (the EXACT same one all of you have, I'm sure), four years ago I decided to start a small business offering one-day quilting retreats. For 13 hours on a Saturday, 25 women gather to sew, laugh, share and EAT. Emphasis on laughing and eating. We do this 5 or 6 times a year. I love it, although the days leading up are busy for me, shopping, cooking & baking. It's great when QBTB falls near a holiday, because we all know that holidays = fun cookies. Thus:


witchy fingers

We make these every year...they are great for freaking out friends at school. If you'd like to make your own, here's what you'll need to mix up in your cauldron.

BLOODY WITCH FINGER COOKIES
1 Cup (250 g) room temperature unsalted butter
1 Cup icing sugar
1 egg
1 tsp (5 mL) almond extract
1 tsp (5 mL) vanilla extract
2 3/4 Cups flour
1 tsp baking powder
1 tsp salt
green food colouring (I use cake decorating gel)
3/4 C blanched almonds
small tube red gel icing

In a mixing bowl, beat together butter, sugar, egg and extracts. Beat in flour, baking powder and salt. Add green food colouring until your dough becomes suitably witchy. Refrigerate dough for 30 mins. or overnight.

Pre-heat oven to 325F. Using about a heaping tablespoon of dough at a time, roll between your hands to get a finger shape. Squeeze in two places to form a middle knuckle. Press an almond in one end. Score the middle knuckle with a knife to make wrinkles (I forgot to do this part in the above photo). Place cookies on a sheet lined with parchment paper. Chill the sheet with raw cookies for 15 mins in the fridge, then bake for 20-22 minutes until the bottom is just starting to brown.

Remove from oven, cool 5 minutes. Pull up the almonds, squeeze some red gel icing in the dent left by the almond, then replace the almond so the icing oozes out around the 'cuticles'.

Leave a bunch on the counter and listen to the comments: Euwwwwww! Gross!!!! Yummy!!!

I'll be back in a few days with some photos from QBTB. I can't wait to see what everyone is going to work on!

Tuesday, October 20, 2009

Harvest of Quilts

Get your cuppa ready. I've got a quilt show for you!! Last weekend, the Vancouver Quilters' Guild held their biannual show. The Gathered Threads attended (we were first in line on day 1, don'tcha know!). I always enjoy this quilt show because it is the perfect size (not overwhelming), they hang the quilts in categories, so you see all of the children/baby quilts together, challenge quilts, workshop results and, they always feature one of their guild members by hanging a retrospective of her work over the years. The guild members also provide a lovely tea/sandwich/cookie lunch that hits the spot after a couple of hours ogling quilts in the gallery!

Here are some of my favs from the show....

20091016_0101


"Rod Stewart" by Jean Allbeury (this is her fourth quilted Rod, I'd say she's got a crush). Somehow she got him to sign this one!!

20091016_0104


Look at these retro-styled rockets called "Lift Off" by Gwen Horne. On her description card she wrote "I can't remember when I started this, or who I was making it for..." I'd say it has aged well and is now super in vogue!

20091016_0106 20091016_0105


Barb Keith did this western red work for her husband and pieced it into a quilt called "Bonanza". Ahh, brings back memories of my childhood crush, Little Joe, the adorable Michael Landon in his 20's! I quickly moved on to Shaun Cassidy, though....I digress.

20091016_0107


"Shirt Scraps" by Alison Rice gives me inspiration for all the shirts I have piled in my sewing room waiting to be cut up and pieced into a quilt.

20091016_0109


I loved this Storm at Sea colour variation called "Sunny Day" by Gail MacDonell. The batiks were so saturated in colour and the whole effect stunning - and definitely sunny!!

20091016_0111

20091016_0112


Now this one really impressed me. I don't mind foundation piecing, but Heather Glassman-Berkowitz has taken it to another level here with her "Chevron Lone Star". Amazing! It was so beautifully pieced and quilted.

20091016_0115

20091016_0116


"Dijon in the Sky with Diamonds" by Plu Dorcey was a big winner with the crowd. Plu and her husband spent a year touring Europe on a Dutch canal boat and this quilt is from her photos of the tiled roof tops of Dijon, France. All of those roof tiles are pieced! Stunning.

I want to show all of you embroidery-types a close up of a great idea I had not seen or tried before:

20091016_0113


Liz Austrom filled her chain stitch with a little running stitch in contrasting thread - isn't that effective? I'm going to try that!

I have to get busy. My guild show is coming in June 2010 and I really want to hang something of mine. What will it be??

Sunday, October 18, 2009

Tutorial - Crop Circle Table Runner

Hello! Welcome to my first tutorial! I'm so excited to share this fun table runner idea with you....


20091018_0155


Sew,Mama,Sew! is having a scrap tutorial contest and I thought I'd try my hand at making one for you using a fun technique for turning scraps in to "FABRIC STICKERS". You read that right - it's a simple case of scrap, cut, sew, flip and stick! This is a fantastic technique I've been using for quilt labels for a few years and it's super versatile...you'll be appliqueing circles onto bags, onesies, quilts, t-shirts, jean jackets, curtains, pillows and who knows what else!?!?.


Here's what you need:
- fabric scraps at least 3" square
- background fabric (I used a piece of organic linen 18"w X 55" long)
-backing fabric the same size as your runner
-lightweight, fusible woven interfacing the same size as your runner (I used this to stabilize my linen by fusing it to the wrong side of the linen before starting any applique)
-scraps of lightweight, fusible non-woven interfacing like "Sewer's Dream" large enough to cover your largest circle template. This is the stuff many people like to back their embroidery work with: it has a very light hand (i.e. has no real weight).
-coordinating piecing (50 wt) and top-stitching thread (30 or 40 wt)
-contrasting DMC floss

Here's how you do it:

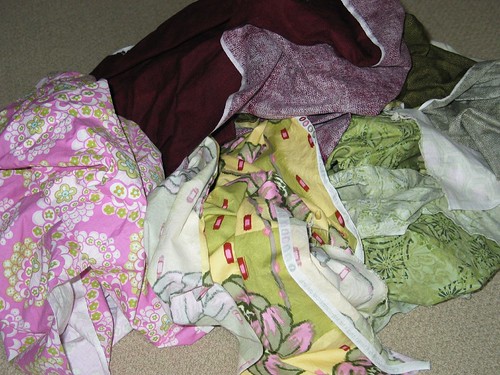
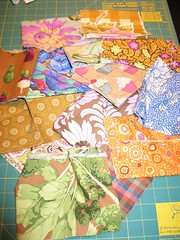
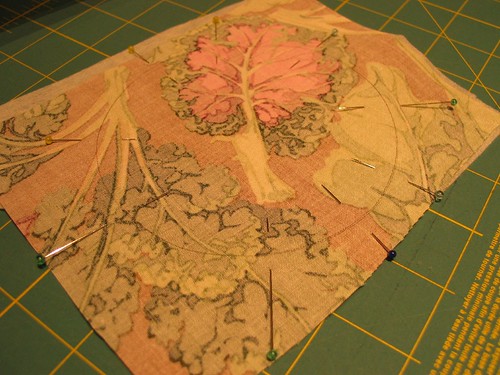
1) Pick a crop of scraps that look nice together. Press.
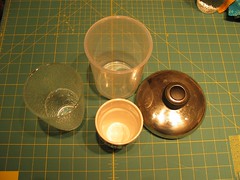
2) Raid your kitchen for circle templates.

20091013_0077 20091014_0079


3) Trace a variety of circle sizes onto the wrong side of your scrap fabric pieces. I used a fine permanent Micron pen.


20091014_0082


4) Roughly cut out the circle of fabric leaving at least an inch all around. Pin right-sides-together (RST) to the gluey side of the non-woven interfacing.


20091014_0083


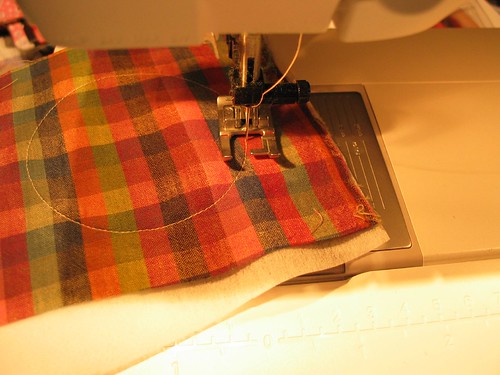
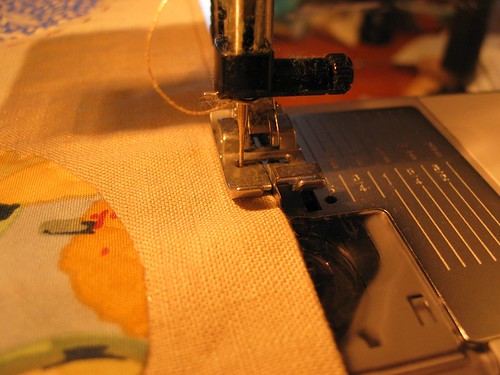
5) With a short stitch length (I used 2), stitch around the drawn circle ON THE LINE. No need to back stitch, just overlap a few stitches when you come around to the start of your stitches. Go slowly, take about 4-5 stitches at a time, stopping with your needle down to pivot around the circle. Careful not to 'steer' and distort your fabric as you sew. I used an open toe embroidery foot so I could really see the drawn line.


20091014_0094


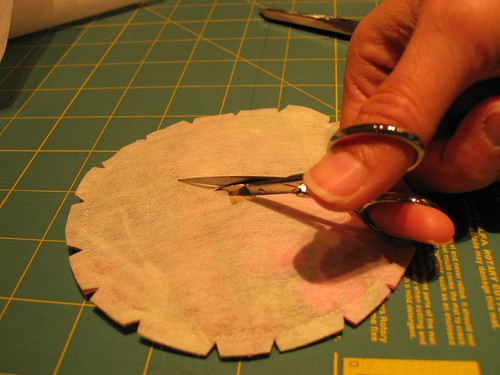
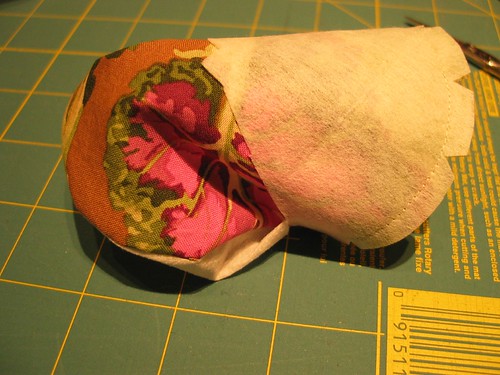
6) Trim your seam allowance to a skinny 1/4". Snip some triangles out of the seam allowance. The more you snip, the smoother your circle's curves will be when it's turned out. Carefully insert the tip of your scissors into the interfacing and make a long slit. Turn your circle out through the slit!


20091014_0090


20091014_0091


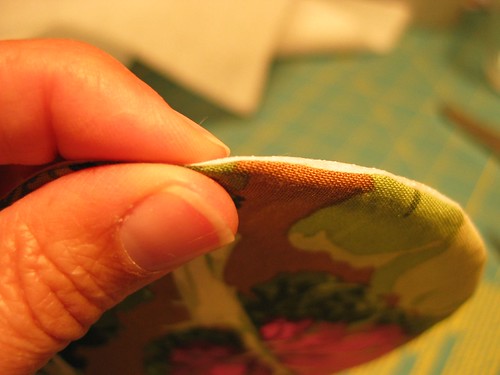
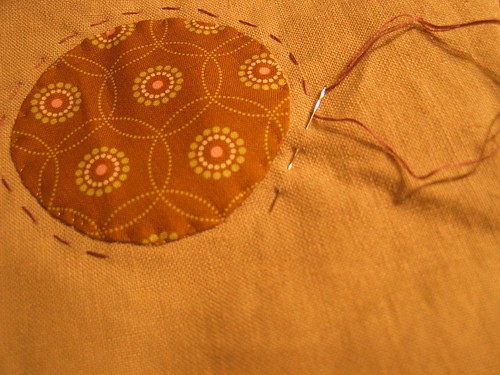
7) Using a Purple Thang (one of my favourite tools!) or a chopstick, gently push the seam allowance out. Gently roll the interfacing under and finger press the edges between your thumb and finger. Make sure the interfacing is all the way under the edge of the fabric and not showing peeking out the edges of your circle.


20091014_0092


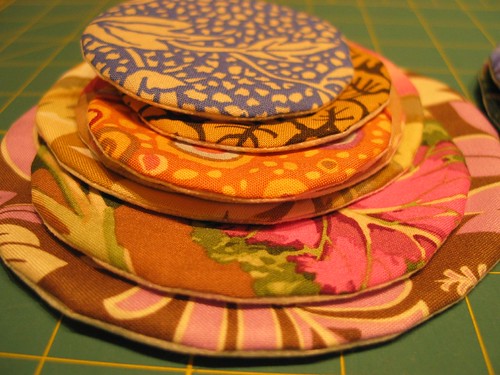
8) You've just made circle FABRIC STICKERS that you can now fuse to anything you want! You could even stack them on top of each other. The beauty is, unlike with Wonder Under, Heat 'n Bond or Steam a Seam, your top fabric is pliable and 'puffed', not glued-on-looking.


20091016_0118


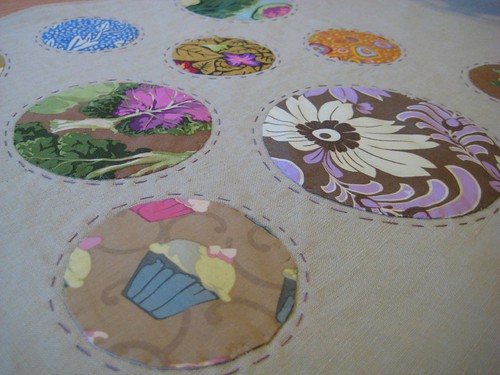
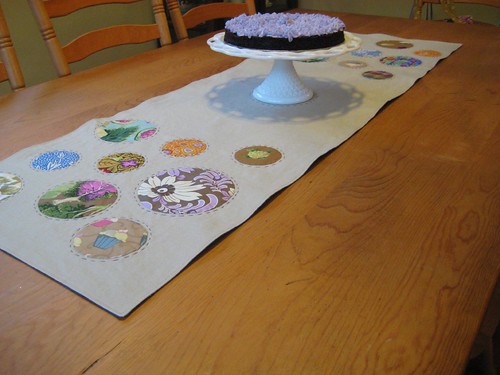
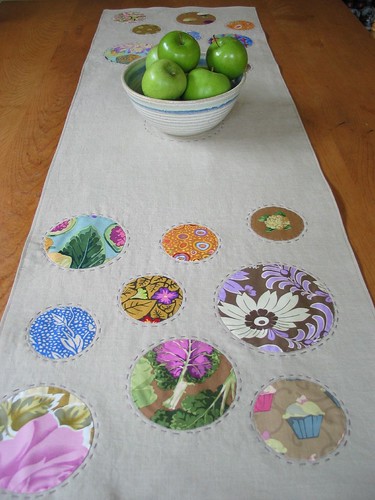
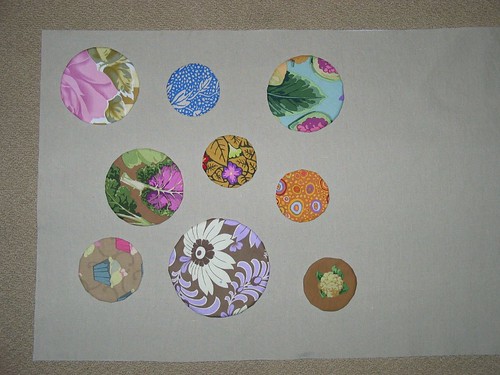
9) For the Crop Circle Table Runner, arrange your fabric stickers in a pleasing way. I always think that an odd number of things in a group looks best so I used 9. Once you're happy, fuse them on with a steamy iron (careful not to shimmy the iron around, just lift up and press down).


20091017_0123


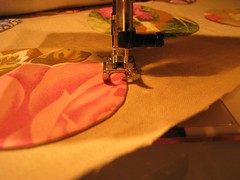
10) Now it's back to the sewing machine to stitch down the circles. I used the blind hem stitch which looks like this: ----^-----^-----^. I shorten the straight stitches and narrow the ^ stitch. Keep the straight stitches in the background fabric right next to your circle (photo on left) so that just the ^ stitch is actually through the circle (photo on right). An open toe embroidery foot is helpful to see what you're doing. Same as before, pivot around the circle when your needle is down in the fabric. I like these stitches to be hidden, so I use Sulky 100% polyester invisible thread. You could use a contrasting thread to blanket stitch, or zigzag. It's tricky to do a nice, smooth satin stitch on curves, so I don't.


20091017_012720091017_0129


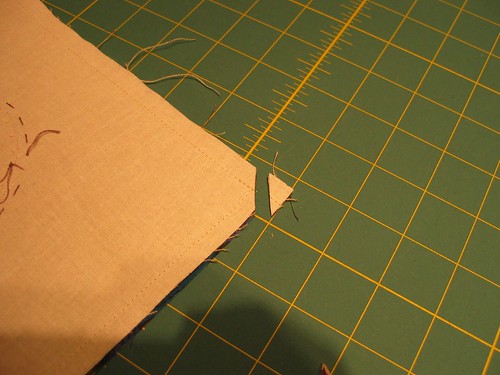
11) Once all of your circles are attached, pin your table runner RST with your backing fabric. Stitch all around using a 3/8" seam allowance, back-stitch at corners for reinforcement and leave about 6" open along one side for turning. Clip corners. Turn project to right sides through the opening in the seam.


20091017_0136


12) Press seam allowance, making sure your backing fabric is all the way tucked under your table runner top. Topstitch with a coordinating thread (30 or 40 wt). I like to use my Pfaff stitch-in-the-ditch-foot for this; it has a fence to line up the edge of the project against. I set my needle to the far left position to get a nice straight topstitching line parallel to the edge of the table runner.


20091017_0137


13) Now you can embellish if you wish. I chose to do a hand running stitch with 2 strands of DMC floss about a 1/4" outside each circle. Then, using a circle template cut out of freezer paper and fused with a dry iron onto the middle of my table runner, I stitched around that to define a spot for a bowl or vase. This stitching also serves to attach the top and backing of the table runner together.


20091017_0131


IMG_1906


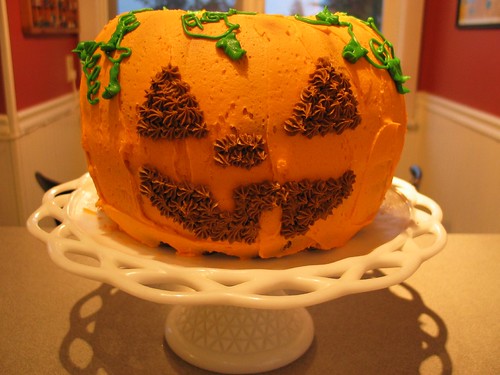
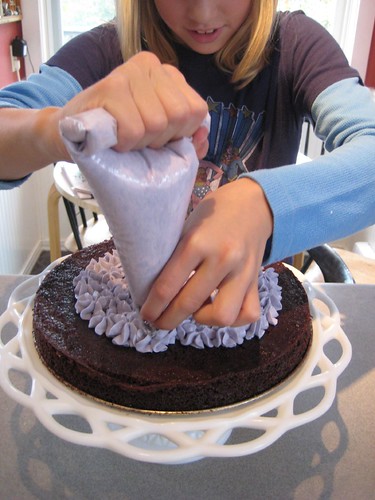
14) OPTIONAL: have your assistant whip up a coordinating chocolate cake for maximum table runner appreciation and to ramp up the ooohhh, aaaahhhh factor for the kids in the family.


IMG_1897


Voila! The Crop Circle Table Runner!

IMG_1905


Wow, that was a super long post. Congratulations for making it all the way down here. Have fun with your fabric stickers and let me know if you use them for a project!


Edited to add: If you live in a quilting desert and you can't find fusible light weight interfacing, don't fret. This method also works with a used, unscented dryer sheet! It's not fusible, but it turns the fabric edges under just the same (without adding bulk or stiffness) and you can pin your fabric circle to the background and stitch it down by hand or machine just the same!

Thursday, October 15, 2009

Deck the walls....

20061009_0417


...with kitty scarecrows, fa la la la la, lalalala. Or should that be Mwah hahahahaaaa, ha ha ha haaaa? Now that (Canadian) Thanksgiving is behind us, it's time to bust out some spooky decor.

IMG_1894


I've been pretty forthright of late regarding my love of pumpkins. These pillows are no exception. I just LOVE them. If you do too, the pattern is available from a B.C. designer called Bella Moon, available here. They did take the better part of a weekend quilting retreat to finish (but the decorative stitching just makes them, so it was well worth it).

IMG_1888


We don't go too crazy, but I've made these few things for Hallowe'en that get us in the mood around here. Most of my October sewing time in the past has been busy with costume-making. Speaking of witch, I mean which, we need to get going on that! There is talk of D being Elvis (not too difficult for a skinny, almost 11 year old, blond girl - Yikes!). T's thinking of going with a friend as Ernie & Bert. I love it! This is T (on the left) and his friend last year - this was totally their own idea, but I did have to help with the booties and boxers...

IMG_0574


Check the ears. Cutest. Christmas. Elves. Ever!

Edited to add: HEY! There's another awesome giveaway in blogland! check out Jenny's generous giveaway at cutsewironrepeat