Showing posts with label vinyl. Show all posts

Saturday, August 22, 2015

Around Town Take II

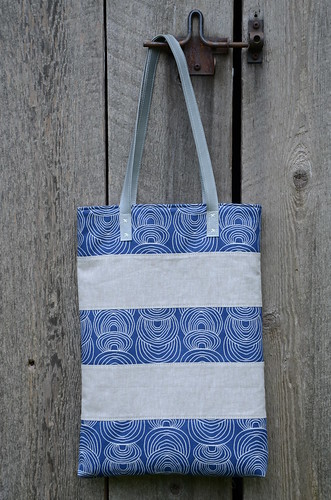
I whipped up this tote for a friend's birthday the other day. It's very straight-forward pattern and a satisfying make. There's something so familiar about rugby stripes - I just love the design of this Around Town Tote Bag.

Around Town Tote Bag by Poppyprint

The pattern can be found in the Liberty Love book by Alexia Marcelle Abegg, one of the uber creative and talented Cotton & Steel designers. The book is out of print now, but you may find one hidden online, or second hand. It's a book on my sewing room shelf that I return to often.  The pattern calls for Liberty tana lawn for the accent strips, but I substituted Anna Graham's gorgeous Ripple canvas from her new Rain Walk line printed by Cloud 9 fabrics (purchased from Fabric Spark). The offset stripes are Essex Linen.
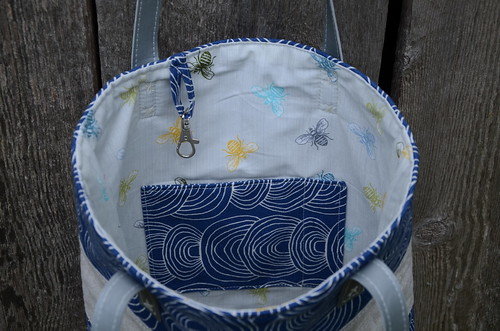
Around Town Tote Bag by Poppyprint

I added an interior pocket and key clip. It's a deep bag and it's a long way down for keys! I also modified the pattern a little bit by adding 1" of depth to the bottom print strip and sewing a 1" gusset into the corners of the tote for some added capacity.  The lining is a sweet Moda print called Be My Honey by MaryJane (I've had it for a couple of years in my stash).
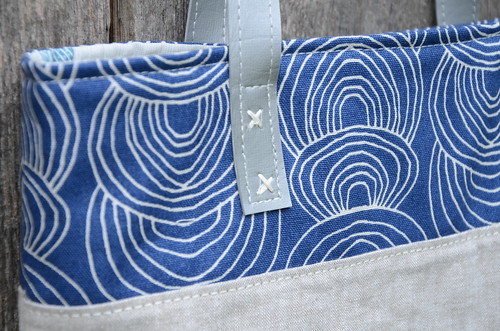
Around Town Tote Bag by Poppyprint

The patterns calls for using an upcycled leather belt for handles, but I have some vinyl on hand so I cut 4 strips and sewed them WST in pairs (for extra strength).  I used my 9mm wide zig zag set to 0 length to make the X stitches, then sewed extra security straight stitches in a box around the X's.  Last time I made this bag, I used gorgeous deer hide for the handles but sadly I don't have enough left to cut more long handles.

I'm slowly making my way through a very long list of fun sewing to do for myself and others. It's always slow-going in summer...especially this exceptionally HOT and dry one here in Vancouver. We're in a rare drought with strict water restrictions. Our lawn is crispy and our garden limp and sad. I've been sewing downstairs where it's cooler as my south facing sewing room is quite a cooker, even with the UV coating on the window.  

I've got a new toy to share with you just as soon as I make enough space to take it out of the BOX!!! So excited.

Saturday, December 7, 2013

A Birthday Box

After watching the Canucks win in overtime last night (on TV), I started a much-delayed birthday gift for a friend. I mean, how much time can a box pouch take anyway? It was only 10:30 on a Friday night....

I've never made one before, so I scoured the internets for available tutorials and decided to use this one by Libby. Even the lining is completely turned, so there are no exposed seams on the inside of the pouch. Just to ramp up the challenge, I decided to cut into my stash of never-used coated cottons and chose an Amy Butler print for the lining (I got mine at a shop that has since closed, but I found some for you here).  Even though I make a lot of bags, visualizing how stuff is going to turn from inside out to right side out is not my strength, so I went slowly.

Lined Box Pouch by Poppyprint

The tutorial was easy to follow with excellent photographs. The only issue I had was trying to sew over top of the zipper ends "in the same place" on both the lining and outer fabric (a luscious AMH linen interfaced with Pellon ShapeFlex, by the way).  I found this impossible due to the bulk of the pull tabs, but it's no biggie, it just means you can see stitches at the end of the zipper on the inside of the pouch.  This, of course, will make absolutely no sense to you unless you've tried to make one of these before!

Lined Box Pouch by Poppyprint

The other issue that kept me up until 1:30 a.m. was finding the right needle for the job. My stitches were lovely on the top, but when trying to sew through any seam allowances that included the coated cotton, the bottom of the work was a bit of a tangled mess. The vinyl side of the fabric was not touching the plate or foot, but just sewing through that stuff proved disastrous to my tension. I think the thread must have been sticking to the vinyl within the layers.  Finally, a topstitch 80 needle coupled with increased top tension did the trick.  See Amy Butler's tips for sewing with her vinyl coated cottons here.

Lined Box Pouch by Poppyprint 

In the rare seams where I had to sew over the right (sticky) side of the coated lining, I used a teflon foot which easily glides over the vinyl.  Apparently a piece of tape on the bottom of  your presser foot can do the trick just as well - if only I'd known before springing $25 for the Pfaff foot! I've heard of putting tissue paper on top of the vinyl can help, but then you have to pick paper out of the stitches. No thanks.  I wish I could have given the pouch a final pressing (all boxes/bags/pouches look best with a good pressing) but I didn't want to risk melting the vinyl!

Lined Box Pouch by Poppyprint

Rumour has it my friend's husband forgot her birthday today. Ouch. I'm so glad I stayed up late to make this for her!