Showing posts with label hand-quilting. Show all posts

Wednesday, April 19, 2017

Peekaboo Bears - a Mini-Mini Quilt

I thought you'd like to see the completed mini-mini quilt that I started while on my trip to Australia. I posted some in-progress photos and more info about the pattern here.

It is mostly hand quilted with perle cotton, although I did do one outlining machine stitched line using 30 wt Aurifil in hot pink in that navy border. The binding was sewn on by machine and hand tacked to the back. Sadly, my hand-piecing accuracy is not the best (it's been ages since I did much hand-piecing) so most of those pretty points were lost around the outside, but I think overall it's still adorable. I hope my partner in the Ottawa MQG likes her little bears.  All I know about her is that she shares my aversion to brown and she likes Cotton & Steel fabric...this is 8" x 8" of 100% C&S!
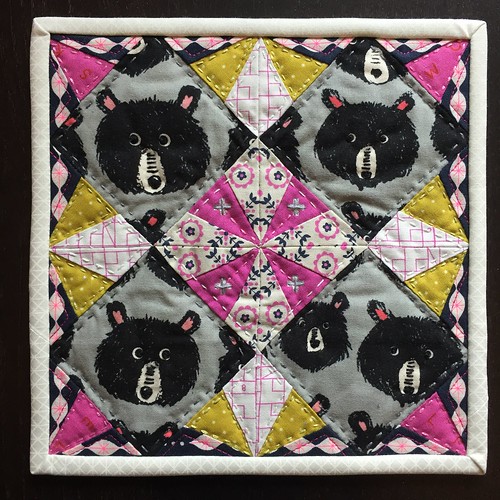
Peekaboo Bears by Poppyprint

I embellished all of the bear eyes with a french knot - so cute!

I really enjoy participating in the swaps we do at VMQG because they tend to be small, manageable projects with a generous time frame to complete them. I'm thankful for the volunteers that take on the organisation and planning; in this case Amy. Our guild ships everything in one go (or sometimes we get lucky with a traveller who can personally deliver the goods). The rules for this one were "make a mini-mini quilt that has an outside perimeter of less than 48 inches". Perfect!!

If you've read Poppyprint for a while, then you know I used to swap like a fiend back in the Flickr days, starting with the famous Doll Quilt Swap.  I think one year I did over 10 swaps and learned many new things every time. Making stuff especially for another person according to their wishlist can be a really fun challenge.  Although I love participating, sharing and receiving beautiful handmade things from around the world, I try to limit myself to one or two a year now and that seems to be the perfect amount. Guild ones are great fun and it's especially fun to connect with other Canadian groups.

How about you...swapping anything these days?

Wednesday, September 14, 2016

Blowing My Hair Back I


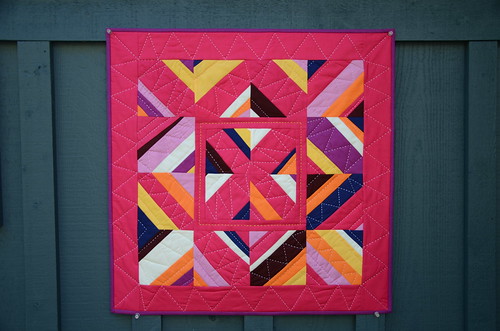
Just popping in with a little finish that you saw here before I added the big-stitch hand quilting. The name is explained in the original post, as is the source of inspiration for this 22" mini that I have grown to love despite the in-yer-face colour scheme.

Blowing My Hair Back I by Poppyprint

I was lucky to have the opportunity to take and review Gwen Marston's Abstract Quilts in Solids class available on iquilt.com . They often have sales and specials on the site, so when they do, grab your chance to learn from the lovely Gwen. Her gently encouraging teaching style is my fav. This quilt is exactly modelled on one of her "string block" class sample quilts.

Blowing My Hair Back I by Poppyprint
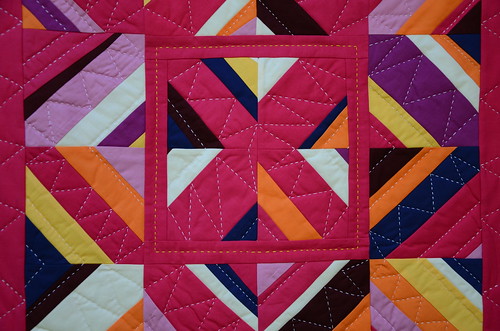
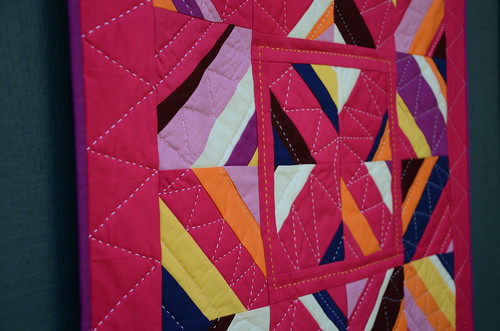
I love the fun details and shapes that emerge when they angled lines of the quilting meet!

I decided to quilt this in a large running stitch using 8wt. white perle cotton. Gwen often does free form zigzag quilting on her abstract work and it's super effective, so I thought I'd give it a try. I marked the lines with a 1" x 6" ruler and a Clover white wax pen so that they would be straight, but unmeasured. I'll definitely do this again as I love the effect. I quilted this whole piece over the course of our summer vacation on Hornby Island...mostly waiting for, and riding on, the ferries (it takes 3 boats to get there!).

I've made a start on a second abstract quilt based on other lessons in the class, but I think I'd like to grow it in a medallion-style like Gwen so often does. I may refer to her excellent book Liberated Medallion Quilts that is in my home library for some additional ideas. I have enough scraps of these fabrics, that's for sure!

Blowing My Hair Back I by Poppyprint

I'm really enjoying working with solids and a limited palette at the moment. I've got another fun improv quilt to share next week that is a sample for an exciting new workshop I'll be teaching in the coming year.  Check back Monday for that one as part of the Blogger's Quilt Festival!

Tuesday, March 1, 2011

VMQG Retreat Redux

If you haven't entered my follower's giveaway yet, please go here so you don't miss out!

Last Saturday I hosted a 13 hour retreat for members of the Vancouver Modern Quilt Guild and some other friends. It was the same format of the Quilt By the Bay retreats that I put on about every 6 weeks. We all had a wonderful day! Snow started falling in the afternoon, which was beautiful, but sort of put a damper on any late nighters at retreat - many people left early when we started getting reports from husbands that roads in the city were in really bad shape!

I am having difficulty getting photos off my 'big' camera, so those will have to wait, but I can show you the project that I completed. It is a wall hanging for my secret partner in the Urban Home Goods swap on Flickr. It looks pretty on that late season snow!

Hoot Dresden by Poppyprint

It's a good thing Krista did join me for retreat, because she brought the perfect fabric for binding along! It's the herringbone print from Joel Dewberry's Modern Meadow. Krista is using the blues/greens of that fabric line for her Single Girl Quilt and got a big start on piecing her arcs.

Hoot Dresden by Poppyprint

I did some running stitch by hand using my gorgeous new Presencia Perle 8 cotton from these skeins. I felt some more quilting was necessary in the white linen background areas, so did some echo stitching with Sulky 12 weight thread. Krista suggested some ditch quilting in the dresden blades to balance everything out and luckily Andrea had some grey Invisifil that I could use (two of the many advantages of retreating: great advice and unlimited supplies to borrow/share with friends!!).

Hoot Dresden by Poppyprint

So, the dresdens were pieced from a charm pack of It's a Hoot by MoMo for Moda. The background is Essex linen in white, and the backing is a print by Tina Givens that I won in a giveaway on Heather's blog last fall.

I hope my partner likes it!

Wednesday, August 18, 2010

On the last Saturday of our trip, I abandoned my family here

IMG_3287

so that I could take in the exhibit of turn-of-the-century African Canadian quilts at the Royal Ontario Museum. The display was a small one, but significant in the historical relevance of these quilts, and the care with which they've been preserved. This amazing quilt is almost 150 years old!

IMG_3293

A pre-cursor to the Storm at Sea pattern? The exhibit documentation called it a 9-patch and went on to say that a 9-patch is made of 9 equal sized squares....hmm, not sure anyone reviewed that info because I don't think it is accurate. The hand-piecing and -quilting is, however, perfectly accurate! Take a look at this closeup.

IMG_3295

Perfectly pointy points and to-die-for uniform stitches. The attention to detail and workmanship no doubt accounts for this quilt's amazing survival over so many years.

The quilts come from the southern Ontario community of Buxton, north of Michigan, where many black slaves from America settled. It's been called 'the terminus of the Underground Railroad'. According to the exhibit material, a charismatic preacher named Rev. King founded the community and it wasn't long before the women set up a quilting bee. One poster had this quote from a woman descended from the quilt makers "It was a gathering time for women, a time to share news, exchange recipes, tell stories..." Sounds just like any modern-day stitch group!

IMG_3296

Two of the quilts were 'signature' quilts used to raise funds for community projects. If you made a donation, the women would embroider your name on the quilt. This way, a record of each community members' philanthropy was on display for everyone to see!

IMG_3306

That Geo T. Kersey was the big spender, so his name was front and centre, in the largest letters. This quilt was badly discoloured, but aside from one small hole, still in amazing condition with all of the embroidery seemingly intact from 1929. Here's another signature quilt close-up (albeit a little blurry - the quilts were waving a bit with the airflow and no flash was allowed):

IMG_3301

I liked this display method, so thought I'd share it with you in case you have an heirloom quilt that you need to keep sticky-finger-free in your home!

IMG_3313

And finally, a newer quilt from the 40's. Dresden plates are making a 'modern' comeback amongst designers and bloggers. I love the colours in this one, obviously made by machine.

IMG_3312

I really enjoy seeing quilts of such significance hanging in public galleries for all to appreciate. These beautiful works of art have incredible stories to tell and it's wonderful that the Buxton Historical Society has been able to gather them back for preservation and teaching.


Monday, October 5, 2009

Contemplative Stitch

Everyone is so busy. There are stacks of WIPs waiting for more piecing, layering, quilting or binding. Kids need to get to school and activities, the dust keeps accumulating on the living room furniture and the cleaning fairy seems to have missed my bathroom last week. How do I cope? Well, I spend the day with Dianne (not this Dianne, but another double N Dianne). I think the second N stands for Nice, because they both sure are. My middle name is Diane - I wonder if my parents had an inkling of things to come and decided against doubling my N's. hehe.

Dianne Stevenson is a well-known traditional quilting teacher here in Vancouver and, I suspect, in her home province of Ontario as well. She's a 5th generation quilter, lucky gal! Extremely knowledgable on the history of Canadian Quilting, she embraces all things traditional and wonderful about quilting: the fellowship of a quilt frame surrounded by women, the care and beauty of a handmade stitch, the use of quality materials. All that, plus great sense of humour. Here she is post-lunch at last Friday's "Hand Quilting" workshop:
IMG_1803

Mind the pointy end!

We spent a calm day learning the art of the contemplative hand-quilting stitch. It is not rocket science, but you could call it rocking science. I re-discovered the importance of good batting, quilt-top marking and proper basting. AND, most importantly, not to tighten the quilt sandwich in the hoop as if I was making a drum! Then, we moved on to the 'rocker' stitch:
IMG_1806
Supporting the fabric with your middle finger of the underneath hand, gently poke the needle straight down until you feel it emerge on the underside of the quilt (now, this is really where you DO have to mind the pointy end). Then...

IMG_1805

pressing down with your stitching-hand thumb to form a little fabric hill in front of your needle, 'rock' the needle back up to the top of the quilt, forming a stitch.
Here's another view:
IMG_1804
You just can't make this happen with a taught quilt in the hoop. I didn't know that!! Thanks Dianne!! You ROCK. (edited to add: if you are interested in some very uniquely Canadian quilt designs, check out her website by clicking on her name above!)

The sunshine continues here, miraculously. My sister-in-law even had her scrappy bench pillows that I made her this summer out on the weekend.
bench pillows
I'm loving this summer extension which is rumoured to stay right through Canadian Thanksgiving next weekend. Oh! In case you were worried, T returned home from saw and axe camp with all digits in tact and a promotion to patrol leader (that means 2 stripes on his epaulets. Aw shucks, I'm so proud).

Back soon with the results of my "Stitched Images" workshop yesterday...