
I'll be teaching Lynne's lovely pattern to two local guilds in the coming months and I offered workshop participants the choice of making a mini, or the full sized version that appears in Make It, Take It. I thought some of you with the book might be interested in trying a mini version yourselves, or a full-sized two-colour variation like my Tinsel version (see below). This blog post is really meant as a reference for folks who have the book and are looking for options. It is not directions on how to make the quilt.
Read on for fabric and cutting guidelines for these two fun variations!
Read on for fabric and cutting guidelines for these two fun variations!
Mini Lonestar Circle 20" square
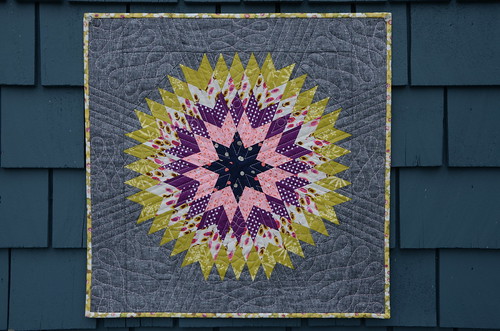
If you'd like to make a 20" mini version where the colours radiate out from the centre as in my sample above (in other words, each 'round' of the star is made up of the same fabric), then you only need F8's of the first 3 fabrics starting from the centre, a FQ of the 2 outermost fabrics and a 2/3 metre of background/border. Cut the number of 1 1/2" strips from the longest side of your fabric as indicated in the chart below. Make all eight of your star wedge segments identical.
FABRIC #
|
1 ½” STRIPS
|
1 (star centre)
|
2
|
2
|
4
|
3
|
5
|
4
|
6
|
5
|
7
|
Background
|
3
(WOF long)
|
In addition, from the background fabric, cut 2 strips 3" for borders and 2 strips 2 1/4" for binding. You'll also need two 6" squares cut in half on the diagonal for your corners.
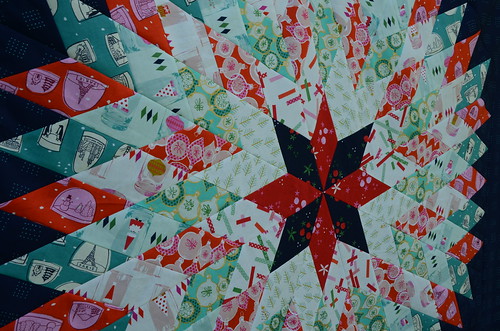
Two Colour-way star
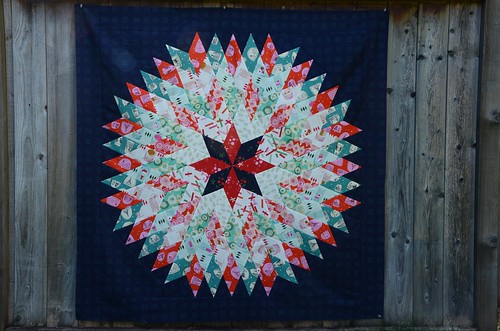
The full-sized version I made above has alternating red/green lights and darks. Similar to the quilt in the book, I alternated light and dark fabrics in radiating rings of the star, but I limited my colours to red and green. To do this, I made 4 strip sets of all red fabrics starting with dark red as fabric #1, then light, dark, light, dark, background. I made 4 similar sets using all greens (well, in the photo you can see I used navy for fabric #1), so navy, light green, dark green, light green, dark green, background. Then when I pieced the 8 star wedges, I alternated red and green strip sets.
Okay, so some of my "light reds" and "light greens" are actually cream prints, but you get my drift.
For this two-colourway version you need 3 dark prints and 2 light prints of each colourway for the star and the same amount of background/border fabric called for in the book. I had 1/2 yards of these Tinsel prints, but there was a ton of fabric leftover. Here's an idea of what you actually need if you are buying yardage at your local shop:
FABRIC # (#1 is centre star)
|
3 ½” STRIPS x WOF
|
YARDAGE* REQUIRED
|
1 (dark red) & (dark green)
|
1 each
|
0.20 m or 1/5 yard each
|
2 (light red) & (light green)
|
1 each
|
0.20 m or 1/5 yard each
|
3 (dark red) & (dark green)
|
2 each
|
0.30 m or 1/3 yard each
|
4 (light red)& (light green)
|
2.5 each
|
0.4 m or 1/2 yard each
|
5 (dark red) & (dark green)
|
3 each
|
0.4 m or 1/2 yard each
|
Background
|
7
|
See Make It, Take It
|
*these are generous amounts that allow for an extra strip in case of cutting error.
All of this will likely read as a foreign language if you haven't got a copy of Make It, Take It and read the pattern!
4 comments:
Thanks for this Krista!!
I love my mini but the Christmas version that you've done is inspiring me to make the larger version. Perhaps an additional project for retreat? Lord knows I have plenty of Christmas fabric!! ;0)
Dear Krista, every single work that you post I love so so much! You are one of the most talented quilters I ever known!
Thank you for sharing your tips!
A lot of hugs from your brazilian friend, Sil
Thanks for sharing, I keep looking at those mini lonestars and wanting one.
Post a Comment