
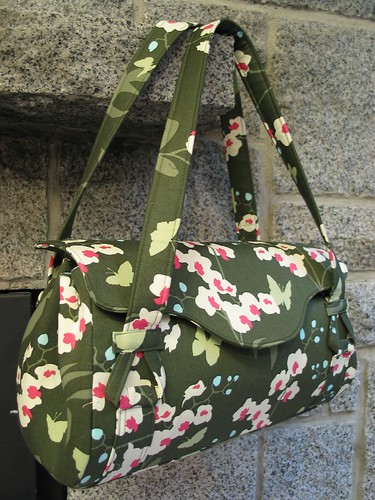
Prior to retreat, I saw that Amy Butler and her publisher had released the Blossom Bag on Sew Mama Sew as a promo for her new book of designer bag patterns called Style Stitches by Chronicle Books. Before intimidating myself out of it, and before reading the instructions, I emailed two of my friends coming on retreat to see if they wanted to make it with me. We all jumped on board and collected the necessary supplies. Now that it's complete, I'm thrilled with my new purse. During construction? Not so thrilled. This was CHALLENGING...very challenging (the "Advanced" project rating is completely accurate!). We are all very experience quilters and two of us have made a lot of purses and bags. By the end we all agreed that we probably would not have completed this project without each other's support.
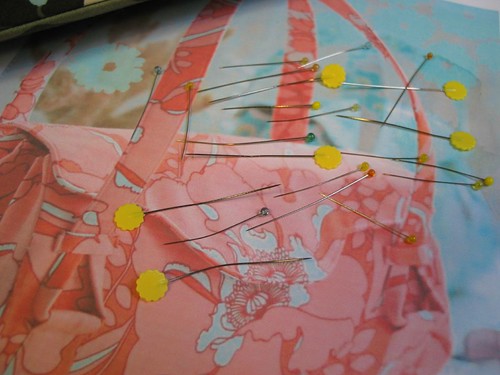
Let me start by saying that 22 pins gave their lives for this bag.
Retreat was a great venue for this project because we had plenty of time, space and cutting tables, not to mention the moral support of our fellow retreaters! First thing Friday morning we began cutting. There are 55 pieces involved, including home-dec weight fabric, heavy-weight Peltex (or Timtex), quilting cotton and light-weight fusible interfacing. Right out of the gate we realized that 2 of our 3 patterns had not printed out the right size from the .pdf file (we think this was due to 'auto sizing' done by their printer drivers). Comparing the pattern sizes to their descriptions showed us that the print-outs were too small. So, we traced the one correct one we had and got going. All three of us chose to make the long shoulder-strap option.
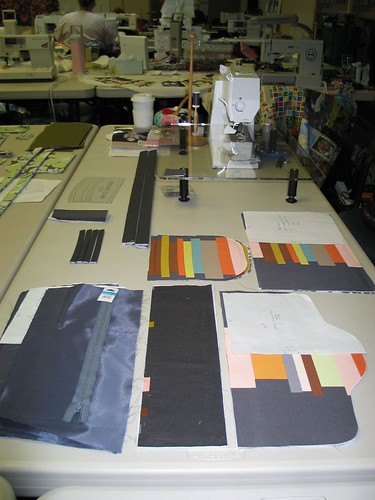
Jo Ann's pieces all laid out before bedtime, ready for construction the next morning!
Amy's instructions are clear, however a few more diagrams would have been helpful, and not having the entire book with us caused some confusion as there are several places in the pattern where an * indicates you need to consult the 'general instructions'. I suppose you can't really complain about this since she gave us the pattern for free! We figured it out. Also, the fabric requirements are extremely generous. We all have tons of very expensive designer home-dec fabric left over. I see several wallets in my future. Probably a matching tissue-holder, too.
The technique of strengthening and giving the bag it's form using Peltex combined with fusible lightweight interfacing is awesome. You cut the Peltex pieces 1/2" smaller than all of your outer bag fabric pieces and then fuse it in place against the wrong side by sealing the interfacing (which is cut the same size as your bag fabric) all around that 1/2" seam allowance. Using this technique eliminates that bubbly fused appearance on the outside of your bag. Pining and sewing through all that Peltex is a challenge, as evidenced by my bent pins!

I love magnetic closures and they provide a nice, clean look on this bag. The flap is a bit strange, as it is a separate piece sewn on with a triple seam across the outside of the top back edge of the bag. I think I would prefer a more integral flap. The straps, strap brackets and covers all went together fairly well - the instructions & diagram were really clear. The hard part was covering all of the raw ends of the straps and handle brackets with the little horizontal tab. We made ours a little bit taller than the pattern called for.

The inside has two dividers, all lined with Peltex for strength. Constructing the zippered divider was a bit confusing (some more diagrams would have been helpful, I think), but we managed to get it all together. The weird part is that these dividers float in the bag, meaning they are not attached to the bottom of the lining, so anything small is going to free-float around in the bottom of your bag. We tried to remedy this by installing our dividers low, so their bottoms are right against the bottom of the bag, instead of the divider tops being flush with the top of the bag as in Amy's example photos (the pattern did not specify how 'high' to install the dividers).

Absolutely, the most difficult part of the construction process was the last step: securing the dividers in the bag. We were instructed to 'pinch' the outer bag around the dividers and sew a bar tack to secure. Well, we're talking 4 layers of Peltex, 4 layers of interfacing, 4 layers of quilting weight cotton and 4 layers of home-dec weight fabric. Yikes. Jo Ann's Bernina barely managed and my Pfaff got through with a 100 denim needle and hand-cranking. I got the "main motor overloaded" message about 20 times and finally my machine gave up and gave me this message: TOO THICK FABRIC. Honestly, I had to manhandle that bag to get it under the foot and when I lowered the foot, it didn't actually move! The instructions suggested doing it by hand if your machine couldn't handle it, and Andrea tried, but not even a tapestry needle could get through all that. This last step was so stressful; I worried about my newly serviced machine. It was nearly impossible to hold those layers together...Jo Ann had brought some gorilla clips that helped. Pins were useless.
TA-DAH!
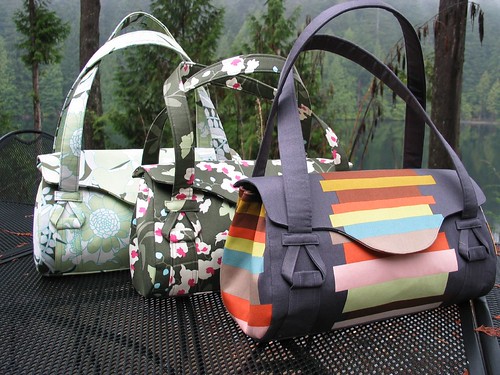
And here they are, our gorgeous Blossom Bags. Jo Ann's is in front, made from AMH's drawing room library print, mine is in the middle with the Joel Dewberry print, and Andrea's is back there sporting a gorgeous Amy Butler floral.
We love our new bags but they will not debut until they are safely Scotch-guarded. There was talk of buying a beautiful hook or extra-large shadow box and just hanging them in our bedrooms for display! We did complete them over 2 days which included and an extra-large bag of M&M's, a few glasses of wine and one or two naughty words. Did I mention they were challenging?
Most beautiful projects are though, aren't they? Two more bags from Style Stitches are reviewed here if you're trying to decide whether to buy this book. The photography is amazing and the designs are super inspiring. I do believe that the majority of projects would be difficult for a beginner. A support group helps (just make sure your friends buy different fabric because after all that work, you do not want to be carrying the SAME one-of-a-kind handbag around town!).
Thanks Jo and Andrea. I could not have done it without you. And the M&M's.
More retreat fun coming soon....
42 comments:
These bags are stunning! I try to make small projects though - I don't like too much frustration when sewing.. Hehe!! Hope you all enjoy your new purses - whether you hang them on the wall or take them out and about!!
Those are absolutely gorgeous bags... Thanks for the accurate review!
Wow - what a great bag, Krista!
Well that post is enough to make me never, ever try to make the bag! It definitely sounded like a pain in the neck! The results are beautiful though! I love all three bags! M&Ms make everything better, don't they? :)
This is such a great looking bag! I used to make a lot of bags but always felt like I was abusing my machine in the process! Love the end result of your bags, though.
Your bags are all GORGEOUS!!! (I especially love yours!) I've been eying this bag for a while (I have the book) but I've put off making it because it know it's going to be so hard! I jumped right into the Miss Maven Handbag and I can totally relate to so many things you said in this post. It was just plain HARD! I really can't believe I got through it. But in the end, the results are always gorgeous. (And much like childbirth, you begin to forget the pain over time, ha ha!)
Enjoy your fabulous bag!!!
This is a great post - thank goodness you persevered - the results are fabulous!!!
I'm with Amy. Won't be making this bag (or any, really) anytime soon. But I sure can appreciate yours, Krista - it is beautiful! Congratulations on a gorgeous finish.
They are stunning and I imagine they are going to be oh so loved even more after all that hard work.
LoVeLy!
Way to "manhandle" those bags, ladies!!
HOLY MOLEY! You are a goddess! This is my favorite bag from the book and I doubt I will ever attempt it. Fantastic job! Round of applause to all involved!!!
These bags are beautiful! Good job Krista, JoAnn and Andrea! I downloaded this pattern ... I do hope to try it sometime, and now will do so with my eyes open! Thanks!
It would take more than M & Ms to get me through making one of those bags!! Wow!! Sounded painful!! But Man, just look at those beauties!! I agree put them in glassed boxes and put them on display beside the Mona Lisa...only they would be called the Moana Krista bags...(get it!!) All in all- they are all stunning!!
Paulette
You guys are legends!!!! Well done for sticking at it, although as you say having each other to encourage (and of course wine and lollies are the eternal comforters) you along probably were invaluable. Great review Krista and really honest. LOVE the finished products and you will certainly walk tall when you are sporting that baby on your shoulder:) Ciao
Holy moley....I'm sure glad it was you and not me. I'd never have the patience for that project! Bravo to you! It is beautiful!
That sounds labourous...but the result was fantastic. Go strut 'em about town!
what a great review Krista! very thorough, down-to-earth and totally frank. i like that. and your bag, though a toil, is stunning!
Wow, all of the bags turned out just gorgeous! The pattern sounds super-scary, but I do want to give it a try! I'm not sure I'm all that keen on the dividers though; do you think the bag would be fine without them?
Congratulations, Krista & team! The results are fabulous! I'm glad you had a support network to get through that challenging experience!
HOly Crap! Those are amazing, all three of them! This bag is on my to-do list, but I guarantee that my little Janome would croak before it could handle it. I'll have to save this for after I upgrade my sewing machine in 10 or so years. And also when there is no chance of animal crackers and sippy cups finding their way inside. Love it, and thanks for the very helpful review!
Hi Krista, I enjoyed reading about your quilting retreat and making these bags. We also have a quilting retreat, always on the last weekend in October because then time is changing and so we got an extra hour of ... sleep or working! ;-)
thanks for sharing
Edith
Krista,
The bags are glorious. Wish I could have been there to cheer you on. My new favourite phrase - TOO THICK FABRIC. Bless your little pfaff's heart.
Gorgeous bags!
And thank you for reviewing the pattern´s little bugs, they can be really annoying. I´ve made a bag tow years ago and some heavy swear-words crossed the room - mistakes in the pattern, my seamripper on my side, but finally I´ve finished it - and I love it!
Anja
Oh wow. Your bags are stunning!
Sincerely - Trish :o)
It was really interesting to hear about your experience with the pattern. Gosh it sounds like a tough project, but I think the final result pays off. All the three bags you guys made are really beautiful and professionally-made looking. I had to laugh though when you said your machine said Too Thick Fabric! Even your machine knew it was really a challenging project!
beautiful bag! I really want to make that pattern, but good to know it will take a whole weekend to complete!
(by the way -- your picture is cute of you sewing away). :)
Love, love, love the bags, but yeah, I'll stick to two dimentional stuff, this looks so difficult.-)
Ooooh I wish I could have been there, sewing, chatting eating chocolate, does life get any better than that?!
Wow your bags are gorgeous! I have this on my to-do list, and I will still attempt it but I will now make sure I have plenty of chocolate on hand :)
Well done for persevering - the finished bags are soooo beautiful! I've added the book to my Christmas wish list and I'm going to have a go at this bag. Hope it's as succesful as yours!
Beautiful bags!
beautiful! i wish i had a quilting buddy close that i could make a bag with!
Wow!!! Your bags are stunning!!! You girls should be so proud of your new bags! I love your review. I don't know if I could tackle a project like this. I would definitely need some assistance. But, I love the ones you have made! Gorgeous!!!
Wow!!! Beautiful work! I hope to make this bag later this year. Thanks so much for sharing your experiences making it. :)
Found you on flickr. I'm doing the Style Stitches Challenge. We are going chapter by chapter, but I'm going to give the other challengers the heads up on your blog post here. Very informative. The "easy" cosmo bag was a little tricky as well. Maybe not though compared to this little gem. The bags all turned out gorgeous.
Well all your hard work paid off, those bags are so pretty and honestly look gorgeous! Great work!
These bags are completely, fabulously gorgeous. You all did such beautiful work! I really appreciated your review of the pattern as I was finishing up my version of this bag this morning. I agree with pretty much everything you said! I only wish that I had been able to be hanging out with friends at a retreat while working on mine ;-)
~Natalie
These bags are fabulous! And you are right --- such an advanced pattern. Almost as if "advanced" doesn't actually cover it!
Not awfully fun to sew - but awfully fun to wear. I get complimented on mine all the time!
I loved your tip to drop the dividers, I very much wish I would have done that.
I'm planning to make another one at some point changing the pattern up just a bit. (Making it bigger for use as a diaper bag, adding pockets inside and outside, making the tabs bigger, like yours.)
Hi Poppyprint, I came across your blog post on Amy Butler's Blossom bag last night after I made mine and did a post of it. That's because I wanted some reassurance that my bag looks as it should. Wow, I wish I found you before I started my bag. I agree with everything you said and somewhat relieved that I wasn't the only one with the difficulties I had. Thanks for sharing!!
Oh, I know I'm almost a year and a half late, but I am SO glad that you posted this. I did a Blossom Bag this weekend and thought that I just had no idea what I was doing. It came together wonderfully, and I'm all for doing another one or two for myself only! Someone asked me for one, and I almost fainted.
I love the prints that you all chose, and you are correct, the fabric I have left over will yield me a coin purse or even that fab checkbook cover in the book.
Great job!
Bonjour
Je trouve ce sac magnifique, j'ai acheté le livre mais je suis à l'arrêt ne parlant que le Français, je me permets de vous posez quelques quetions pour pouvoir finir mon sac!
Les coutures sont elles comprises ??
Y a-t-il un fond à ce sac immpossible de le voir sur les photos !
Merci d'avance...
Marylène
Found this as I was googling bar tack blossom bag... I'm on that very last step and not sure how it will work out!! I actually didn't find the pattern as bad as I was fearing, except the zippered inner pouch which I felt like could have used a lot more explanation. I'm pretty sure I did it different than the pattern, but it looks fine, so I guess that's all that matters.... Ok, no more procrastinating, time to bar tack!!
Post a Comment