Showing posts with label QAYG. Show all posts

Friday, May 20, 2016

All the Acronyms

So, recently I took an advanced FMQ class with the VMQG and made a QAYG baby playmat with the results.

I like to take Free Motion Quilting classes every couple of years just to work up my mojo and build confidence while trying new designs. There are so many great books, classes and teachers out there to learn from.  This class was taught by fellow Vancouver Modern Quilt Guild member Stacey Murton (hushrules on IG). She recently learned from some of the best modern quilters at QuiltCon and brought back some of her new found knowledge to share.

FMQ practice by Poppyprint

Ideas for free motion designs are endless, but it is always a good idea to start at the beginning and get into the flow with some simple swirly, loopy, meandering lines. While I regularly revert to my safe swirly stipple for a quick finish, one day I'd like to take more time with a special quilt and custom FMQ elements of it with individual motifs. It is wonderful that authors Christa Watson and Christina Cameli are supporting those of us working on domestic machines!

FMQ practice by Poppyprint

FMQ practice by Poppyprint

FMQ practice by Poppyprint

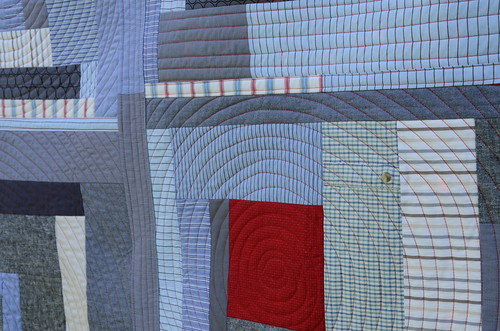
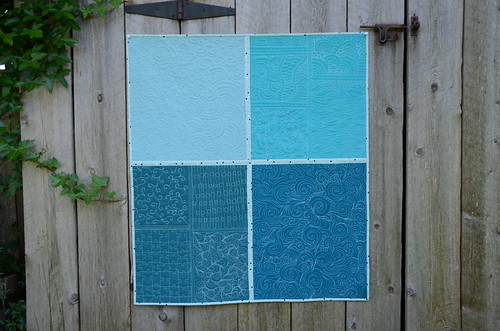
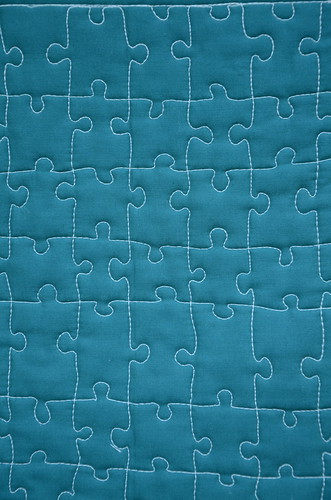
Some of these designs came from Stacey's class handouts (overlapping whorls, swirls + hooks, water and pebbles seen above), while the ones you see below came from Christina Camelli's book First Steps to Free Motion Quilting (puzzle pieces, interlocking circles & lines, tendrils and mussel shell thingies seen below).  I didn't mark anything on these practice sandwiches, I just started quilting. I think that with something like the puzzle pieces and interlocking circles & lines on a real quilting job, I would use a hera marker and ruler to lay out a grid of lines to follow in order to keep things fairly uniform and parallel.

FMQ practice by Poppyprint

FMQ practice by Poppyprint

FMQ practice by Poppyprint

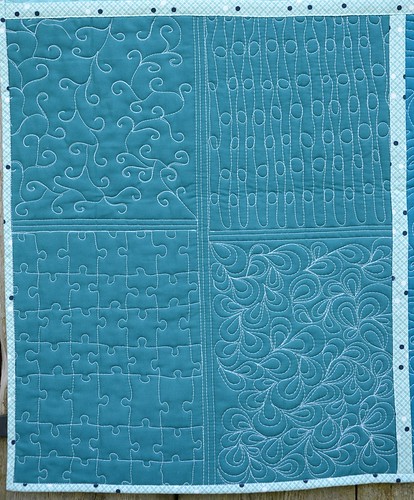
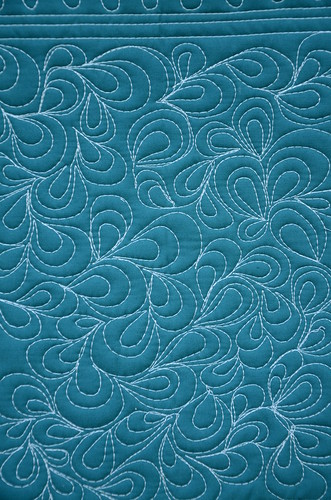
I like medium sized motifs, like the swirls and mussel shell and paisley flower shapes. I find it more difficult to work smaller, as with tiny pebbles. Stacey suggested drawing pebbles like figure 8's but when I tried that it was tough to stay circular - mine ended up looking like tear drops. More practice required!  I thought the tendril/vine one would be super hard since backtracking with a darning foot is rather daunting for me, but turns out it wasn't too bad after all. 

Having the new Juki TL-2010Q has been a major help for me.  The machine purrs along beautifully and I do not have any difficulty with tension or thread breakage. The fairly low extension table is a bonus as well. I keep my speed in the middle range of the machine's tortoise to hare scale and actually move my quilt fairly slowly. I learned to do this from Christina's Craftsy class  "Free Motion Quilting Essentials" which is on sale for $24.60 Cdn* until Saturday.  I must say, slowing everything down helps to keep my shoulders more relaxed and I have more control over motif shapes and stitch length (no more 1/4" long stitches on curves!).

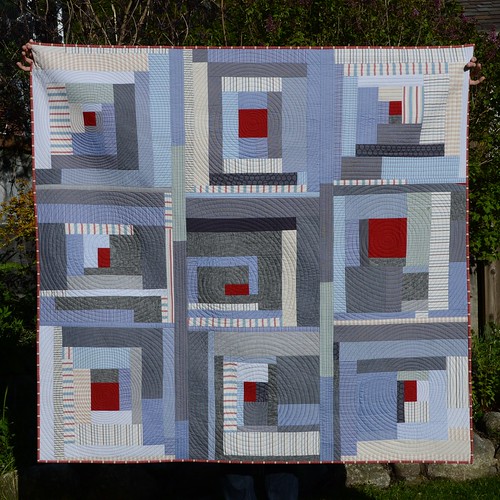
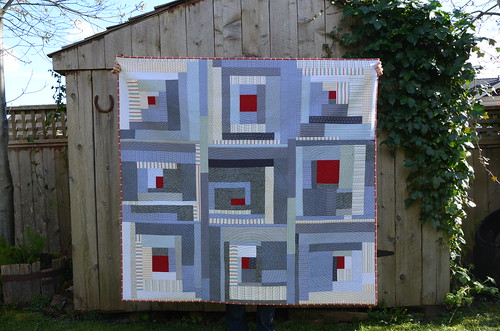
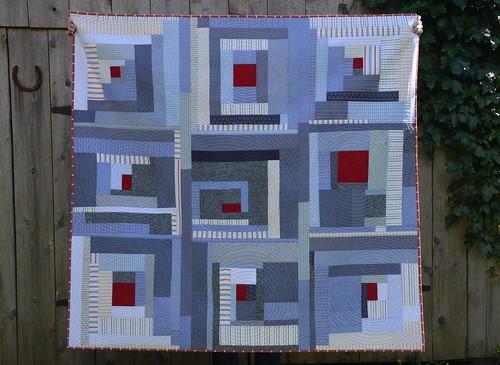
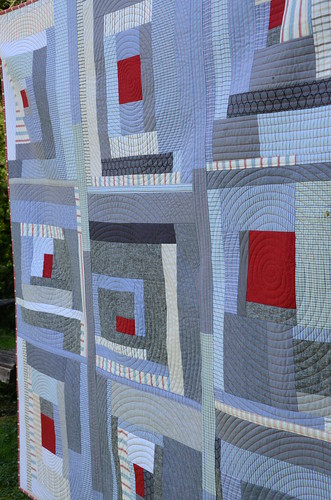
I didn't do all of this work in the class - these are fairly big FQ sized sandwiches. I completed two of the four while on retreat the week after class. After trimming them up, I joined them together using Marianne's tutorial here.  I've sent this off with some VMQG members to display and possibly be our raffle prize at Vancouver's Mini Maker Faire, June 11-12.

*I'm a Craftsy affiliate, which means if you click on the link and end up purchasing a class, I will receive a small commission. I promise to think of you when I buy my next latte.

Friday, May 15, 2015

Bloggers Quilt Festival Spring 2015 - Power Nap

Hello and welcome to another edition of the fabulous Blogger's Quilt Festival: the only quilt festival best enjoyed in PJ's and bare feet! I've been participating off and on in Amy's great festival for years and I always enjoy meeting new quilt bloggers and enjoying the work of old friends alike. 

This time I'm sharing my first ever QAYG (Quilt-As-You-Go) quilt, made with upcycled, worn out work shirts of my husband's along with some chambray, linen and a few yardage scraps. I'm entering it in the Scrappy Category. This quilt was gifted to a friend of ours on the occasion of his 50th birthday last month.


Power Nap by Poppyprint

Power Nap by Poppyprint

Most of the blocks were spiral quilted individually, then joined together into rows with narrow joining strips. The rows were then joined with wider sashing strips stuffed with a strip of batting and quilted with straight lines. Initially, I liked the idea of the red "power tie" in the centre of each improv pieced block, surrounded by shirt fabrics, so the quilt was going to be called Power Tie. Then I found out that our friend likes to take a brief nap every afternoon in his downtown office, so I renamed it Power Nap (plus, he's not a tie kinda guy anyway).

Power Nap by Poppyprint
There's even a sleeve placket with button and a chest pocket left on and quilted over. 

 The quilt was started in a class with Marianne Haak at the Vancouver Modern Quilt Guild last fall. Before the class, I precut all of the laundered shirts into strips of various widths. Each block began with a red square-ish shape in the middle area and was built out improvisationally. At one point, I made a very traditional style log cabin with light fabrics on one corner and darker fabrics on the other. When laying out all of the blocks, that one really stuck out, so I decided to make three more and put them in the corners. I like the resulting big blue circle effect!  Check out Marianne's blog for excellent tutorials if you would like to try this technique. It is a great way to create a big quilt, fully quilted, on a small domestic machine.

Power Nap by Poppyprint

Thanks for stopping by. Be sure to check out the rest of the festival. You can really make someone's day by nominating a quilt for Viewers Choice sometime in the next week, then vote for your category favs when voting opens on May 22!

AmysCreativeSide.com

Wednesday, April 15, 2015

Power Nap

Here's my latest finish: Power Nap.

Power Nap by Poppyprint

This quilt was constructed using the fun Quilt As You Go (QAYG) method. It is mostly made of upcycled old work shirts of B's, some linen, chambray and a few shirt-stripe scraps from my bins. I thought it would be fun to add the red in the centre of the log-cabinish blocks as the "power tie" to the shirts.

Power Nap by Poppyprint
I even left a cuff button on - can you see it? I sewed the placket closed before piecing that sleeve into the block.

Marianne Haak visited the VMQG and gave us a trunk show and workshop. She is definitely the most experienced person I know using the QAYG method. Check her blog for detailed tutorials on every step of the process and admire her gallery of quilts. If you want to create a large quilt on a small machine, then this is a great way to go.  All of the blocks are quilted individually, squared up, then joined with strips. If you are creative with your piecing and plan a little bit, you can hide your joining strips very well!  I used skinny strips to join the blocks into 3 rows, then wider strips (stuffed with a strip of batting) to join the rows and elongate the quilt a little bit so that it wasn't perfectly square. It ended up about 58" x 62".

Power Nap by Poppyprint

The first two blocks that I built in the class were very random and improv. I made a few more like that and then decided to make corner blocks in a more traditional dark/light log cabin. I like to organize my chaos a little bit ; )  All of the blocks were quilted with Aurifil 40wt thread in cherry red. Most of them have a spiral, but one I quilted with straight lines. I didn't like how the straight lines were pulling and distorting the stripes in the shirt fabrics, though, so I went back to spirals.

Power Nap by Poppyprint

Our friend, neighbour and investment guru turned 50 last weekend and his wife threw him a great party that we really enjoyed. There were strict instructions for no gifts, but I'd already decided to give him this quilt after discovering he likes to take a power nap at his office most afternoons. That's why I called it Power Nap instead of my original idea of Power Tie.  It is always a little nerve-wrecking giving a quilt away, especially to a guy. I took it over the next day in time for him to spend the afternoon on the couch watching the Masters. Luckily he not only loves it, but he also appreciates the time and effort that has gone into it. Win!